Licensing on Windows
The following licensing methods are available:
• Activation Keys - activation keys allow you to activate and generate your actual product license key, at a later point after purchase, on the machine for which you require the license.
They are provided for both node locked, floating, and Nuke Indie log-in licenses, and generate the appropriate license type once installed using the product's Licensing dialog or online using the Activate a Product page: https://www.foundry.com/licensing/activate-product
• Node Locked Licenses - these can be used to license an application on a single machine. They do not work on different machines and if you need them to, you’ll have to transfer your license.
Node locked licenses, sometimes called uncounted licenses, do not require additional licensing software to be installed.
• Floating Licenses - also known as counted licenses, enable applications to work on any networked client machine. The floating license is put on the server and is locked to a unique number on that server.
Floating licenses on a server requires additional software to be installed on the server to manage the licenses and give them out to the client stations that want them. This software is supplied as part of the Foundry Licensing Utility can be downloaded at no extra cost from https://www.foundry.com/licensing/tools
• Subscription Licenses - subscription licensing differs from traditional node locked or floating licenses in that a single license, or entitlement, is valid on any authorized device up to the entitlement's maximum number of activations.
For more information on Subscription Licensing, see Licensing Nuke Non-commercial on Windows.
The following instructions run through the basic options for the first two licensing methods, but you can find a more detailed description on our website: https://www.foundry.com/licensing
Obtaining Licenses
To obtain a license, you'll need your machine's System ID (sometimes called the MAC address, Host ID, or rlmhostid). Just so you know what a System ID looks like, here’s an example: 000ea641d7a1.
Note: For floating licenses, you'll need the System ID of the license server, not the machines on which you intend to run the application.
There are a number of ways you can find out your machine's System ID:
• Launch the application without a license, click Status, and then scroll down the error report until you see your System ID.
• Download the Foundry License Utility (FLU) from https://www.foundry.com/licensing/tools and run it. Click System ID to display your computer's unique identifier.
When you know your System ID, you can request a license for Foundry products:
• from Foundry's Sales Department at sales@foundry.com
• from the product pages on our website, such as https://www.foundry.com/products/nuke
• by launching the application without a license and selecting:
• Buy Nuke or Buy Hiero - opens a web browser directly to our website to purchase a license.
• Try Nuke or Try Hiero - displays the 15-day trial license download screen. Enter your Foundry account details or create a new account and follow the on-screen instructions to receive a trial license.
Note: By default, if you have installed a temporary license, the application displays a dialog at start-up alerting you to the number of days remaining. If you want to disable this behavior, you can set the FN_DISABLE_LICENSE_DIALOG environment variable to 1 to suppress the warning message about imminent license expiration. See Environment Variables for more information.
To use license roaming you require a Roaming License. Licenses issued Before July 10th 2020 do not support roaming. New roaming licenses will be issued to customers at Maintenance Renewal time. If you are in Current Maintenance and would like to upgrade your licenses to take advantage of this new feature, please submit a request using this form: https://www.foundry.com/nuke-roaming-license
See License Roaming for more information on roaming.
Installing Licenses
We recommend using the Foundry Licensing Utility to install licenses, available from https://www.foundry.com/licensing/tools free of charge. See https://learn.foundry.com/licensing/Content/install.html for more information on installing licenses.
However, you can also install licenses after starting a Foundry application.
When you start the application before installing a license, a Licensing dialog displays an error informing you that no license was available. The installation process is dependent on what type of license you requested:
• License file - if you requested a license file, typically foundry.lic, this option allows you to browse to the file location and install it automatically. See To Install a License from Disk for more information.
• Activation Key or license text - if you requested an Activation Key or license by email, this option allows you to paste the key or license text into the Licensing dialog, which then installs the license in the correct directory. See To Install an Activation Key or License Text for more information.
• A floating license - if you requested a floating license to supply licenses to multiple client machines, this option allows you to enter the server address that supplies the client licenses.
Note: You must install a floating license and additional software on the license server to use this option.
See To Install a Floating License for more information.
To Install a License from Disk
| 1. | Save the license file to a known location on disk. |
| 2. | Launch your Foundry application. |
The Licensing dialog displays.
| 3. | Click Install License to display the available license installation options. |
| 4. | Click Install from Disk. |
| 5. | Browse to the location of the license file. |
| 6. | Click Open to install the license automatically in the correct directory. |
To Install an Activation Key or License Text
| 1. | Launch your Foundry application. |
The Licensing dialog displays.
| 2. | Click Install License to display the available license installation options. |
| 3. | Click Activation Key / License Text and then either: |
• Enter the Activation Key string in place of Insert Activation Key Here. A license key typically looks something like this:
nuke-0101-77d3-99bd-a977-93e9-8035
OR
• Copy the license text and paste it over the Copy/Paste license text here string. License text typically looks something like this:
LICENSE foundry nuke_i 2015.0929 29-sep-2015 uncounted hostid=000a957bfde5 share=h min_timeout=30 start=29-sep-2015 issued=29-sep-2015 disable=VM _ck=da32d7372f sig="60P0450MJRP97E3DP B42C99Y5UAPRMEMGNQ39PG22H4WGH3WFK2KPTXFWJTYR0GYASJBXC0PU8"
| 4. | Click Install. |
The license is automatically installed on your machine in the correct directory.
Note: Activation Keys require an internet connection. If you access the internet through a proxy server and cannot connect to the activation server, you may get an error dialog prompting you to either:
Click Use Proxy to enter the proxy server name, port number, username, and password. This enables the application to connect to the activation server and obtain a license. The license is then installed automatically, or
Click on the web link in the dialog and use the System ID (also known as hostid) provided to manually activate and install a license.
To Install a Floating License
If you requested a floating license from Foundry, you will receive your license key (foundry.lic) in an email or download. You should also receive a link to the Foundry License Utility (FLU) application to help you install the license key on the license server machine. The server manages licenses for the client machines on your network.
| 1. | Download and run the Foundry Licensing Utility on the server machine. |
| 2. | Click Licenses > Install. |
| 3. | Click Select File and browse to the location of the file Foundry sent to you. |
Note: You can also copy and paste the text inside the license directly into the FLU, but make sure that you copy the all the license text correctly.
| 4. | Click Install. |
The FLU checks the license file and, provided that the license is valid, installs it into the correct directory.
| 5. | In order for the floating license to work, you will need to install the server tools on the license server machine. |
For more information on how to install the server tools, refer to Installing the Server Tools.
| 6. | Once your license server is up and running, launch the application on the client machine. |
The Licensing dialog displays.
| 7. | Click Install License to display the available install methods. |
| 8. | Click Use Server and enter the server address in the field provided. The format for the server name is: <port>@<servername>, for example, 30001@red. |
Note: You must perform steps 6 through 8 on each client machine that requires a license from the server. The client machines do not need the server tools installed.
License Roaming
License roaming allows you to temporarily check out a server license so you can work offline. Licenses are checked out and returned through the Help > License menu or by setting environment variables.
Note: License Roaming is not currently supported with Production Collective and EDU Collective licenses.
There are a few important things to take into consideration with license roaming:
• Roaming is only available to Maintenance customers and requires a new license from Foundry.
• Roaming and returning licenses requires a connection to the license server.
• Roamed licenses are valid for a maximum of 30 days.
• Roamed licenses are only valid on the machine that took the license from the server.
• The number of roaming licenses available on the server decreases by one until you return the license.
Installing the Roaming License
To activate roaming licenses you need to request a new roaming license and install the license on your license server.
See Obtaining Licenses and Installing Licenses for more details on requesting and installing a server license.
How to Roam a License
| 1. | Launch the application you want to roam, making sure it has a connection to your license server. |
| 2. | Go to Help > License. |
The Licensing dialog is displayed.
| 3. | Click Roaming. |
The License roaming panel is displayed.
| 4. | Enter the number of days you want the roamed license to last, from 1 to 30 days. |
Note: The maximum number of roam days may be less than 30 depending on your license.
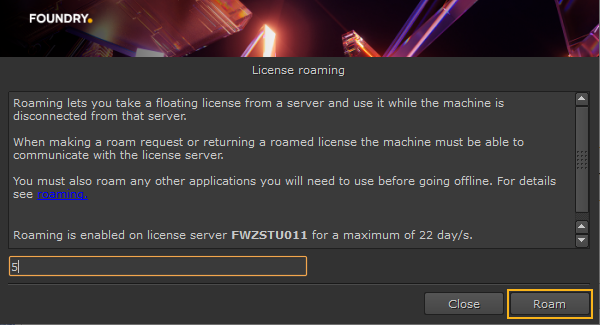
| 5. | Click Roam. |
The License roaming panel displays the number of roaming days remaining.
| 6. | Click Close. |
Note: You can't return a roamed license in the same session. Close and re-launch the application to return the roamed license.
How to Return a Roamed License
| 1. | Launch the application using the roamed license, making sure it has a connection to your license server. |
| 2. | Go to Help > License. |
The Licensing dialog is displayed.
| 3. | Click Roaming. |
The License roaming panel is displayed. The license type and number of roam days remaining is displayed for convenience.
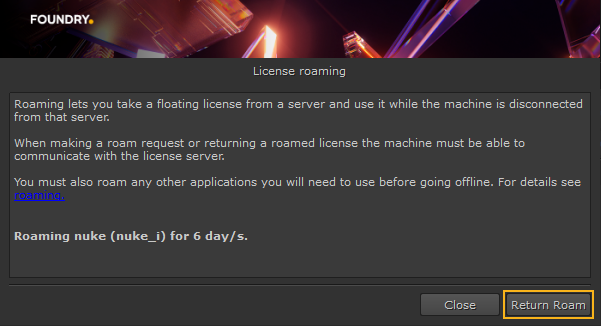
| 4. | Click Return Roam. |
| 5. | Exit the application to return the roaming license to the server. |
Roaming Using Environment Variables
You can automate some of the aspects of roaming licensing using the RLM_ROAM environment variable supplied by Reprise Software, the third-party vendor of our licensing administration software.
For more information see How to use Roaming Licenses in the RLM Administration Guide:
https://www.reprisesoftware.com/RLM_License_Administration.pdf
Further Reading
There is a lot to learn about licenses, much of which is beyond the scope of this manual. For more information on licensing, displaying the System ID number, setting up a floating license server, adding new license keys and managing license usage across a network, you should read the Foundry Licensing Guide, which can be downloaded from our website, https://learn.foundry.com/licensing/