Consistent and Accurate Color Management with OCIO and ACES
OpenColorIO (OCIO) and Academy Color Encoding System (ACES) are widely used in the VFX industry to manage color throughout the entire production pipeline. Using OCIO and ACES in Nuke helps to ensure consistent and accurate color management and provides a standardized framework for color transformations, which contribute to improved efficiency, increased artistic control, and enhanced visual quality in your VFX productions.
ACES is designed to standardize color management across different applications, such as Mari, Katana, and Nuke. ACES captures the full range of human color perception and was designed to stand the test of time as display and image capture technology improves to work with wider color gamuts.
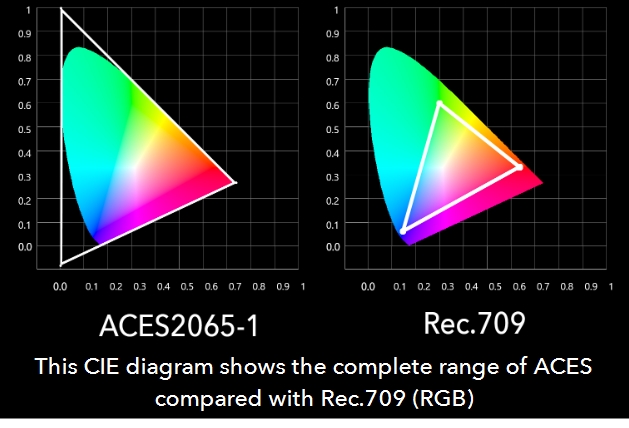
ACES bridges the gap between the colorspace of images, renders, or footage you bring into Nuke and the colorspace of your final render. Using ACES helps ensure that your plate, textures, CG renders, and any reference images all conform to the same colorspace. When it comes to the final delivery, everything can be output for a specific display type without losing any color data.
Watch the video below from Victor Perez for a comprehensive and accessible breakdown of color theory and explanation of color spaces.
Depending on the OCIO config file that you are working with, there are a number of color transform options and roles (aliases to transforms) that you can set in Nuke. There are also default options, which change depending on what file type you are working with. When the default option is selected, the color transform that Nuke has set for it is listed in brackets.
Note: There are a number of NDK examples covering OCIO workflows that ship with the Nuke developer documentation, which can be found here:
<install_directory>/Documentation/NDKExamples/Plugins/00b_8source.html
Tip: Use the options in Preferences > Project Defaults > Color Management to apply them to all new projects.
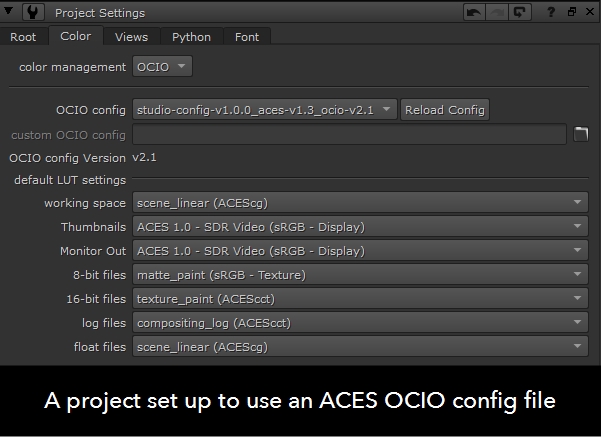
To Use ACES OCIO Transforms in Nuke
The Project Settings > Color > color management dropdown determines whether Nuke uses the color transforms read from the configuration specified or the Nuke native transforms. Selecting OCIO makes the relevant OCIO transforms available to the Read and Write nodes in scripts on a per project basis.
All OCIO configurations except nuke-default automatically switch this control to OCIO.
- Set the OpenColorIO Config you want to use for this project.
- Changing the configuration updates the default LUT settings accordingly. If the selected configuration is invalid for certain transforms, a warning displays.
- You can use default LUT settings dropdown menus to override how clips in the Viewer, thumbnails, and so on are transformed to and from the working space.
Nuke ships with a number of default configurations, but you can use a custom OCIO config file by selecting custom from the OCIO config dropdown and then entering the file path.
The working space transform determines what colorspace files should be transformed to (Read) and from (Write) - it's the colorspace used by Nuke under the hood.
Note: The working space dropdown is always set to linear and disabled when color management is set to Nuke.
When color management is set to Nuke, Reads and Writes work the same as in legacy versions of Nuke, with no integrated OCIO transforms. When OCIO is selected:
• Reads and Writes use OCIO transforms, with no Nuke built-in transforms applied to the image.
• Read and Write input and output transform are populated with a list defined in your currently selected OCIO config.
• The default LUT settings dropdowns are also populated with the list of display transforms defined in your OCIO config. The default value for each menu match the defaults in a project with the same config. These defaults can be overridden using Python callbacks. See the following path for the default implementation that ships with Nuke:
<install_dir>/plugins/nuke/colorspaces.py
• The working space dropdown sets the colorspace that Nuke uses internally for its image processing. This sets what an input file should be transformed to when read in using a Read node and the expected input colorspace to Write nodes and the Viewer.
This defaults to the scene linear role defined in your OCIO config. For example, selecting an ACES config sets the working space to scene_linear (ACEScg).
Simplify Transforms Using OCIO Roles
OCIO roles allow you to set custom role names for different colorspaces to make it easier for artists to instinctively know which transform to use for any shot, such as lin to log. The OCIOLogConvert node, for example, does a simple transform from the scene_linear role to the compositing_log role or compositing_log role to the scene_linear role. As an artist, you select lin to log or log to lin from the operation dropdown, without needing to know what's happening under the hood.
OCIO roles are the primary method for selecting colorspaces, but you can alter this behavior using the Project Defaults > Color Management > OCIO Roles controls in the Preferences or by setting the NUKE_OCIO_ROLES environment variable. See Nuke Environment Variables for more information on environment variables in Nuke.
All of the colorspaces in the OCIO config file are still accessible, but they have been grouped together into a Colorspaces menu under the roles.
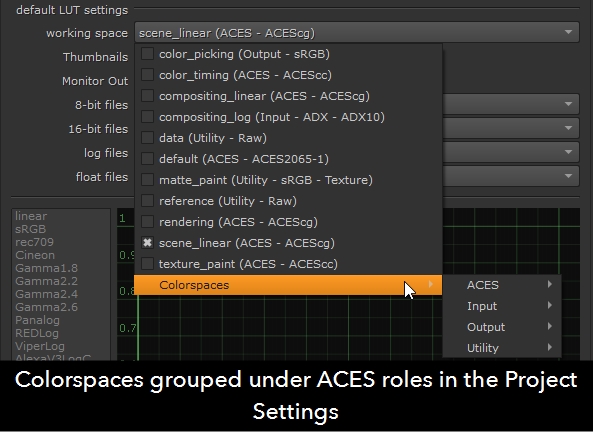
OCIO roles are stored in config files, some of which ship with Nuke in the following directory:
<install_dir>/plugins/OCIOConfigs/configs/
For example, the aces-v1.3 config file includes the following roles:
roles:
aces_interchange: ACES2065-1
cie_xyz_d65_interchange: CIE-XYZ-D65
color_picking: sRGB - Texture
color_timing: ACEScct
compositing_log: ACEScct
data: Raw
matte_paint: sRGB - Texture
scene_linear: ACEScg
texture_paint: ACEScct
The !<Colorspace> describes colorspace name and family. The name and family define which colorspace is associated with the role. For example, the scene_linear role uses the ACEScg colorspace:
- !<ColorSpace>
name: ACEScg
aliases: [ACES - ACEScg, lin_ap1]
family: ACES
equalitygroup: ""
bitdepth: 32f
description: |
Convert ACEScg to ACES2065-1
ACEStransformID: urn:ampas:aces:transformId:v1.5:ACEScsc.Academy.ACEScg_to_ACES.a1.0.3
isdata: false
categories: [file-io, working-space]
encoding: scene-linear
allocation: uniform
to_scene_reference: !<BuiltinTransform> {style: ACEScg_to_ACES2065-1}
You can edit these files to add roles or create your own custom config and then point Nuke to the file using the Project Settings > Color > custom OCIO config control.
To add a role to a config file:
- Open the required config file or create a custom config.
- Enter the role and name of the role under the roles: line. For example:
- Save the file and open Nuke.
- Open the Project Settings and click the Color tab.
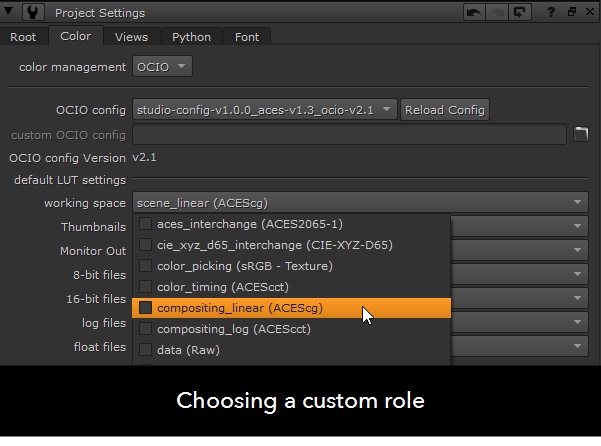
- You can now pick your role from the default LUT settings. For example, you can set the working space to compositing_linear if you want to work in the ACEScg colorspace.
compositing_linear: ACEScg
Correcting Out of Gamut Errors Using the ACES Gamut Compression Look
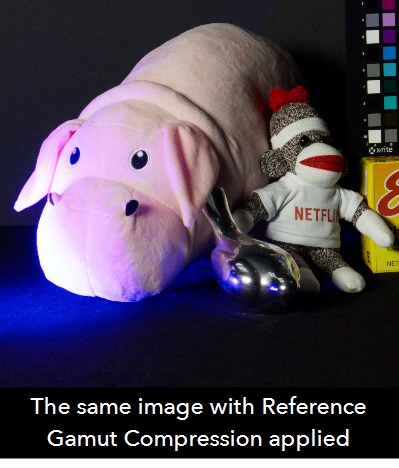
A common side effect of using ACES is artifacts that result from out of gamut values in source images. This typically affects blue light, such as that found in police car warning lights. The ACES 1.3 OCIO config files that ship with Nuke contain a look designed to correct this error.
To apply the ACES 1.3 Reference Gamut Compression look:
- Go to Edit > Project Settings or press S in the Node Graph to display the Project Settings.
- Click the Color tab and then select OCIO from the color management dropdown.
- Select an ACES 1.3 config in the OCIO config dropdown.
- Select the Read node in the Node Graph to which you want to apply the look.
- Press Tab and start typing OCIO to display a list of available OCIO nodes.
- Select OCIOLookTransform from the list to add the node to the graph.
The ACES 1.3 Reference Gamut Compression look is applied by default, because it is the only look defined in the configs that ship with Nuke.
Tip: If you're using a custom config or you've added more looks to the ACES config yourself, you can enter ACES 1.3 Reference Gamut Compression manually or copy and paste the look from the config.
|
|
|

