Nuke offers several ways to select and edit keyframes in the Dope Sheet.
• To select multiple keyframes, drag a marquee over your keyframes in the keyframe view.
• To add keyframes to or remove them from a marquee selection, hold Shift and drag another marquee around some of the selected keyframes.
• To select a single keyframe, click it in the keyframe view. Its parent keyframe and all other keyframes depending on it are selected too. The frame number of the keyframe is displayed next to it.
• To select all keyframes in one node, click the node name in the hierarchy view. All the child keyframes under that node are selected.
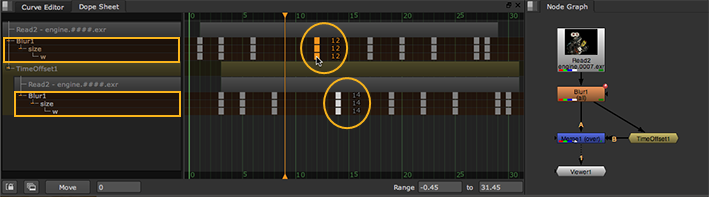
• If there are multiple paths from an animated node to the currently active Viewer, the keyframes for the animated node appear in the Dope Sheet multiple times. When you select them in one location, they turn orange, while the corresponding keys in other locations turn white.
NOTE: When selecting keys that appear in the Dope Sheet multiple times (via multiple paths), marquee selection is constrained to one path only.
After you’ve selected keyframes, you can move and rescale them:
• To move your keyframes, drag the selection around in the keyframe view.
• To nudge the selected keyframes right or left, use the arrow keys on the numeric keypad.
• To edit the frame number of your keyframe directly, double-click on the frame number next to the keyframe and adjust it in the x field that pops up.
• You can also move your keyframes with the move control at the bottom of the Dope Sheet: enter the number of frames by which you want to move the selected keyframes, and click Move. You can enter negative values to move the keyframes backwards. If you don't enter a number, the Move field shows the amount of your previous move.
• To rescale, grab the right or the left side of your marquee selection box and drag it. The opposite side of the box stays put and the keyframes are proportionately rescaled according to how you adjust the box.
• If there are multiple paths from an animated node to the currently active Viewer, the keyframes for the animated node appear in the Dope Sheet multiple times. Adjusting the keys in one location also updates them in the other.
NOTE: You cannot move keyframes past other keyframes.
You can copy and paste keyframes in the Dope Sheet. Use the Ctrl/Cmd+C shortcut to copy a keyframe, or selection of keyframes, and Ctrl/Cmd+V to paste them in another location of the Dope Sheet.
When using the Ctrl/Cmd+V hotkey, pasting keyframes is relative to the location of the current frame indicator. In other words, if you have keyframes at 1, 10, and 20 and you copy this selection before pasting the selection at frame 21, new keyframes are set at frames 21, 30, and 40.
To paste keyframes on the same frame as the source keys, select the control you want to receive the keys, right-click on the Dope Sheet, and select Edit > Paste > Paste Absolute.
You can remove keyframes in the Dope Sheet. To delete a keyframe, just select it and press Delete/Backspace button or right-click on the keyframe and select Edit > Erase.
You can also add keyframes in the Dope Sheet to add animation where there isn’t any at the moment. Add keyframes by Ctrl/Cmd+Alt+clicking on an empty spot in the Dope sheet. A new keyframe is created and you can adjust it as necessary.