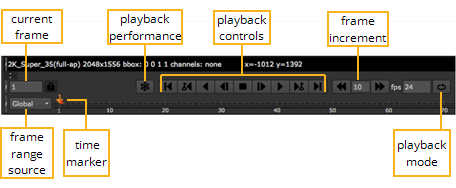
Drag the orange marker along the timeline to quickly cue to a specific frame. The number of the current frame appears in the Current field above the timeline. You can also cue to a frame by typing its number directly into this field.
By default, Nuke automatically adjusts the timeline of every Viewer window to show the frame range defined in your Project Settings. If no frame range is defined, the frame range of the first image you read in is used as the global frame range.
Viewer timeline controls also have a frame range source dropdown menu that you can use to define where the timeline gets its frame range from. You can set this menu to Global, Input, or Custom. Global is the default setting described above.
To have the Viewer adjust the timeline to show the “in” and “out” frames of the current input clip, select Input from the frame range source dropdown menu. The number of the first frame in the clip is shown in the left end of the timeline and the number of the last frame in the right end. If you change the input of the Viewer, the frame range on the timeline is adjusted accordingly.
To manually adjust the frame range for the current Viewer window, pan and zoom on the timeline until you see the desired frame range and Custom becomes selected in the frame range source dropdown menu. Alt+drag to pan, and MMB+drag to zoom in. You can also zoom in on or out of the timeline using the mouse wheel. To reset the zoom, press the middle mouse button over the timeline.
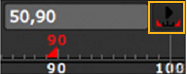
To adjust the playback range for the current Viewer window, Ctrl+drag (Mac users Cmd+drag) the red playback range marker on the timeline to a new “in” and “out” frames as shown below, or click on the frame range lock button and enter a new playback range in the playback range field.

|
| Adjusting the frame range for the current Viewer. |
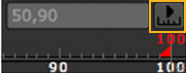
To toggle between the new playback range and the visible timeline range, click the button next to the playback range field.
|
|
| Playback is locked to the range defined in the playback range field. |
The entire visible timeline range is used. |
The fps field (frames-per-second) initially displays the project’s playback speed. Nuke attempts to maintain this speed throughout playback, although this adjusts depending on the resolution of the imagery and your hardware configuration.
The Frame Increment field  lets you specify the number of frames by which the Previous increment/Next increment buttons cue the sequence.
The following table lists the functions of the playback buttons:
|
Buttons |
Functions |
|
|
The First frame and Last frame buttons cue the sequence to the first and last frame. |
|
|
The Previous keyframe and Next keyframe buttons cue the sequence to the script’s previous or next keyframe. |
|
|
The Play backward and Play forward buttons play the sequence backward or forward at the script’s frame rate. |
|
|
The Back 1 Frame and Forward 1 Frame buttons cue the sequence to the previous or next frame. |
|
|
The Stop button halts playback. |
|
|
The Previous increment and Next increment buttons cue forward or back by 10 frames by default. These are useful for heavy keyframing tasks. You can adjust the increment value as necessary. |
The Playback Mode button lets you control how many times and in what direction the Viewer plays back the sequence. Click the button to toggle between the following modes:
|
Button |
Function |
|
|
Repeatedly play the sequence (loop). |
|
|
Play the sequence once from the current frame to the head or tail (stop). |
|
|
Repeatedly play the image back and forth from head to tail. |