Open topic with navigation
User Tracking Methods
User Tracks can be tracked automatically or manually, extracted from auto-tracking data, and imported from a Tracker node.
Auto User Tracks
The easiest way to get started with User Tracks is using the Autotrack feature, but you can create tracks totally independent of auto-tracking. After placing your tracks on the required features in the sequence:
|
1.
|
Click on the UserTracks tab in the properties panel to display the track table. |
|
2.
|
Select all the tracks you want to calculate in the table and then click Autotrack. |
CameraTracker attempts to track the selected features, in a similar way to Auto Tracks, except that when a track fails it is not reseeded.
|
3.
|
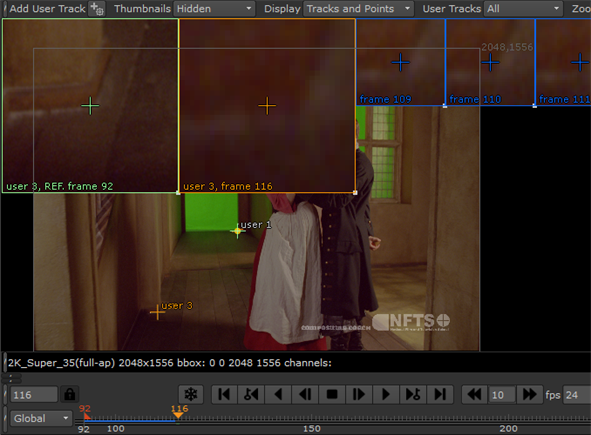
You can examine features during and after tracking to determine if they failed: |
• During tracking - the anchors are colored yellow until they fail.
• After tracking - any failed tracks don't have keyframes all the way through the sequence.
The image shows a good track, user 1, highlighted in yellow and a failed track, user 3, which has started to drift on frame 116.
|
4.
|
If a track fails or drifts, adjust the position of the tracking anchor by dragging the anchor in the zoom window. |
|
5.
|
Scrub through the sequence a few frames and repeat. Continue on through to the end of the sequence. |
|
6.
|
At each frame, a new keyframe window is added to the right of the zoom window. |
Manual User Tracks
Manual tracking can produce the best results, but is time consuming because all keyframes are tracked manually by you, rather than CameraTracker.
TIP: Generally, you would only manually create User Tracks in stills. Nuke's Tracker node can create reliable tracks for continuous sequences which you can then import as User Tracks.
After placing your tracks on the required features in the sequence:
|
1.
|
Click on the UserTracks tab in the properties panel to display the track table. |
|
2.
|
Select the required track from the tracks list. |
|
3.
|
Scrub the playhead forward a few frames and move the tracking anchor to the correct position in the new frame using the current zoom window. |
A new keyframe zoom window is added to the Viewer.

|
4.
|
At the top of the Viewer, set Thumbnails to User Tracks. |
All keyframes for the currently selected user track are displayed in the thumbnail gallery.
|
5.
|
To see a User Track's reference frame, hover over the track in the Viewer. This can help you quickly decide if the object you're tracking is in the current frame or not. |
TIP: The keyframe windows at the top of the Viewer show you all of the keyframes for the currently selected User Track. You can click on a keyframe window to jump directly to that frame.
|
6.
|
When you've finally keyframed your User Track in all of the desired frames, the tick marks on the Viewer's timeline are set on all of those keyframes. By using Alt+left or right arrow, you can quickly jump to the previous or next keyframe. Doing this while looking at the zoom window helps show you what keyframes your User Track is slightly off in, making this a very useful trick for getting perfectly placed User Tracks. |
Extracting User Tracks
After auto-tracking, you can use the data to extract User Tracks. CameraTracker considers User Tracks to be important and tries to lock down on them over auto-tracks. As a result, extracting User Tracks from an auto-track can be useful if you have an auto-track that appears to be reliable.
You might also extract auto-tracks to User Tracks if you want to export some auto-tracks to be used in a Tracker node for 2D work.
|
1.
|
Right-click on an auto-track in the Viewer and select tracks > extract user track. |
The selected track is prefixed with extr. and placed in the User Tracks table.
|
2.
|
If a track fails or drifts, adjust the position of the tracking anchor by dragging the anchor using the zoom window. |
|
3.
|
Scrub through the sequence a few frames and repeat. Continue on through to the end of the sequence. |
|
4.
|
At each frame, a new keyframe window is added to the right of the zoom window. |
Importing a Tracker
You can quickly create User Tracks by importing keyframes and tracking data from a Tracker node within the same script.
|
1.
|
Click on the UserTracks tab in the properties panel to display the track table. |
|
3.
|
The Select Tracker to Import From dialog displays. |
|
4.
|
Select the required Tracker node from the tracker node dropdown. |
A new User Track is added to the tracks list.