Open topic with navigation
Using Practical Grain
Although Nuke’s ScannedGrain node offers controls for creating synthetic grain (ones comparable to those just discussed), it’s main use is for reading in and applying scanned grain - that is, grain derived from actual film stock. If your facility has such sequences available, you can read them in and apply them using the ScannedGrain node. You can also download grain files from our website for this purpose. Both creating and downloading grain files are described below, as well as using the resulting grain files with the ScannedGrain node.
To create film stock sequences
|
1.
|
Film a gray card. Only about 50 frames are needed. |
|
3.
|
Select Image > Read to load the scanned image into Nuke. |
|
4.
|
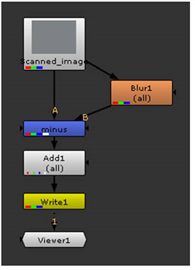
Add a Blur node (Filter > Blur) after the image to blur the image until you cannot see any grain. Then, blur the image a bit more. |
|
5.
|
Select Merge > Merge to insert a Merge node in your script. Connect the A input of the Merge node into the original image, and the B input into the Blur node. Then, open the Merge controls and select minus from the operation dropdown menu. The blurred image is subtracted from the original image. |
The purpose of this and the previous step is to subtract any overall gray level from the grain so that only the grain is left.
|
6.
|
Select Color > Math > Add to insert an Add node after the minus node. In the Add node controls, enter 0.5 in the value field. This adds a value of 0.5 to all channels. |
This step is necessary, because the ScannedGrain node subtracts 0.5 from the channels when it reads the grain file (the subtraction is needed to store negative numbers in most file formats).
|
7.
|
Select Image > Write to insert a Write node after the Add node. Render the output. Any file format will do (for example, we have used the .rgb extension in the grain files on our website). |
To download film stock sequences
|
2.
|
Click on a grain sample to download it. The downloads are in compressed tar format (tgz). The grain samples are .rgb files. |
To add scanned grain with the ScannedGrain node
|
1.
|
Click Draw > ScannedGrain to insert a ScannedGrain node at the appropriate place in your script. |
|
2.
|
Connect a Viewer to the output of the ScannedGrain node so you can see the effect of your changes. |
|
3.
|
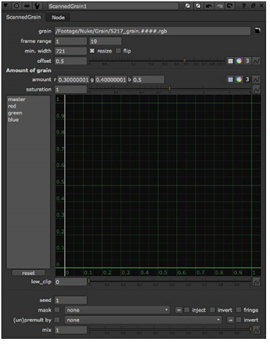
Click the folder icon of the grain field and navigate to the appropriate film stock sequence. Select Open. |
|
4.
|
If necessary, check the resize box to scale the grain sequence up or down to match your working resolution. |
|
5.
|
In the min. width field, define a minimum width (in pixels) that images have to have in order to receive grain. |
|
6.
|
Enter values into the red, green, and blue amount fields to increase or decrease on a per-channel basis the density of granules. (This is accomplished, crudely speaking, by boosting or reducing the gain of the grain sequence.) |
Now you’re ready to fine-tune the blending between the grain and backplate.
To mix the grain and backplate
|
1.
|
Drag on the saturation slider to increase or decrease the intensity of the grain’s hue across all channels. |
|
2.
|
If necessary, you can also use the supplied curve editor to edit the grain sequence’s color curves. In this manner, you can alter gain, gamma, contrast, etc. on a per channel basis. (These curves function in the same manner as those described in Using ColorLookup Curves). |
|
3.
|
To set a low threshold, based on the input image, below which the grain is not subtracted, adjust the low_clip slider. |