You can freely add custom menus and menu options as well as toolbars and toolbar options to the Nuke interface. Artists can then use these options to trigger gizmos and plug-ins stored in the plug-in path directory.
For example, to add a new menu in the default Toolbar with an option to trigger a gizmo called MyGizmo, you can do the following:
| 1. | In your home directory, create a directory called .nuke (if it doesn't exist already). For more information on this directory, see Loading Gizmos, NDK Plug-ins, and Python and TCL Scripts. |
| 2. | In the .nuke directory, create a file called menu.py if one does not already exist. |
| 3. | In a text editor, modify the file menu.py, adding the lines: |
toolbar = nuke.toolbar("Nodes")
toolbar.addCommand( "Test/MyGizmo", "nuke.createNode('MyGizmo')")
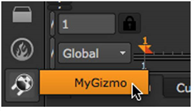
This adds a menu labeled "Test" to the default Nodes Toolbar with an item labeled "MyGizmo" that creates an instance of the node MyGizmo.
NOTE: Node Class() names occasionally change between major releases, such as Nuke 7 to Nuke 8. While these changes do not affect legacy scripts, you may not get the results you were expecting if a node class has been modified. The toolbars.py file, used to create Nuke's node toolbar, contains all the current node class names and is located in <install_directory>/plugins/nukescripts/ for reference.
As an example, between Nuke 7 and Nuke 8, the Text node Class() changed from Text to Text2. In the toolbars.py file for the two releases, the entries for the Text node appear as follows:
m.addCommand("Text", "nuke.createNode(\"Text\")", icon="Text.png")
m.addCommand("Text", "nuke.createNode(\"Text2\")", icon="Text.png")
It's also possible to add items to other menus in Nuke and even create your own toolbars. The following sections cover these possibilities in detail.
To add a toolbar:
| 1. | Create a file called menu.py in your plug-in path directory if one doesn’t already exist. |
For more information on plug-in path directories, see Loading Gizmos, NDK Plug-ins, and Python and TCL Scripts.
| 2. | Open the menu.py file in a text editor and add an entry in the following format: |
t=nuke.toolbar("ToolbarName")
t.addCommand("NewMenu", "PythonCode", "Shortcut", icon="IconName")
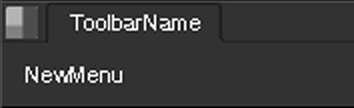
• Replace ToolbarName with the name you want to give to the toolbar. This name appears in the content menus under “Pane” and above the toolbar on the title tab.
• Replace NewMenu with the name of the menu you want to add to the toolbar. The following image illustrates where whatever you use to replace ToolbarName and NewMenu appears in the new toolbar.
• Replace PythonCode with relevant Python code (usually nuke.createNode), and, if necessary, use the name of the gizmo, generic Python script, or plug-in file you want the menu option to invoke. For ease of use, place all such referenced files inside the plug-in path directory.
If you like, you can also replace PythonCode by a Python callable.
• Replace Shortcut with a keyboard shortcut, for example Alt+A, Ctrl/Cmd+A, or Shift+A. The letter a alone represents lower-case a. F1 represents function key 1. You can combine the Shift, Ctrl/Cmd, and Alt keys as necessary. If you like, you can also use #A to represent Alt+A, ^A to represent Ctrl/Cmd+A, and +A to represent Shift+A.
• Replace IconName with the name of the .png (or .xpm) image you wish to use as the menu icon. This image must be stored in your Nuke plug-in path directory. It should be 24 x 24 pixels in size.
| 3. | In the above entry, you can also add the following optional arguments in the parenthesis after "ToolbarName": |
• True. This is the default. When True, nuke.toolbar() calls the toolbar with the given name or creates it if it does not exist. For example, t=nuke.toolbar("Extras", True) would either call an existing toolbar called Extras or create one if it did not already exist.
• False. When False, the toolbar is not created if it does not already exist and nuke.toolbar() returns None. You can use this to find out if a toolbar with a given name already exists. For example, t=nuke.toolbar("Extras", False) would either call an existing toolbar called Extras or return None if such a toolbar did not exist.
The new toolbar does not appear by default, but is listed under Pane in the content menus. From there, you can insert it in any pane. Once you are happy with the new toolbar and its position, save the layout (select Layout > Save Layout 1). Thereafter, the toolbar appears whenever Nuke is launched.
|
|
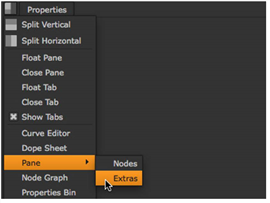
| Custom toolbars are listed under “Pane” in the content menus. |
You can build several toolbars for different tasks and save layouts that have one or another present for easy context switching.
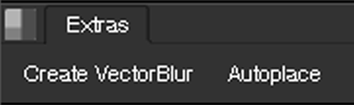
The following entry creates a new toolbar called Extras. The toolbar includes an option called Create VectorBlur that creates a VectorBlur node. The entry also defines v as the keyboard shortcut for the VectorBlur node.
t=nuke.toolbar("Extras")
t.addCommand("Create VectorBlur", "nuke.createNode ('VectorBlur')", "v")
|
|
| The result of example 1. |
In this example, we add an option called Autoplace to the toolbar created in example 1. This option places the selected nodes neatly one after another, as illustrated in the following images:
|
|
|
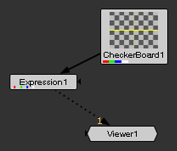
| Before using Autoplace to tidy up the Node Graph. |
After using Autoplace to tidy up the Node Graph. |
The following entry adds the Autoplace option. It also defines Alt+A as the keyboard shortcut for this option.
def _autoplace():
n = nuke.selectedNodes()
for i in n:
nuke.autoplace(i)
t=nuke.toolbar("Extras")
t.addCommand("Auto&place", "_autoplace()", "Alt+a")
|
|
| The result of example 2. |
To define a menu or toolbar option:
| 1. | If you haven’t already done so, create a file called menu.py in your plug-in path directory. For more information on plug-in path directories, see Loading Gizmos, NDK Plug-ins, and Python and TCL Scripts. |
| 2. | Open the menu.py file in a text editor and add an entry in the following format: |
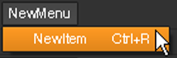
menubar=nuke.menu("MenuType")
m=menubar.addMenu("&NewMenu")
m.addCommand("&NewItem", "PythonCode", "Shortcut", icon="IconName", index=#)
• Replace MenuType with the type of menu or toolbar you want to add an item to:
Nuke adds an item to the application main menu bar.
Animation adds an item to the menu on the Animation button![]() of all panels, and to the right-click menu of the Curve editor.
of all panels, and to the right-click menu of the Curve editor.
Properties adds an item to the right-click menus of properties panels.
Node Graph adds an item to the right-click menu of the Node Graph.
Nodes adds an item to the default Toolbar.
Viewer adds an item to the right-click menu of the Viewer.
Pane adds an item to the content menus where it appears under Pane.
• Replace NewMenu with the menu name. Using an existing menu name appends any new options to the existing menu. You can also add options to the default Menu bar and Toolbar.
• Replace NewItem with the underlying item you want to add to the menu. You may precede any character with an & in order to flag it as hotkey trigger.
• Replace PythonCode with relevant Python code (usually nuke.createNode) and, if necessary, use the name of the gizmo, generic Python script, or plug-in file you want the menu option to invoke. For ease of use, place all such referenced files inside the plug-in path directory.
For more information on plug-in path directories, see Loading Gizmos, NDK Plug-ins, and Python and TCL Scripts.
If you like, you can also replace PythonCode by a Python callable. This has the advantage that you get informed about errors in your script on start-up instead of when the menu item is invoked. For an example of using a lambda function, see Example 3.
• Replace Shortcut with a keyboard shortcut, for example Alt+A, Ctrl/Cmd+A, or Shift+A. The letter a alone represents lower-case a. F1 represents function key 1. You can combine the Shift, Ctrl/Cmd, and Alt keys as necessary. If you like, you can also use #A to represent Alt+A, ^A to represent Ctrl/Cmd+A, and +A to represent Shift+A.
NOTE: By assigning a keyboard shortcut, you can overwrite existing shortcuts. For example, if you assign the shortcut Ctrl/Cmd+O to a new menu item, it is no longer used for it’s default purpose, which is opening a file. However, shortcuts are only overwritten in the main menu bar, the Toolbar, any user-created toolbars, and the menu you are adding the new menu item to. This means you can add a shortcut into the Node Graph, for example, without resetting the same shortcut in the Viewer. However, you cannot add a shortcut into the Node Graph without resetting the same shortcut in the main menu bar or the Toolbar.
• Replace IconName with the name of the .png (or .xpm) image you wish to use as the menu icon. This image must be stored in your Nuke plug-in path directory. It should be 24 x 24 pixels in size.
• Replace # with a number that represents the position of the item in the menu or toolbar. If you do not use an index keyword, the item is added in the end of the menu or toolbar.
TIP: You can also put the menu name in the addCommand call, like this:
nuke.menu("MenuType").addCommand("NewMenu/NewItem", "PythonCode("name")")
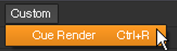
The following entry creates a new menu and option called Custom > Cue Render in the menu bar. It inserts a gizmo called “cue_render.” The entry also defines Ctrl+R as the keyboard shortcut for the gizmo.
menubar=nuke.menu("Nuke")
m=menubar.addMenu("&Custom")
m.addCommand("&Cue Render", "nuke.createNode('cue_render')", "Ctrl+R")
For information on how to create a new menu in the default Toolbar with a menu item that triggers a gizmo, see the example under Defining Custom Menus and Toolbars.
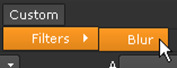
The following entry creates a menu and options called Custom > Filters > Blur in the menu bar. Selecting Blur inserts the Blur node.
menubar=nuke.menu("Nuke")
m=menubar.addMenu("&Custom")
m.addCommand("Filters/Blur", "nuke.createNode(\"Blur\")" )
You can also do the same with a lambda function:
menubar=nuke.menu("Nuke")
m=menubar.addMenu("&Custom")
m.addCommand("Filters/Blur", lambda: nuke.createNode("Blur") )
This way, you don’t have to use the backslashes.