The Preferences dialog is divided into the following tabs:
• Preferences - Settings for automatic backup of files, local file caching, memory usage, GPU devices, and file path remappings.
• Windows - Settings for window positions, tool tips, window snapping, script loading, the File Browser, and script command dialog.
• Control Panels - Settings for changing the behavior of properties panels.
• Appearance - Settings for changing the colors and font on the application interface.
• Node Colors - Settings for changing the colors of different nodes.
• Node Graph - Settings for changing the appearance of the Node Graph (for example, colors, font, background grid usage, arrow size, and Dot node behavior).
• Viewers - Settings for changing the colors, controls, interaction speed, and buffer bit depth of Viewers.
• Script Editor - Settings for changing the behavior and syntax highlighting colors of the Script Editor.
• Scopes - Settings for changing the behavior of Nuke's scopes.
The following tables describe the available preference settings and their functions. Each tab of preferences is described in its own table.
The Preferences tab includes the following controls:
Setting |
Function |
Files & Paths |
|
autosave filename |
Define where and under what name Nuke saves your automatic backup files. By default, the files are saved with the extension .autosave in the same folder as your project files. To change this, enter a full directory path name in the autosave filename field. You can use [value root.name] to refer to the full script path name, and [file tail [value root name]] to just refer to the file name with its extension. |
autosave after idle for |
Define how long (in seconds) Nuke waits before performing an automatic backup after you have left the system idle (that is, haven’t used the mouse or the keyboard). If you set the value to 0, automatic backups are disabled. |
force autosave after |
Define how long (in seconds) Nuke waits before performing an automatic backup regardless of whether the system is idle. If you set the value to 0, forced automatic backups are disabled. |
Local File Cache |
|
localize to |
Enter the file path where all the localized files are stored. Localizing files allows for faster reloading for files that are stored in a location that is slow to access (such as a network drive). You should construct the file path as follows • Replace any leading forward or back slashes with underscores. For example, replace \\windowspath\to\my\network\file.dpx with __windowspath\to\my\network\file.dpx. • Replace any Windows drive signifiers (colons) with underscores. For example, replace t:\my\network\path\file.dpx with t_\my\network\path\file.dpx. |
auto localize from |
Enter the location of the files you need automatically localized, unless otherwise specified in the Read node’s cache locally control. Commonly this would be your remote working folder. If you leave this field blank, automatic local file caching doesn’t take place. |
Memory |
|
cache memory usage (%) |
Set the amount of RAM that Nuke uses for processing images. Generally, the default setting gives a good trade off between performance and interactivity. |
aggressive caching |
Enable this to improve the performance of Nuke on systems with 8 GB or more memory. This should remain disabled on systems with less memory. |
playback cache memory (%) |
Set the amount of total cache memory usage that Nuke can use as playback cache. Recently used frames are retained in the memory to avoid relying on the disk buffering system. |
gpu texture cache memory (Mb) |
Set the amount of GPU memory Nuke uses when caching textures, in megabytes. The default setting is 256 MB. |
disk cache |
Nuke attempts to save all recent images displayed in the Viewer for fast playback. Using this control, you can specify where you want Nuke to save these images. Pick a local disk (for example, c:/temp), preferably with the fastest access time available. It’s also important to leave enough space for the maximum disk cache size (defined below). The environment variable NUKE_DISK_CACHE can be used to override this setting. |
disk cache size (GB) |
Set the maximum size the disk cache can reach. Ensure there is enough space on the disk to accommodate this value. The environment variable NUKE_DISK_CACHE_GB can be used to override this setting. |
paint disk cache size (GB) |
Set the maximum size the RotoPaint disk cache can reach. Ensure there is enough space on the disk to accommodate this value. |
nuke memory available for paint (%) |
Limit the memory usage of the RotoPaint node to a percentage of available Nuke memory. |
undo history size (MB) |
Select the amount of RAM to use for the undo history. If this limit is exceeded, older items are discarded. |
minimum undo events |
Select the minimum number of undo events you want Nuke to store, even if they breach the memory limit. |
GPU Device |
|
GPU Device |
You can enable the Use GPU if available control on certain nodes to have them run on the graphics processing unit (GPU) rather than the central processing unit (CPU). The GPU Device dropdown menu allows you to then select which of the available devices to use. You must restart Nuke for the change to take effect. The output between the GPU and CPU is identical, but using the GPU can significantly improve processing performance. The GPU processing requires certain NVIDIA GPUs and CUDA drivers. For more information on the minimum requirements, please refer to the Nuke Release Notes available in Help > Release Notes. If you are using a render license of Nuke, you need to add --gpu on the command line. |
OFX Plugins |
|
allow trial mode in OFX plugins |
When enabled, OFX plug-ins that include a trial mode are able to run when no license is available. When this control is disabled and no license is available, OFX plug-ins behave as other nodes when no license is found. |
QuickTime |
|
reader subprocess limit |
Sets the number of background processes that Nuke can run when reading QuickTime files. |
File Path Remapping |
|
Path Remaps |
Allows you to remap file paths in order to easily share Nuke projects across different operating systems. When Nuke encounters a file path, any text in the OSX/Linux column is replaced with the text in the Windows column, or vice versa. For example, if you enter /Volumes/networkmount in the OSX/Linux column and Z: in the Windows column: • On Mac OS X and Linux, any file paths that start with Z: are converted to start with /Volumes/networkmount. • On Windows, any file paths that start with /Volumes/networkmount are converted to start with Z:. To be able to enter text in either column, you need to click on the + button below to add a row to the table. |
+ |
Adds a row under Path Remaps. |
- |
Deletes the selected row(s) under Path Remaps. |
The Windows tab includes the following controls:
Setting |
Function |
script command dialog defaults to TCL |
Select which scripting language the script command dialog defaults to when you select File > Script Command. When enabled, the dialog defaults to TCL. When disabled, it defaults to Python. |
show menus with previous item under the cursor |
When enabled, right-click menus are opened with the previously selected item under the cursor. When disabled, right-click menus are opened with nothing under the cursor. |
tooltips on |
When enabled, hover the cursor over a control to display its tooltip. |
Positions |
|
stored: Clear |
When you rearrange floating windows, such as the color picker window, Nuke remembers their position the next time you open them. You can use this control to clear remembered positions. |
floating windows |
This preference only affects Nuke on Linux and is used to fix problems with floating windows, dependent on the window manager you are using: • Utility (GNOME) - for use with the GNOME window manager. If you haven’t specifically selected to use KDE, you’re most likely using GNOME. If you find that floating windows go behind full screen windows, select Utility (GNOME). • Normal (KDE) - for use with the KDE window manager. If this option is not used on KDE, all the floating windows, such as Viewers and color pickers, are hidden when you move focus away from Nuke. If floating windows are disappearing when another application gets focus (using KDE on Linux) set Hide utility windows for inactive applications to off (KDE Menu > Settings > Desktop > Window Behavior > Advanced ). |
show dialogs under the cursor |
When enabled, pop-up dialogs display at the current position of the cursor. When disabled, pop-up dialogs display in the middle of the Nuke application window. |
Snapping |
|
snap when moving windows |
When this is enabled and you move floating windows, the windows snap to screen edges and other floating windows, making it easy to place them right next to each other. When this is disabled and you move floating windows, the windows do not snap to anything. On Linux, window snapping may not work. However, most Linux window managers snap windows if you hold down Shift while moving the window. |
snap if parallel without touching |
When enabled, all floating windows’ edges are considered to extend infinitely outward, so that you can easily align windows, even if they aren’t close to each other. For example, say you have one floating window on the left and another on the right. When you move either of these up or down, their top and bottom edges snap to align with the top or bottom edge of the other window. When disabled, window snapping is restricted to nearby windows. |
threshold |
Defines how close to each other (in pixels) the windows have to be for them to snap together. |
Script Loading |
|
re-open viewers when loading saved scripts |
When this is enabled and you open a saved script, any Viewers in the script are opened in the Viewer pane. When disabled, Viewers must be opened manually by double-clicking on them in the Node Graph. |
use window layout from saved scripts |
When enabled, Nuke opens saved scripts with the window layout in the same positions they were saved. When disabled, Nuke opens saved scripts with the default layout. |
File Browser |
|
start file browser from most recently used directory |
When enabled, the File Browser opens in the directory that was used most recently. When disabled, the File Browser opens in your default root directory. |
The Control Panels tab includes the following controls:
Setting |
Function |
new panels go to |
Sets where you want properties panels to appear when you add a new node or double-click on an existing node in the Node Graph: • own window - new properties panels appear in their own floating window. • top of control panel bin - new properties panels appear at the top of the Properties bin. • bottom of control panel bin - new properties panels appear at the bottom of the Properties bin. |
max nodes in Properties bin |
Defines the maximum number of properties panels that can appear in the Properties bin at the same time. When you’re working, you can override this setting using the field on top of the Properties bin. However, the number saved in the preferences is used as the default whenever you launch Nuke. |
reopen acts like new panel |
When this is enabled and you reopen a floating properties panel, Nuke opens the panel in the same place as a new panel, even if you moved the panel to a new location earlier. When this is disabled and you reopen a floating properties panel, Nuke remembers where the panel was located when it was last closed and opens it in that position. |
double-click moves panel |
When enabled, double-clicking on a node whose properties panel is already open moves the panel as specified in the new panels go to control. When disabled, double-clicking on a node whose properties panel is already open selects the panel, but doesn’t change its position (floating panels are placed on top of everything else). |
close Properties bin when empty |
When enabled, the Properties bin is closed when the last properties panel in the bin is closed. When disabled, the Properties bin remains open when the last properties panel in the bin is closed. |
expand/collapse panels in Properties bin to match selection |
When enabled, only the properties panels of the nodes that are selected in the Node Graph are opened. All unselected nodes have their properties panels collapsed. This only applies to the properties panels in the Properties bin. When disabled, properties panels are not opened or closed based on the selection in the Node Graph. |
input button does |
Sets what happens when you click the input button at the top of a properties panel and select one of the node’s inputs: • select input node only - an input of the node is selected in the Node graph. • scroll node into view - an input of the node is selected in the Node Graph and, if the input is outside the currently displayed area of the Node Graph, the displayed area is adjusted to include the input node. • center node - an input of the node is selected and positioned in the center of the Node Graph. |
max channels or layers per menu |
Sets the maximum number of entries that a channel control sub-menu can display. For example, the Grade node channels > other layers sub-menu. |
Documentation |
|
documentation source |
Select the source for the online help: • local - use Nuke's built-in help system. This is included in the Nuke installation and does not require an Internet connection. NOTE: When you click on a ? button on a node, Nuke searches the following locations for HTML files with the same name as the requested node (for example, blur.html): • foundry - use the help system available on The Foundry website. This contains the most up-to-date information, but requires an internet connection. NOTE: On Windows, you may have to add a firewall program or port exception to view the most up-to-date help from our website. If the connection is blocked, Nuke falls back to the local copy. • custom - use your own custom help system. |
documentation source > local | |
auto port |
When enabled, Nuke automatically assigns a free documentation server port. When disabled, you can use local port and port range to manually set a local documentation server port and port range to attempt. This control is only available when documentation source is set to local. NOTE: To be able to use the online help from multiple sessions of Nuke running at the same time, you must enable auto port. |
local port |
Allows you to set a local documentation server port manually. Typically, the local port value should be 1024 or higher. Setting the value to 0 causes a port to be automatically assigned. This control is only available when documentation source is set to local and auto port is disabled. |
port range |
Sets a range of local documentation server ports to attempt. This control is only available when documentation source is set to local and auto port is disabled. |
documentation source > foundry | |
foundry host |
Displays The Foundry documentation server host address. This control is only available when documentation source is set to foundry. |
foundry port |
Sets The Foundry documentation server port. This control is only available when documentation source is set to foundry. |
NOTE: On Windows, you may have to add a firewall program or port exception to view the most up-to-date help from our website. If the connection is blocked, Nuke falls back to the local copy. |
|
documentation source > custom | |
custom host |
Sets a custom documentation server host address. This must be an Internet Protocol version 4 (IPv4) address. This control is only available when documentation source is set to custom. |
local port |
Sets a local documentation server port. Typically, the local port value should be 1024 or higher. Setting the value to 0 causes a port to be automatically assigned. This control is only available when documentation source is set to custom. |
custom port |
Sets a custom documentation server port. This control is only available when documentation source is set to custom. |
Color Panel | |
color picker button opens |
Sets the type of color picker displayed when you click a color picker button in the properties panel: • in-panel color picker - opens a color wheel and sliders in the properties panel. • floating color picker - opens a color wheel and sliders in a floating panel. TIP: Holding Ctrl/Cmd and clicking the color picker button opens the alternate color picker to the one specified in the Preferences. |
The Appearance tab includes the following controls:
Setting |
Function |
presets: Choose |
Select a predefined color scheme: Standard or Silver. You can also create new color schemes yourself. Do the following: 1. Go to the Appearance tab and adjust the colors until you are happy with them. Click Save Prefs. 2. Make a copy of the preferences7.0.nk file and rename it to UI_name.tcl (where name is the name of your color scheme). You can find preferences7.0.nk in the following location: • On Windows: In the .nuke directory, which can be found under the directory pointed to by the HOME environment variable. If this variable is not set (which is common), the .nuke directory will be under the folder specified by the USERPROFILE environment variable - which is generally of the form "drive letter:\Documents and Settings\login name\" (Windows XP) or "drive letter:\Users\login name\" (Windows Vista). To find out if the HOME and USERPROFILE environment variables are set and where they are pointing at, enter %HOME% or %USERPROFILE% into the address bar in Windows Explorer. If the environment variable is set, the folder it’s pointing at is opened. If it’s not set, you get an error. • On Mac OS X: /Users/login name/.nuke • On Linux: /users/login name/.nuke 3. Put this file into the plug-in path. For more information on the plug-in path, see Environment Variables. When you next launch Nuke, your new color scheme is listed as one of the predefined color schemes. |
font |
Change the type, weight, angle, and size of the font used on Nuke’s user interface. |
UI Colors - right-click on any color button and select Set color to default to revert changes. |
|
Background |
Change the background color of most user interface elements (menus, toolbars, panes, properties panels, Viewers, and pop-up dialogs). |
Base |
Change the color of input fields, the input pane of the Script Editor, and the left side of the Curve Editor. |
Highlight |
Change the color of the highlighting that appears when you hover the cursor over a control, select a file or folder in the File Browser, or scrub to a new frame on the timeline. |
Highlighted Text |
Change the color of any highlighted text (for example, text you select in node properties). |
Label |
Change the color of labels and text on the application interface. Note that this does not set the color of the labels on nodes in the Node Graph. |
Button |
Change the color of buttons and dropdown menus. |
Animated |
Change the color that indicates a control has been animated. |
Keyframe |
Change the color that indicates a keyframe has been set. |
Cached frames |
Change the color of the cached frames on the Viewer timeline. |
Playhead |
Change the color of the frame marker on the Viewer timeline. |
In/Out Markers |
Change the color of the in and out frame markers on the Viewer timeline. |
File Browser Colors - right-click on any color button and select Set color to default to revert changes. |
|
Queued Item Color |
Change the color of items that are already selected for opening while the browser dialog is still open. |
Focus Color |
Change the color of the highlight that indicates the mouse pointer is focused on an item. |
File Browser Options |
|
sequence display mode |
Change the way sequences are displayed in the browser dialog: • Hashes (#) - show hashes for the frame number buffers (for example, mysequence.####.exr). • Printf Notation (%d) - show printf notation for the frame number buffers (for example, mysequence.%04d.exr). |
assume fixed width frame numbers in file sequences |
Set whether to assume fixed width padding on file names in sequences or not. When enabled, Nuke assumes that any new files added to a sequence have the appropriate padding. For example, when adding frame number 9 to a sequence of 10 to 20 frames, the file name must indicate the frame number with 09 (as in filename.09.exr) for Nuke to recognize it as a part of the sequence. When disabled, Nuke treats new files without padding as parts of the sequence. In the previous example, Nuke now recognizes frame number 9 without (and only without) the zero in the filename (filename.9.exr) as belonging to the sequence. |
Curve Editor / Dope Sheet - right-click on any color button and select Set color to default to revert changes. |
|
no of curves visible |
Sets the maximum number of curves visible in the Curve Editor. |
background |
Change the background color of the Dope Sheet tab. |
unselected key |
Change the color used for an unselected key on the Dope Sheet. |
part-selected key |
Change the color used for a part-selected key on the Dope Sheet. |
selected key |
Change the color used for a selected key on the Dope Sheet. |
timeline |
Change the color used for the timeline on the Dope Sheet. |
control text |
Change the color used for the control text on the Dope Sheet. These indicate the frame number of a key when you select one. |
control text shadow |
Change the color used for the shadow of the control text on the Dope Sheet. |
time label |
Change the color used for the time labels on the Dope Sheet. These indicate frame numbers. |
current frame |
Change the color used for the current frame on the Dope Sheet. This is a vertical line that indicates the current frame on the timeline. |
project frame range |
Change the color used for the project frame range on the Dope Sheet. These are two vertical lines indicate your frame range. |
The Node Colors tab includes the following controls:
Setting |
Function |
autocolor |
When enabled, nodes are colored based on the class to which they belong. When disabled, the All Others color is used on all nodes. |
Shade Nodes |
When enabled, shading is applied to nodes in the Node Graph. |
Deep, RotoPaint, Drawing, Color, Time, Channel, Merge, Keyer, Write, 3D, Filters, 2D Transform |
Change the color of the nodes that belong to each group. You can change which nodes belong to each group by entering the names of the nodes in the text input fields. To set the color back to default, right-click on the color button on the right and select Set color to default. |
User 1, User 2 |
These controls create a group of gizmos and change their color in the Node Graph. List the names of the gizmos (without the .gizmo extension) in the input field, and then use the color button to change their color in the Node Graph. To set the color back to default, right-click on the color button on the right and select Set color to default. |
All Others |
Change the color of any nodes that do not belong to the node groups above. To set the color back to default, right-click on the button and select Set color to default. |
Text |
Change the color of the labels and text in the Node Graph (for example, the labels on nodes and notes created using StickyNote nodes). To set the color back to default, right-click on the button and select Set color to default. |
Selected |
Change the color used to indicate that nodes are selected. To set the color back to default, right-click on the button and select Set color to default. |
Selected Input |
Change the color used to display the input names of the nodes that are selected. To set the color back to default, right-click on the button and select Set color to default. |
GL Color |
Change the color of the Viewer overlays. To set the color back to default, right-click on the button and select Set color to default. |
The Node Graph tab includes the following controls:
Setting |
Function |
autolabel |
When enabled, automatically label nodes with the information specified in the autolabel.py file. When disabled, nodes only show the file name or the node name. |
highlight running operators |
When enabled, highlight any nodes whose output is currently being calculated. |
postage stamp mode |
When displaying a thumbnail render of the node’s output on its surface (either using the PostageStamp node or the postage stamp control on the Node tab of each node), you can select one of two modes: • Current frame - The postage stamp is always updated to match the current frame. • Static frame - The postage stamp displays a fixed frame. To specify the frame to use, open the node’s controls, go to the Node tab, and adjust static frame. NOTE: If the frame number you use is outside the frame range for the node, it is clamped to the first or last frame in the range accordingly. |
node name background |
When a node is selected and the node’s name is too long to fit inside the node, a background is drawn behind the name to improve legibility. Use this control to set the intensity of the background, from 0 (no background) to 1 (fully opaque background).
|
label font |
Change the type, weight, angle, and size of the font used on labels in the Node Graph. |
tile size (WxH) |
Change the width and height (in pixels) of the nodes in the Node Graph. |
snap to node |
When enabled, moving a node in the Node Graph snaps to a position that aligns it horizontally and vertically with its input and output nodes. |
grid size (WxH) |
When show grid is enabled, define the width and height (in pixels) of the cells in the background grid displayed on the Node Graph. |
snap to grid |
When this is checked and you move a node in the Node Graph, the node snaps to a position that lines it up with the background grid lines. To see the grid, check show grid below. |
show grid |
When enabled, show a background grid on the Node Graph. |
snap threshold |
When snap to grid is enabled, defines the maximum number of pixels to jump by when snapping nodes to grid lines. |
Colors - right-click on any color button and select Set color to default to revert changes. |
|
Node Graph |
Change the background color of the Node Graph. |
Overlay |
Change the color of the grid on the Node Graph when show grid is enabled. |
Elbow |
Change the color of the “elbows” that appear on arrows when you press Ctrl/Cmd on the Node Graph. |
Arrows - right-click on any color button and select Set color to default to revert changes. |
|
Left arrow button |
Change the color of arrows pointing left in the Node Graph. |
Right arrow button |
Change the color of arrows pointing right in the Node Graph. |
Up arrow button |
Change the color of arrows pointing up in the Node Graph. |
Down arrow button |
Change the color of arrows pointing down in the Node Graph. |
expression arrows |
Change the color of the arrows that indicate nodes are connected by an expression. |
enable |
When enabled, display expression arrows in the Node Graph. |
clone arrows |
Change the color of the arrows that indicate nodes have been cloned. |
enable |
When enabled, display clone arrows in the Node Graph. |
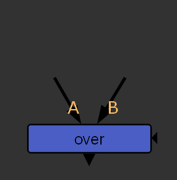
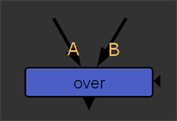
unconnected top input arrow length |
Adjust the length of the unconnected input arrows that appear on top of nodes in the Node Graph.
|
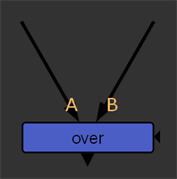
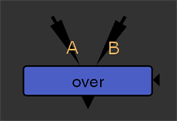
unconnected left/right input arrow length |
Adjust the length of the unconnected arrows that appear on the sides of some nodes in the Node Graph. For example, mask inputs and extra Viewer or Scene node inputs.
|
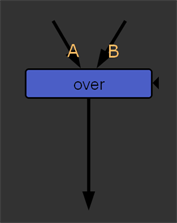
unconnected output arrow length |
Adjust the length of unconnected output arrows in the Node Graph.
|
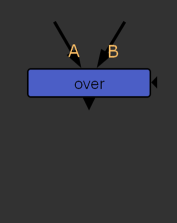
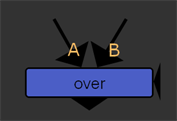
arrow head length |
Adjust the length of arrow heads in the Node Graph.
|
arrow head width |
Adjust the width of arrow heads in the Node Graph.
|
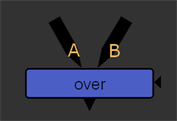
arrow width |
Adjust the width of the arrows in the Node Graph.
|
allow picking of connected arrow heads |
When enabled, you can click on an arrow head and drag it to a new location. When disabled, connected arrow heads are locked into place and you can only change the connections by moving the arrow tails. |
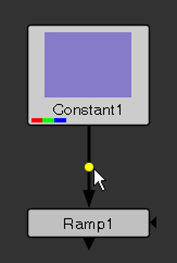
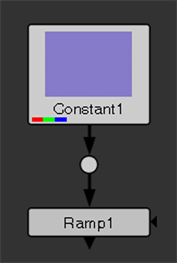
allow picking of arrow elbows to create Dots |
When enabled, press Ctrl (Cmd on a Mac) on the Node Graph to display yellow “elbows” on the Node Graph arrows and then click on these to insert Dot nodes.
If you Ctrl/Cmd+Shift+click on an elbow, the new Dot node is branched off to a new arrow rather than inserted in the existing arrow. When disabled, adding Dot nodes in this manner is not possible. |
drag-to-insert only works near middle of arrows |
When disabled, you can insert nodes in between other nodes by dragging them over any point of the connecting arrow. When enabled, you can only insert nodes in between other nodes in the above manner by dragging them over the middle point of the connecting arrow. |
size of dots |
Adjust the size of Dot nodes. |
Node Defaults |
|
new Merge nodes connect A input |
When enabled, any Merge nodes you add to the Node Graph are connected to the currently selected node through the A input of the Merge node. When disabled, the B input of the Merge node is used instead. |
autokey roto shapes |
When enabled, the autokey control in the RotoPaint and Roto node properties is enabled by default, and Bezier and B-spline shapes and paint strokes are automatically saved as key shapes. When disabled, the autokey control is disabled by default, and Bezier and B-spline shapes and paint strokes are not automatically saved as key shapes. |
The Viewers tab includes the following controls:
Setting |
Function |
new Viewers go to own window |
When enabled, each new Viewer node created appears in its own floating window. When disabled, additional Viewers attempt to dock with existing Viewers. |
prevent auto zoom for new Viewers |
When this is checked, new Viewers for inputs of different sizes maintain the current zoom level rather than the current on-screen image dimensions. When this is NOT checked (default), new Viewers automatically zoom the input to match the current on-screen image dimensions. |
when Viewer is closed delete its node |
When this is checked, Viewer nodes are deleted from the Node Graph when you close the associated Viewers in the Viewer pane. When this is NOT checked, closing Viewers in the Viewer pane does not affect Viewer nodes in the Node Graph. |
apply LUT to color channels only |
When this is checked, look-up tables (LUTs) are only applied to the red, green, and blue channels. When this is NOT checked, LUTs are applied to all channels. |
viewer buffer bit depth |
Set the default Viewer OpenGL buffer depth: • float - Uses a full float texture. • half-float - Converts to 16-bit (half) float. • byte - Uses 8-bit with error diffusion. This is the default. When Nuke is set to use 8-bit (byte) gl buffer depth, we perform error diffusion in the conversion from the internal floating point image data to 8-bit. This is to avoid the appearance of banding due to the reduced bit depth. Without this, artists often mistakenly assume the banding they see is actually present in their image data and try to blur to remove it, softening the image unnecessarily. However, because Nuke works internally at floating point, there is little likelihood of banding actually being present. When gl buffer depth is set to half-float or float, an ordered dither is applied, rather than error diffusion. |
use GPU for Viewer when possible |
When this is checked, the Viewer applies its effects (such as gain, gamma, and the Viewer Process node) in the GPU when possible. However, in some cases, like when monitor output is enabled or gl buffer depth is set to byte in the Viewer settings, effects must still be computed in the CPU. |
use GPU for inputs when possible |
Normally, the Viewer only attempts to run its own effects (such as gain, gamma, and the Viewer Process node) on the GPU. However, when this is checked, any nodes connected to the Viewer are also computed on the GPU when possible. Note that this cannot be done for all nodes because not all nodes have a GPU implementation. If nodes are computed on the GPU, the color values displayed in the Viewer are inaccurate. This is because they show the color from the last node computed in the CPU prior to transferring the image into the graphics card. |
disable GPU Viewer dithering |
Check this to disable dithering in the Viewer when you’re using half-float depth. Uncheck to allow dithering at all times. |
optimize Viewer during playback |
Frame by frame updates in Nuke’s interface can be expensive, and real-time playback can suffer as a result. The Curve Editor, Dope Sheet, and RotoPaint or Tracker nodes are good examples of update-heavy areas of the interface. You can check this to stop updates elsewhere on the interface during RAM cache playback, helping to optimize the playback frame rate. This affects the following interface areas until playback stops, at which point the whole interface is updated: • Properties panel controls - controls are not updated during playback, they show the value of the frame you were on when play forward or backward was pressed. When playback is stopped, the controls update to show the values for the current frame. • Node Graph - auto labels and postage stamps are not updated. • Curve Editor/Dope Sheet - the yellow timeline indicator is hidden until playback is stopped, at which point it displays at the current frame. You can still manipulate controls, curves, and keyframes as normal, and checking optimize Viewer during playback does not affect handles in the Viewer. When optimize Viewer during playback is not checked, all interface elements update as required. NOTE: This setting only affects Viewers in new scripts. |
flip stereo interlaced views |
You can check this to swap the left and the right views when using the Interlaced stereo viewing mode. If you leave this unchecked, the views display as in other stereo modes. |
no incomplete stereo for new viewers |
When this is checked, the Viewer only displays one view of a stereo project until both views have been rendered. This is to prevent disorienting effects when watching the results. When this is not checked, the Viewer displays both stereo views, even if the render of either is incomplete. |
texture size |
Select the size of the texture maps for the OpenGL preview of 3D objects and 2D transformations. The default size is 512x512. |
texture mode |
Choose how textures are handled in the Viewer. Select Classic if you don’t want textures to be updated in the Viewer during playback. This gives the fastest playback speed. Select Animated if you want textures recalculated during playback This results to slower playback, but uses no extra memory. Select Multitexture to cache each frame of a texture. This uses a lot more memory, but results in fast playback once the caching is done. You can also have multiple frames of a texture visible at once, for example, with particles. |
2D bg |
Change the background color of the 2D Viewer. To set the color back to default (black), right-click on the button and select Set color to default. |
2D fg |
Change the color of borders and text in the 2D Viewer. To set the color back to default (light gray), right-click on the button and select Set color to default. |
3D bg |
Change the background color of the 3D Viewer. To set the color back to default (black), right-click on the button and select Set color to default. |
3D fg |
Change the color of borders and text in the 3D Viewer. To set the color back to default (light gray), right-click on the button and select Set color to default. |
3D sel |
Change the color of the selected vertices or faces of an object in the 3D viewer. To set the color back to default (blue), right-click on the button and select Set color to default. |
Interaction |
|
middle button pans |
Check this to use the middle mouse button to pan in the Viewer, Node Graph, the Curve Editor, and the Dope Sheet. |
left+middle to zoom |
Check this to use the left and the middle mouse button together to zoom in the Viewer, Node Graph, the Curve Editor, and the Dope Sheet. |
show transform preview |
Check this to disable the OpenGL preview when manipulating the handles of 2D nodes, such as Transform and CornerPin. |
3D control type |
Select the navigation control scheme you want to use in the 3D Viewer: Nuke, Maya, Houdini, Lightwave, or Modo. |
use new rotation controls |
Check this to use the 3D handles implemented in Nuke 6.3. They apply rotation values in 3D view according to the relative mouse movement (enabled by default). If you uncheck this, Nuke reverts to applying rotation according to the absolute values from the mouse movement when rotating in 3D view. |
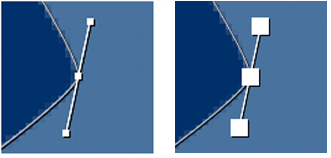
2D handle size |
Adjust the size of the square control handles that appear on the Viewer for some operations, such as transformations, warps, and Bezier and B-spline shapes. By default, this value is set to 5.25.
|
pick size |
Adjust the size of the pickable area for handle points, such as those found on RotoPaint shapes. For example, If the value is 20, you can pick up the point (for instance, when click-dragging) within a 20 pixel’s radius from the point. By default, this value is set to 10. |
3D handle size |
Adjust the size of the square control handles that appear when you’re, for instance, selecting vertices on a 3D object in the 3D view. By default, this value is set to 5. |
pick size |
Adjust the size of the pickable area for 3D handle points. For example, if the value is 20, you can pick up the point (for instance, when click-dragging) within a 20 pixel’s radius from the point. By default, this value is set to 10. |
icon size |
Adjust the size of the 2D transformation overlay, 3D camera, 3D object normals, and 3D axis on the Viewer. By default, this value is set to 50. |
icon scaling |
Adjust how much the scale of display affects the size of the 2D transformation overlay, 3D camera, and 3D axis. When this is set to 0, these controls are always drawn the same size, regardless of the zoom level. When the value is set to 1, the controls scale with the displayed image or 3D scene when you zoom in or out. Intermediate values mix this so that the controls do scale, but not as much as the image does. This gives an optical illusion that you are zooming in or out without making the controls unusably small or large. |
object interaction speed |
Set how fast mouse movements rotate and translate 3D axis and cameras. The lower the value, the finer the movements. The default value is 0.1. |
camera interaction speed |
Set how fast mouse movements tumble and roll the 3D view in the Viewer. The lower the value, the finer the movements. The default value is 1. |
Splines |
|
line width |
Adjust the width of lines in the RotoPaint strokes and shapes. |
draw shadow |
When this is checked, a shadow is drawn for lines in the RotoPaint shapes and strokes. This can make the lines easier to see. When this is NOT checked, no shadows are drawn. |
general |
• Expression color - Change the default color of the control points when an expression is set. • Focus color - Change the default color of the control points when focused. To set the color back to default (green), right-click on the button and select Set color to default. |
roto |
• Points - Change the default color of the points on RotoPaint shapes and strokes. • Curves - Change the default color of the rotoshape and stroke curves in RotoPaint and Roto. • Transform - Change the default color of the RotoPaint transform jack. • Locked - Change the default color of RotoPaint points and curves when locked or otherwise unmodifiable. To set the color back to default (gray), right-click on the button and select Set color to default. |
splinewarp |
• A Sourcecolor - Change the default color of SplineWarp’s A source curves. To set the color back to default, right-click on the button and select Set color to default. • B Sourcecolor - Change the default color of SplineWarp’s B source curves. To set the color back to default, right-click on the button and select Set color to default. • draw source stippled - Check to change source curves from solid to stippled. • A Destinationcolor - Change the default color of SplineWarp’s A destination curves. To set the color back to default, right-click on the button and select Set color to default. • B Destinationcolor - Change the default color of SplineWarp’s B destination curves. To set the color back to default, right-click on the button and select Set color to default. • draw destination stippled - Check to change destination curves from solid to stippled. • Correspondencecolor - Change the default color of the SplineWarp correspondence lines. To set the color back to default, right-click on the button and select Set color to default. • Boundarycolor - Change the default color of the SplineWarp boundary curves. To set the color back to default, right-click on the button and select Set color to default. • Hardboundarycolor - Change the default color of the SplineWarp hard boundary curves. To set the color back to default, right-click on the button and select Set color to default. |
The Script Editor tab includes the following controls:
Setting |
Function |
font |
Change the type, weight, angle and size of the font used in the Script Editor. |
Input |
|
clear input window on successful script execution |
When this is checked, any successfully executed Python statements disappear from the input pane of the Script Editor and appear in the output pane. When this is NOT checked, all statements stay in the input pane of the Script Editor, even if they were successfully executed. |
echo python commands to output window |
Check this to have all Python commands executed by yourself or Nuke appear in the output pane of the Script Editor. This way, you can, for example, select a node from the Toolbar and have the corresponding Python command displayed in the output pane. |
Highlighting - right-click on any color button and select Set color to default to revert changes. |
|
keywords |
Change the color that’s used to highlight any words that are Python’s keywords (for example, print and import) in the Script Editor. |
string literals (double quotes) |
Change the color that’s used to highlight strings (inside double quotation marks) in the Script Editor. |
string literals (single quotes) |
Change the color that’s used to highlight strings (inside single quotation marks) in the Script Editor. |
comments |
Change the color that’s used to highlight comments (anything beginning with #) in the Script Editor. |
The Scopes tab includes the following controls:
Setting |
Function |
Blackpoint |
Sets the black out-of-range warning level. |
Whitepoint |
Sets the white out-of-range warning level. |
Include viewer color transforms |
When enabled, scope data includes the applied Viewer color transforms (gain, gamma, and LUT). When disabled, scope data does not include the applied Viewer color transforms. This may slow down rendering, as it may require image calculation. |
Force full frame |
When enabled, scopes display data for the full frame, regardless of what portion of that frame is displayed in the Viewer. When disabled, scopes only display data for the current area requested by the Viewer rather than the full frame. |