
To fine tune the results:
| 1. | Set Denoise Amount to adjust the overall amount of noise to remove. Increase this to remove more noise, or decrease it if you want to keep more detail. A value of 0 removes no noise. |
| 2. | If the denoised image looks too sharp, use Roll Off to adjust the smoothness of the denoise thresholding. A value of 1 equals hard thresholding. Any other value produces soft thresholding between: |
• the Denoise Amount value and
• the Roll Off value multiplied by Denoise Amount.
| 3. | If you’re not getting the correct smoothness level by adjusting the Denoise Amount, try setting Smoothness to a new value. This controls the smoothness of the denoised image, affecting the underlying image rather than the noise detected. In most cases, the default value of 1 works fine though. |
| 4. | If the results are too smooth and adjusting the above controls didn’t help, try setting Profile to Automatic. Unlike the Constant profile, which looks at the analysis region and removes the same amount of noise across all intensities, automatic profiling looks at the entire Profile Frame to estimate a noise profile and removes different amounts of noise from the shadow, midtone, and highlight areas of the Source image. |
|
|
|
| Constant profile. | Automatic profile. |
When you first switch to automatic profiling, Denoise uses the current frame to calculate the profile. If you’d like to use a different frame, you need to scrub to that frame and click the Recalculate Profile button on the Profile tab. This updates the Profile Frame control, which is read only.
Note that Denoise always bases the noise profile on your Source footage even if you’ve attached another clip to the Noise input.
| 5. | You can also tweak the noise profile yourself using the controls on the Profile tab. This works in both the Constant and Automatic profiling mode. |
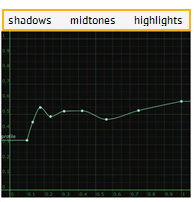
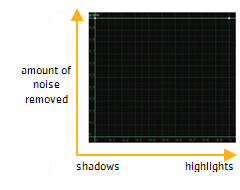
• Denoise displays the noise profile curve in the curve editor. The x axis represents image intensity, from dark areas on the left to lighter areas on the right. The y axis represents the relative amount of noise removed.
|
|
| A noise profile curve. |
You can adjust the curve manually by dragging the points on the curve to a new location. To add more points to the curve, Ctrl/Cmd+Alt+click on the curve.
If you are not happy with your changes, click Reset Profile to reset the curve to its original shape (clicking reset works as well).
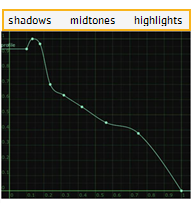
• Make sure you check Tune Profile to enable your changes. Then, adjust Low Gain, Mid Gain, and High Gain to scale the denoising threshold in the shadow, midtone, and highlight areas of the image. For example, a value of 2 multiplies the threshold by 2. Everything below the threshold is considered noise and removed, while everything above the threshold is kept.
|
|
|
|
The noise profile after |
The noise profile after |
| 6. | Back on the Denoise tab, the Tune Frequencies section lets you enable, disable, and adjust the denoising in different noise frequencies. This allows you to select the frequencies that contain noise, process them by as much as you think is best, and leave details in the other frequencies untouched. |
Normally, most of the noise occurs in the high and medium frequencies, so often you can disable the low and very low frequencies altogether. Use the Gain sliders to remove noise (by increasing the value) or to add more detail and noise (by decreasing the value).
| 7. | Under Tune Channels, you can adjust the denoising threshold for the luma and chroma channels. Increase the Luminance Gain and Chrominance Gain values to remove more noise, or decrease them to remove less. |
| 8. | Finally, if you like, you can use Chrominance Blend to blend the denoised chrominance with the image’s original chrominance. However, it is rare that this value needs editing. |