The screen color represents the color of the pure blue (or green) screen. The first thing you should do when pulling a key is pick the Screen Color.
NOTE: If you press Alt when sampling a color, Nuke always samples the source image regardless of what you’re looking at. This means that you can pick the blue screen color even if you are viewing the matte, status or composite.
Picking the Screen Color creates the screen matte used to composite the foreground over the background. It also sets the Screen Balance and despills the foreground.
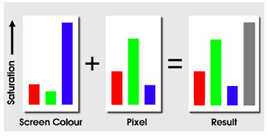
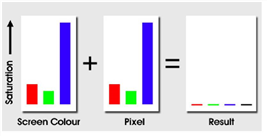
The Screen Color is a single color. It has a primary component, blue or green, and that has a saturation. Once the screen color has been picked, Keylight analyzes all the pixels in the image and compares the saturation of the primary component in each of these pixels with the corresponding saturation of the screen color. Keylight uses this comparison to do two things.
| 1. | It calculates the transparency of that pixel and puts it in the alpha channel. |
| 2. | It removes the screen color from the pixel, a process known as despilling. |
TIP: It’s worth sampling a selection of screen (blue or green) colors and viewing the result. Picking different colors gives different results.
If the saturation of the pixel in the image is as strong or greater than the screen color, then it’ll be a pixel from the blue screen background, and that pixel is set to completely transparent and black. See the figure below.
|
|
| Blue screen pixel set alpha to zero. |
If the saturation of the pixel is less than the screen color, then it’ll be the edge of the foreground object, and we subtract some of the screen color from the pixel (despilling) and set the image to semi-opaque. See the figure below.
|
|
| Edge pixel gives partial alpha. |
If the primary component in the pixel is not the same as the primary component of the screen color, we have a foreground pixel, and the alpha is set to completely opaque. The pixel color is not modified. See the figure below.
|
|
| Foreground pixel gives full alpha. |
NOTE: You should note that the ScreenColor is a single color. You are not picking lots of colors that are keyed out.
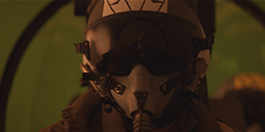
What’s biasing all about? Biasing in Keylight was originally developed for a shot in the motion picture "Executive Decision". The foreground consisted of reddish browns, but a combination of factors led to the 'green screen' being lit so that its primary component was actually slightly red.
So what happens when we pick the screen color? Well because the screen was 'red', as is the foreground, our pilot ends up being keyed out as shown below.
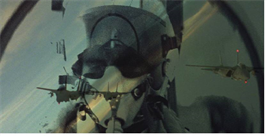
Not a great result, I’m sure you’ll agree, and much pressure was applied to the lowly programmers to get around the problem.
A work around to this is to manually color correct the image so that the background is properly green, pull the key from this corrected image, then 'un-correct' the result of that so that the foreground colors match the original. A corrected image would look something like the one shown below. The green screen is now strongly green and distinct from the foreground colors. Notice also the red cast on the pilots mask has been removed and turned into a neutral gray.

This is effectively how the Keylight developers got around the problem. They introduced the concept of a 'bias' color, which is a color cast that is removed from the source image and screen color, then a key is pulled from this modified image, then the color cast is put back. In essence, this automates the work around described above, however, it is done in a way that does not slow Keylight down at all.
For our Executive Decision shot, an appropriate color is the red cast on the pilot's mask in the source footage. Setting our bias to this now gives us the far better result as shown below.

It also turns out that the bias color is actually useful for situations without strong casts, typically where there is some color spill around the edge of keys. By setting the biases to the main color that occurs near the edge of the foreground (typically flesh tones or hair tones), you allow Keylight to better discriminate between foreground and background.
To pick a bias color, click the color swatch next to Alpha Bias to activate an eye dropper and Ctrl/Cmd+Shift+Alt+drag a box over the image foreground. The average color under the box is used for the bias you have selected.
NOTE: If you press Alt when sampling a color, Nuke always samples the source image regardless of what you’re looking at. For instance, you may be looking at the blue screen keyed over the background but you are picking colors from the Source image.
Remember that Keylight does two things, calculates a transparency and removes the screen color from the foreground. By default, one bias color, the Alpha Bias, is used for both operations. This works fine in most situations, for example, the Executive Decision shot above.
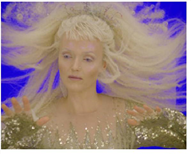
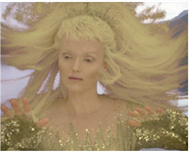
However, sometimes you can pick a bias that gives a great alpha, but performs a poor despill, and another bias that gives a great despill, but a poor alpha. Consider the blue screen from the TV series Merlin, courtesy of CFC Framestore shown below in the figure on the left.
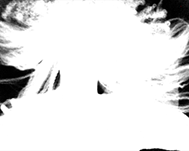
We pick the strong blue of the background without selecting an alpha bias, and end up with the lovely alpha shown on the right, but the despill resulting from this key is poor as shown below.
|
|
|
| Merlin blue screen. | Nice Alpha. |
TIP: There are several nodes in Nuke you can use for spill removal. For example, if you are using a greenscreen image, you can add an Expression node after your foreground image and set the expression field for the green channel to:
g>(r+b)/2?(r+b)/2:g
Similarly, you can despill a bluescreen image by setting the expression field for the blue channel to:
b>(r+g)/2?(r+g)/2:b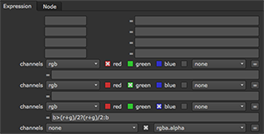
You can also use the HueCorrect node for despill. For more information, see Suppressing spill .
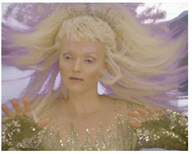
We can pick an alpha bias to get a better despill, but this destroys our nice alpha. The way around this is to turn off the Use Alpha Bias for Despill, which gives you a separate bias factor to use solely for despill calculations. If you then pick the Despill Bias to be something from Miranda Richardson's hair or skin tone, you keep the nice alpha, and get a good despill as well (see the figure on the right).
|
|
|
| Poor despill. | Final key, using separate Despill and Alpha Biases. |