Whether you want to use the Precomp node to speed up rendering or to enable a collaborative workflow, the process of creating the Precomp is the same.
| 1. | Select the nodes you want to include in the separate precomp script. If you select a Group node, the nodes nested inside it are copied into the precomp script. |
| 2. | Select Other > Precomp (or press Ctrl/Cmd+Shift+P on the Node Graph). |
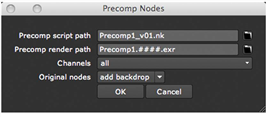
The Precomp Nodes dialog opens.
NOTE: If you don't select any nodes when you create a Precomp node, the Precomp Nodes dialog is not displayed and the node is left blank. Using the file parameter in the Precomp controls, you can then browse to an existing script to load into the Precomp node.
If you have several Write nodes in the existing script and want to control which of them is used for the output of the Precomp node, you can select Other > Output to insert an Output node after the Write node you want to use.
If the Precomp node cannot find an Output node in the script, it looks for a Write node and sets Output node in the Precomp controls to the name of that node. The Output node field can also be used later to override what is set as the Output node in the precomped script. To do so, make sure you check enable. This check box allows you to toggle between the output node chosen by default and the output node you specified in the Output node field.
| 3. | Click the file browser icon next to Precomp script path, and browse to the directory where you want to save the precomp .nk script. After the directory path, enter a name for the precomp script, for example Precomp1_v01.nk. By default, the precomp script is saved next to the main script. If the main script has not been saved, the precomp script is saved in the current directory. next to Precomp script path, and browse to the directory where you want to save the precomp .nk script. After the directory path, enter a name for the precomp script, for example Precomp1_v01.nk. By default, the precomp script is saved next to the main script. If the main script has not been saved, the precomp script is saved in the current directory. |
| 4. | Click the file browser icon next to Precomp render path, and browse to the directory where you want to save the rendered output of the precomped nodes. After the directory path, enter a name for the rendered image, for example Precomp1_####.exr. If you like, you can also use version numbers in the name, for example Precomp1_v01_####.exr. |
WARNING: We recommend rendering the image as an .exr because that way Nuke can write the hash value of the incoming node tree into the rendered file. If the precomp script changes so that the hashes won’t match, Nuke can then notify you, and you can update the resulting image. If you use a file format other than .exr, you do not get this notification and the rendered file is likely to become out of date.
For more information on hash values, see Creating Precomp Nodes.
| 5. | From the Channels dropdown menu, select the channels you want to include in the rendered output of the precomped nodes. |
If you later need to adjust this selection, you can do so by setting the channels on the appropriate Write node (by default, Write1) in the precomp .nk script.
| 6. | From the Original nodes dropdown menu, select: |
• add backdrop to create a backdrop behind the precomped nodes in the Node Graph.
• delete to delete the precomped nodes.
• no change to do nothing to the precomped nodes.
| 7. | Click OK. |
Nuke saves the selected nodes in the .nk script specified. This script also includes input and output nodes, a Write node, and the current project settings.
In the Node Graph, the selected nodes are replaced with the Precomp node. Nuke opens the properties of the Precomp node.
The hash value is a unique number (for example, b1c9c0aff2012a8) calculated from a node and the entire tree of nodes connected to its input. The class of the node and all the current control settings contribute to the hash value.
You can display the hash value at any point in the node tree by selecting a node in the Node Graph and pressing I. The hash can be different at different points in the tree.
When you create a Precomp node, the precomp .nk script gets its project settings from the main script. The main script’s project settings are also used whenever the precomp script is loaded into the main script. Therefore, if you open the precomp script in a separate instance of Nuke and change its project settings so that they no longer match the main script’s settings, your changes do NOT have an effect when the precomp script is loaded into the main script. If you want to change the project settings, you should always do so in the main script rather than the precomp script.