Before you can track a plane, you need to either draw one using the Roto node or connect an alpha to the mask input.
When selecting a plane in your footage, it’s good to keep in mind that it needs to be a fairly rigid surface with preferably no deformation during the footage. For instance, a wall or a flat side of an object are good planes, but you can also get good results tracking faces or people. It’s also important that the plane you’re tracking has some texture and that the plane isn’t completely obscured at any point of the tracking. Tracking surfaces without texture and few features to track is likely to fail.
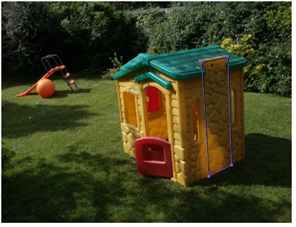
| 1. | Using the pre-created Roto node, draw a Bezier shape around the plane you want to track. The shape is automatically created in the alpha channel and added to a layer called PlanarTrackLayer1 in the stroke/shape list, so you don’t have to worry about setting anything up, just go ahead and start drawing. |
| 2. | Your new shape’s boundaries appear purple in the Viewer, and a Bezier shape item appears in the stroke/shape list. In the PT column, you can toggle the purple rectangle according to whether you want the shape to affect the track (rectangle visible) in your planar tracking results or not (rectangle invisible). |
| 3. | If you’re drawing more than one shape, you can arrange them in the stroke/shape list to tell PlanarTracker that they are different layers. Order your shapes from closest to camera (top of the list) to furthest away (bottom of the list), and PlanarTracker automatically holds out any track layers above the current one. |
| 4. | Make sure you’re still on the same frame as you used to draw the Bezier shape. You’re now ready to track your footage. Proceed to Tracking the Footage. |
NOTE: When you select a frame to draw a roto shape on, that frame becomes your reference frame. When you proceed with tracking your plane it’s important that you’re always starting in the same reference frame. Move to your reference frame using the Go to Reference Frame button ![]() . In the course of the process you may decide to change your reference frame. You can do this by clicking Set Reference Frame
. In the course of the process you may decide to change your reference frame. You can do this by clicking Set Reference Frame ![]() in the Viewer.
in the Viewer.
TIP: If you’ve drawn shapes in a Roto node and later decide you want to planar track these, you can do that easily by right-clicking on the shape in the shape list and selecting planar-track. This creates a new planar tracking layer for the shape and attaches the shape to it.
|
|
| Roto shape ready for planar tracking. |
In addition to the shape in Roto, you can also use another mask or an alpha from another source. This is useful for instance if you have the results of a chroma keying that you want to use with your primary mask.
| 1. | If you want to use an external mask, connect it to the mask input. |
| 2. | In the Mask dropdown, select: |
• Source Alpha - use the alpha channel of the source footage to define the plane to track.
• Source Inverted Alpha - use the inverted alpha channel of the source footage to define the plane to track.
• Mask Luminance - use the luminance of the mask input to define the plane to track.
• Mask Inverted Luminance - use the inverted luminance of the mask input to define the plane to track.
• Mask Alpha - use the mask input alpha channel to define the plane to track.
• Mask Inverted Alpha - use the inverted mask input alpha channel to define the plane to track.
You can now proceed to track the plane you’ve drawn. The tracking controls in PlanarTracker are very similar to those in the Tracker node.
| 1. | In the dropdown below the tracking buttons, and in the Viewer, specify you can tell PlanarTracker what type of camera movement to expect. Select: |
• Translation - to expect a translating camera.
• T + Scale - to expect the camera to both translate and scale.
• S + Rotation - to expect a rotating and scaling camera.
• TS + Rotation - to expect a translating, scaling, and rotating camera.
• TSR + Shear - to expect the camera to translate, scale, rotate and shear, or move as if cutting through the scene.
• Perspective - to expect the camera to change perspective freely.
| 2. | Use the Tracking buttons to track backwards or forwards throughout the whole footage, or if you want, select a specified frame range. You can also track on a frame by frame basis. For example, if the plane you’re tracking is visible throughout the footage, forward tracking might be all you need. If the plane is only partially visible over a part of the footage though, it might be a good idea to first track the part with the whole plane visible, and then track the rest of the footage separately. |
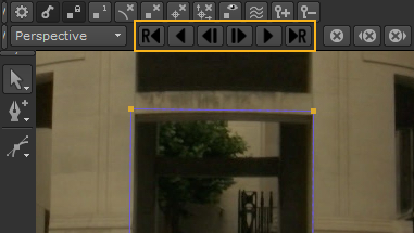
With the Tracking controls you can track and re-track your footage. You can find the same buttons in the PlanarTracker toolbar above the Viewer. For more information on using the tracking controls, have a look at Tracking and Stabilizing .
| 3. | You can clear tracking information that you’ve already created with the clear buttons: |
• clear all - clear all tracking information created by PlanarTracker.
• clear bkwd - clear all tracking information backwards from the current frame.
• clear fwd - clear all tracking information forwards from the current frame.
| 4. | After PlanarTracker has tracked your footage, you can review your results by scrubbing back and forth on the timeline. You can also click the Display Tracks button |
| 5. | You might find that your roto shape drifts in the course of the tracking. In this case you can adjust its shape points in the Viewer to fix it. Checking the center viewer box |
| 6. | If you want to further adjust your tracking results, or add smoothness to your planar surface, move on to Adjusting Tracking Results . |