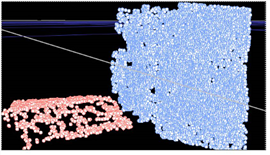
Point clouds can be awkward to interpret, especially if the Point Separation control is set to a relatively high value. Grouping points in the cloud can help to visualize the scene, particularly when sensibly labeled and colored in the Viewer.
Groups can also be baked out as separate point clouds or converted into meshes. See Creating a Mesh from a Point Cloud for more information.
To create a group from a point cloud:
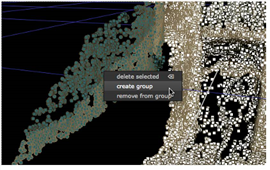
| 1. | Manually select group points in the 3D Viewer by: |
• Dragging a marquee over the required points in the Viewer, or
• Holding Shift, and dragging a marquee over several selection areas in the Viewer to select all points at once.
NOTE: You can remove points from a selection by holding Shift+Alt and re-selecting highlighted points.
| 2. | Right-click on a highlighted point and select create group. |
The new group is added to the Groups tab.
NOTE: If groups already exist, the option to add the selected points to a group is enabled.
| 3. | Add more groups as required to build up the visualization of the scene. |
| 4. | In the properties panel, select the Groups tab to display the list of existing groups. Use the Groups controls to determine the appearance of your groups: |
• Display groups in overlay - when enabled, groups are highlighted in the Viewer using their associated RGB color.
• Create Group - click to add the selected points in the Viewer to a new group.
• Delete Selected Groups - click to delete all the selected groups in the list.
| 5. | Double-click the table columns to edit group names or colors, and toggle visibility. |
| 6. | Enable Output visible groups only to display only selected groups in the Viewer. |
| 7. | After creating the required groups, you can split them off into individual point clouds, using Bake Selected Groups, or create group meshes. |
| 8. | Proceed to Creating a Mesh from a Point Cloud |