The OFlow node generates high-quality retiming operations analyzing the movement of all pixels in the frames and then rendering new “in-between” images based on that analysis. This node can also add motion blur or enhance the existing motion blur in the image.
TIP: We recommend using the Kronos node instead, particularly if you’d like to have the node run on the graphics processing unit (GPU) rather than the central processing unit (CPU). For more information, see Kronos.
| 1. | Select the node for the clip that you want to retime. |
| 2. | Select Time > OFlow from the toolbar. |
| 3. | Set the speed of the output clip. A value of 0.5 slows the movement down. |
That’s pretty much it.
If you prefer you can map input to output frames to retime the clip. For example, if you wanted to halve the speed of a 50 frame clip using this method, switch Timing to Source Frame. On frame 1, set a key for the Frame value to be 1. On frame 50, set a key for the Frame value to be 25.
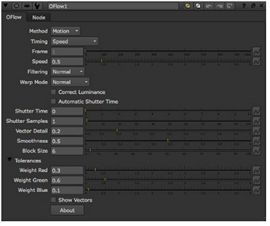
The following table describes the different parameters in the OFlow node’s controls.
|
OFlow Parameter |
Function |
|
Method |
Sets the interpolation algorithm. • Frame - the nearest original frame is displayed. • Blend - a mix between two frames is used for the in-between frame. This is quick to render and is useful when tweaking the timing on a curve before setting the method to motion. • Motion - vector interpolation is used to calculate the in-between frame. |
|
Timing |
Sets how to control the new timing of the clip. • Speed - select this if you wish to describe the retiming in terms of “double speed” or “half speed”. • Source Frame - select this if you wish to describe the retiming in terms of “at frame 100 in the output clip I want to see frame 50 of the source clip”. You’ll need to set at least 2 key frames for this method to work. |
|
Frame |
This parameter is active only if Timing is set to Frame. Use this to specify the source frame at the current frame in the time bar. For example, to slow down a 50 frame clip by half set the Frame to 1 at frame 1 and the Frame to 50 at frame 100. The resulting animation curve results in a half-speed retime. |
|
Speed |
This parameter is only active if Timing is set to Speed. Values below 1 slow down the clip. Values above 1 speed up movement. For example, to slow down the clip by a factor of 2 (half speed) set this value to 0.5. Quarter speed would be 0.25. |
|
Filtering |
Sets the quality of the filtering when producing in-between frames. • Normal - uses bilinear interpolation which gives good results and is a lot quicker than extreme. • Extreme - uses a sinc interpolation filter to give a sharper picture but takes a lot longer to render. |
|
Warp Mode |
Sets how to control the new timing of the clip. • Simple - this is the quickest option, but may produce poor results around moving objects and image edges. • Normal - this is the default option with better treatment of moving objects and image edges. • Occlusions - this is the advanced option which attempts to reduce the level of background dragging that occurs between foreground and background objects. |
|
Correct Luminance |
Local motion estimation is highly dependent upon the idea that the brightness of objects doesn’t vary through a sequence. Where brightness varies rapidly - for example a highlight moving across the bodywork of a car - the motion calculation performs poorly. The luminance of a shot can come from other sources too - such as an overall flicker problem. In these cases where there is a global luminance shift, toggling this control on allows the local motion estimation algorithm to take account of overall brightness changes between frames. |
|
Automatic Shutter Time |
Calculates the shutter time throughout the sequence automatically. |
|
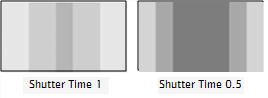
Shutter Time |
Sets the equivalent Shutter Time of the retimed sequence. A shutter time of 1 is equivalent to averaging over plus and minus half an input frame which is equivalent to a shutter angle of 360 degrees. A shutter time of 0.5 is equivalent to a shutter angle of 180 degrees. Imagine a gray rectangle moving left to right horizontally across the screen. The figures below show how Shutter Time affects the retimed rectangle.
|
|
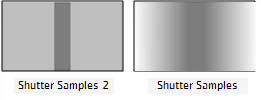
Shutter Samples |
Sets the number of in-between images used to create an output image during the shutter time. Increase this value for smoother motion blur, but note that it takes much longer to render.
|
|
Vector Detail |
Adjust this to vary the resolution of the vector field. Large vector fields take longer to process, but contain more detail and may help to isolate smaller motion in the scene. A value of 1 generates a vector for every pixel. A value of 0.5 generates a vector at every other pixel. For some sequences, a high vector detail near 1.0 generates too much unwanted local motion detail and often a low value gives a better result. |
|
Smoothness |
Vector fields usually have two important qualities: they should accurately match similar pixels in one image to another and they should be smooth rather than noisy. Often it is necessary to trade one of these qualities off against the other. A high smoothness misses lots of local detail, but is less likely to provide you with the odd spurious vector. A low smoothness concentrates on detail matching, even if the resulting field is jagged. The default value of 0.5 should work well for most sequences. |
|
Block Size |
The vector generation algorithm subdivides the image into small blocks, and separately tracks them. blockSize defines the width and height of these subdivisions. Smaller values produce noisy data, whereas larger values may produce data that is lacking in detail. This value should rarely need editing; some sequences may benefit from using large block sizes to help the algorithm track regions better where the algorithm isn’t “locking on” to the overall motion in the sequence. |
|
Tolerances |
For efficiency, much of the local motion estimation is done on luminance only - i.e. using monochrome images. The tolerances parameters allow you to tune the weight of each color channel when calculating the image luminance. These parameters rarely need tuning. However, you may, for example, wish to increase the red weighting Weight Red to allow the algorithm to concentrate on getting the motion of a primarily red object correct, at the cost of the rest of the items in a shot. |
|
Weight Red |
The red weighting used when calculating the vector field. |
|
Weight Green |
The green weighting used when calculating the vector field. |
|
Weight Blue |
The blue weighting used when calculating the vector field. |
|
Show Vectors |
Switch this on to draw the motion vectors over the image. |
|
About |
Shows the version number of this node. |
TIP: Some Nuke users may remember nodes called OpticalFlow and OptiFlow. OFlow replaces these nodes. It can be used for retiming and adding motion blur, but it does not have the capability to output motion vectors. To output motion vectors, you could use VectorGenerator (included in NukeX).
For retiming and motionblur, we recommend using the Kronos node instead of OFlow, particularly if you’d like to have the node run on the graphics processing unit (GPU) rather than the central processing unit (CPU). For more information, see Kronos.