Open topic with navigation
Applying Tracking Data Using Tracker’s Controls
The simplest way to apply tracking data to the input image or other nodes is to use the controls of the Tracker node itself. Here, we look at using these controls to stabilize, match-move, and remove or apply jitter.
Stabilizing Elements
The Tracker node’s controls let you remove motion, such as unwanted camera shake, from the node’s input clip. You can use a single track to stabilize horizontal and vertical motion across the 2D plane, or two or more tracks to eliminate rotation and scale.
|
1.
|
Create the track(s) you want to use for stabilizing the footage: |
• If you’re using a single track, ensure T is selected in the Tracks list, so that Tracker only calculates translation.
On the Transform tab, select transform > stabilize 1-pt to lock the Filter to Keys. This filter produces the best results when using a single track.
• If you’re using more than one track in the Tracks list, select the transformations that you want Tracker to calculate when stabilizing the image, Translation, Rotation, and/or Scale.
On the Transform tab, select transform > stabilize.
|
2.
|
Set the reference frame if you don’t want to use the first frame as the transform control frame. |
|
3.
|
Use the smooth controls to average frames together to smooth the transforms applied. |
For example, if you’re stabilizing using more than one track, you might average frames together for translation and rotation by entering the number of frames in the t and r fields.
Nuke stabilizes the footage, locking its elements to the same position within the composite.
NOTE: You can export the transform information to a linked or baked Transform node by selecting the required type from the Export dropdown and clicking create.
Match-moving Elements
You can use the Tracker node’s controls to apply the tracked motion to another image, that is, to match-move an image.
|
1.
|
Use a Tracker node to track the feature you intend to match. |
|
2.
|
Copy the Tracker node and paste it after the footage you want to match-move. |
|
3.
|
In the second Tracker node’s controls, go to the Transform tab. |
|
4.
|
From the transform dropdown menu, select match-move. |
|
5.
|
Set the reference frame if you don’t want to use the first frame as the transform control frame. |
|
6.
|
Use the smooth controls to average frames together to smooth the transforms applied. |
For example, if you’re using more than one track, you might average frames together for translation and rotation by entering the number of frames in the t and r fields.
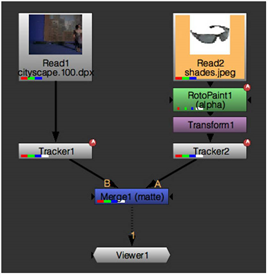
Nuke applies the tracked movement to the footage you want to match-move. A simple script might appear as follows, where Tracker2 is a copy of Tracker1:
|
|
| A simple match-move script. |
NOTE: You can export the transform information to a linked or baked Transform node by selecting the required type from the Export dropdown and clicking create.
Removing or Adding Jitter
Tracker can be used to remove high frequency jitter from a sequence, exaggerate existing jitter, or add jitter to another sequence for a consistent look.
To remove jitter:
|
1.
|
Create the tracks you want to use for jitter removal. |
|
2.
|
In the Tracker node’s controls, go to the Transform tab. |
|
3.
|
From the transform dropdown menu, select remove jitter. |
|
4.
|
Set the reference frame if you don’t want to use the first frame as the transform control frame. |
|
5.
|
Use the jitter period to average together frames, adjusting the jitter to achieve the required stability. |
|
6.
|
Use the smooth controls to average frames together to smooth the transforms applied. |
For example, if you’re removing jitter using more than one track, you might average frames together for translation and rotation by entering the number of frames in the t and r fields.
|
8.
|
Nuke removes jitter from the footage, locking its elements to the same position within the composite. |
To exaggerate or add jitter:
|
1.
|
Create the tracks you want to use for the required jitter operation. |
|
2.
|
In the Tracker node’s controls, go to the Transform tab. |
|
3.
|
From the transform dropdown menu, select add jitter. |
|
4.
|
Set the reference frame if you don’t want to use the first frame as the transform control frame. |
|
5.
|
Use the jitter period to average together frames, adjusting the jitter to achieve the required instability. |
|
6.
|
Use the smooth controls to average frames together to smooth the transforms applied. |
For example, if you’re adding jitter using more than one track, you might average frames together for translation and rotation by entering the number of frames in the t and r fields.
Nuke exaggerates the tracked jitter in the footage.
NOTE: If you want to transfer jitter to another sequence, copy the Tracker node and paste it after the footage to which you want to add jitter, then follow steps 3-7 above.