tracking.
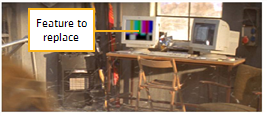
The CornerPin2D node is designed to map the four corners of an image sequence to positions derived from tracking data. In practice, this node lets you replace any four-cornered feature with another image sequence. For example, suppose you needed to replace the monitor image in the fast-panning shot shown below.
|
|
| Fast-panning shot requires four-corner tracking. |
First, use the Tracker to calculate four separate tracks, one for each corner of the feature.
|
|
| Generating the four tracks. |
Next, attach a CornerPin2D node to the image sequence you want to use as the replacement for the feature, and apply the tracking data. This remaps the image sequence’s corners to the correct positions over time. You can create the node manually, or by using Tracker’s Export dropdown.
The final step is to layer the result over the original element.
|
|
| The composited image. |
The steps below summarize the use of Tracker’s Export CornerPin2D workflow.
| 1. | Generate four tracks, one per corner, on the feature requiring replacement. |
| 2. | Use the current frame or reference frame field to specify the frame to use as the starting point. You can also decide whether the CornerPin2D node is expression linked or baked using the Export dropdown: |
• CornerPin2D (use current frame)
• CornerPin2D (use transform ref frame)
• CornerPin2D (use current frame, baked)
• CornerPin2D (use transform ref frame, baked)
| 3. | Click create to add the CornerPin2D node to the script. |
| 4. | Attach the image or sequence to replace the feature tracked to the input of the CornerPin2D node. |
| 5. | If necessary, select a different filtering algorithm from the filter dropdown menu. See Choosing a Filtering Algorithm for more information. |
| 6. | When filtering with Keys, Simon, or Rifmen filters, you may see a haloing effect caused by the pixel sharpening these filters employ. If necessary, check clamp to correct this problem. |
| 7. | In most cases, you will keep black outside checked. This renders black pixels outside the image boundary, making it easier to layer the element over another. (If you uncheck this parameter, the outside area is filled with the outermost pixels of the image sequence.) |
| 8. | The final step is to layer the result over the original element. |
A simple script might appear as follows:
![]()