Making Hue, Saturation, and Value Adjustments
For certain color correction tasks like spill suppression, you ideally want to influence only a very narrow range of color values. For such tasks, it’s often helpful to use effects that employ the Hue, Saturation, and Value (HSV) color model. As its name indicates, the HSV color model breaks color into three components:
• Hue, which refers to the color’s location on the traditional color wheel.
• Saturation, which refers to the extent to which the color has “soaked up” its hue.
• Value, which refers to the brightness of the color.
|
|
|
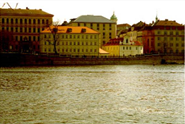
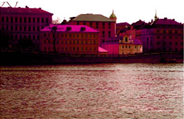
| Original. | Hue shift. |
|
|
|
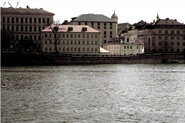
| Original. | Saturation decrease. |
|
|
|
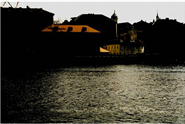
| Original. | Value decrease. |
Nuke offers effects that allow you to correct the hue, saturation, and value components individually or collectively.
Correcting HSV
Nuke’s HSVTool node lets you simultaneously adjust hue, saturation, and value components from a single properties panel. It also features a color replacement tool. The main strength of this node is the precision it offers in limiting corrections to a narrow swath of colors.
|
|
|
| Adjusting color within a specific range of pixel values. |
Adjusting color within a specific range of pixel values. |
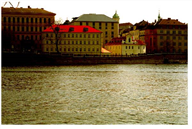
For example, suppose you wanted to add a bit more punch to the waterfront scene by diversifying the rooftop hues. To do so, you could limit the correction to the rooftop’s ochre-colored hues by sampling a few pixels, then shift their values. Because you limited the color range, the surrounding image would be generally unaffected by the shift.
To make HSV corrections with the HSVTool node
| 1. | Click Color > HSVTool to insert an HSVTool node at the appropriate place in your script. |
| 2. | Connect a Viewer to the output of the HSVTool node so you can see the effect of your changes. |
| 3. | Limit, as appropriate, the range of colors you want subsequent corrections to influence: |
• In the HSVTool properties panel, click the srccolor color swatch. Ctrl/Cmd+click on the Viewer to sample a single color displayed, or Ctrl/Cmd+Shift+drag to sample a range of colors. To sample a single color from the node’s input while viewing its output, Ctrl/Cmd+Alt+click on the Viewer. To sample a region from the input, Ctrl/Cmd+Alt+Shift+drag on the Viewer.
Tip: You can discard sampled pixels by Ctrl/Cmd+right-clicking in the Viewer.
• The Range sliders on Hue, Saturation, and Brightness clamp to the sampled range.
• For any color component, drag on the Range sliders to expand the color range as necessary.
• For any color component, drag on the Range Rolloff slider to fine tune the color range. Doing so, adjusts the amount of falloff allowed past the limits defined by the Range sliders.
| 4. | Make the necessary HSV corrections: |
• For hue corrections, drag on the Rotation slider to input color wheel value between 0 and 360.
• For saturation corrections, drag on the Saturation Adjustment slider to input values between -1 (completely desaturated to some shade of gray) and 1 (completely saturated).
• For value corrections, drag on the Brightness Adjustment slider to input values between -1 (black) and 1 (white).
You can also make color replacements using the srccolor and dstcolor parameters: First sample the color you wish to replace with the srccolor color swath, then sample the color which you wish to use as the replacement with the dstcolor color swath. The color in dstcolor replaces the color in srccolor throughout the image.
Also, keep in mind that the HSVTool node makes an excellent keyer. You can use its Hue, Saturation, and Brightness range sliders to precisely select a range of colors, then use the channel output dropdown at the bottom of the dialog to output this selection as a matte channel. This dropdown lets you specify which color components (hue, saturation, value, etc.) are added to the matte.
Correcting Hue Only
Nuke’s HueCorrect node lets you make precision adjustments to the levels of saturation in a range of hues. You do so via edits to a series of suppression curves.
|
|
| Editing the suppression curve. |
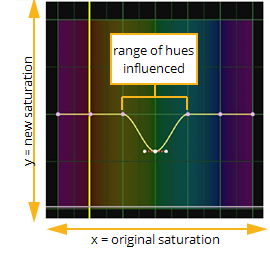
By selecting which curve you edit and how much of that curve you alter, you can precisely limit the influence of the effect.
Suppressing spill
For the compositor, HueCorrect is obviously of greatest use in diminishing green, blue, or redscreen spill.
To suppress spill with the HueCorrect node:
| 1. | Click Color > HueCorrect to insert a node at the appropriate place in your script. |
| 2. | Connect a Viewer to the output of the HueCorrect node so you can see the effect of your changes. |
| 3. | In the HueCorrect properties panel, select the channels you want to influence: |
• Click sat to influence all channels (red, green, blue, and alpha) equally.
• Click lum to influence all channels, but with luminance weighting in effect (meaning that the red channel receives approximately 30% of the effect; the green, 60%; and the blue, 10%).
• Click red to apply the curve as a lookup on the red channel only, looking up the pixel's hue on the curve and then multiplying the red value in the pixel by the lookup result.
• Click green to apply the curve as a lookup on the green channel only, looking up the pixel's hue on the curve and then multiplying the green value in the pixel by the lookup result.
• Click blue to apply the curve as a lookup on the blue channel only, looking up the pixel's hue on the curve and then multiplying the blue value in the pixel by the lookup result.
• Click r_sup to apply a suppression function to reduce the level of the red channel. While the red curve is used to directly multiply the red channel by the curve value, the r_sup curve is used to control the amount that the red channel is suppressed.
• Click g_sup to apply a suppression function to reduce the level of the green channel. While the green curve is used to directly multiply the green channel by the curve value, the g_sup curve is used to control the amount that the green channel is suppressed.
• Click b_sup apply a suppression function to reduce the level of the blue channel. While the blue curve is used to directly multiply the blue channel by the curve value, the b_sup curve is used to control the amount that the blue channel is suppressed.
Note that you can select multiple curves in order to edit one curve with reference to another.
| 4. | If necessary, drag the cursor over the Viewer to sample the image pixels that are representative of the part of the image you want to correct. Then, in the HueCorrect properties panel, press Ctrl+Alt (Cmd+Alt on a Mac) while clicking on the curve to plot a particular pixel’s value on the curve. This lets you see what portion of the curve you want to edit. |
| 5. | Edit the curve as necessary - typically this means dragging down on control points in the hue region that you wish to suppress. |
| 6. | To control how much of the original luminance is preserved after the color correction, enable and adjust mix luminance. A value of 0 means the altered luminance is used in the output image. A value of 1 produces a luminance value close to that of the original input image. |
|
|
Original image. |
|
|
| Mix luminance set to 0. | Mix luminance set to 1. |
Note: When mix luminance is set to 1, the resulting luminance value is close to the original luminance, but not exactly the same. The difference may vary depending on the color corrections applied to the source image.
Correcting Saturation Only
For the times when you just want to correct the saturation component and don’t require limiting the correction to any particular channel, you can use Nuke’s Saturation node. Its controls are bare bones - basically, just a saturation slider.
To make saturation corrections with the Saturation node
| 1. | Click Color > Saturation to insert a Saturation node at the appropriate place in your script. |
| 2. | Connect a Viewer to the output of the Saturation node so you can see the effect of your changes. |
| 3. | Drag the saturation slider to make the necessary corrections. |