Adjusting the Bounding Box
The bounding box defines the area of the frame that Nuke sees as having valid image data. The larger the bounding box is, the longer it takes Nuke to process and render the image. To minimize processing and rendering times, you can crop the bounding box. Occasionally, the bounding box may also be too small, in which case you need to expand it.
Note: Other Nuke functions, such as Transforms and Merges, can also affect the size of the bounding box, see Transforming in 2D and Merging Images for more information.
Resizing the Bounding Box
To adjust the bounding box, you can use the AdjBBox and CopyBBox nodes. The AdjBBox node crops and expands the bounding box edges, whereas with the CopyBBox node you can copy a bounding box from one input to another. If needed, you can also add a black outside edge to the bounding box using the BlackOutside node.
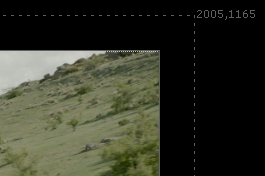
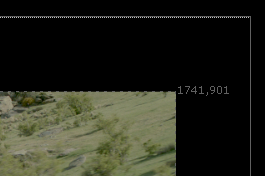
The AdjBBox node expands or crops the edges of the bounding box by a specified number of pixels.
|
|
| An expanded bounding box. | A cropped bounding box. |
Tip: You can enable a warning to indicate when the bounding box is greater that the format in Nuke's Preferences. See Bounding Box Warnings for more information.
For example, if you have an image with lots of black (0,0,0,0), you can adjust the bounding box to contain just the useful area so that Nuke won’t waste time computing results where there is no change.
| 1. | Select Transform > AdjustBBox to insert an AdjBBox node after the image whose bounding box you want to resize. |
| 2. | Connect a Viewer to the AdjBBox node, so you can see the effect of your changes. |
| 3. | In the AdjBBox controls, adjust the Add Pixels slider to increase or decrease the size of the bounding box. By default, 25 pixels are added to the edges of the bounding box. |
Nuke expands or crops the edges of the bounding box. If the bounding box is cropped, whatever is outside the bounding box area is replicated towards the edges of the image.
Copying a Bounding Box from One Input to Another
Some Nuke operations, such as a merge, can cause an expansion of the bounding box area because Nuke does not know that the extra area is going to be black or another constant color. Often, you can fix this by copying the bounding box from one of the inputs to the resulting image, thus cutting off this extra area. For this, you can use the CopyBBox node.
| 1. | Select Merge > CopyBBox to insert a CopyBBox node after the node whose bounding box you want to use. |
| 2. | Connect the image whose bounding box you want to copy to the CopyBBox node’s input A, and the image onto which you want to copy the bounding box to input B. |
Nuke copies the bounding box from input A to input B. Whatever is outside the copied bounding box area in image B gets replicated towards the edges of the image.

Adding a Black Outside Edge to the Bounding Box
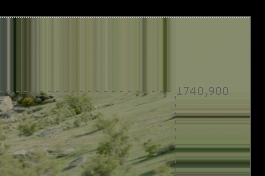
If you adjust a bounding box with the AdjBBox or CopyBBox node, you may notice that whatever is outside the bounding box area gets replicated towards the edges of the image. If necessary, you can remove these replicated edge pixels and fill everything outside the bounding box area with black. To do this, use the BlackOutside node.
|
|
|
| A cropped bbox with replicated edges. | The effect of the BlackOutside node. |
| 1. | Select the image whose edges outside the bounding box you want to fill with black. |
| 2. | Select Transform > BlackOutside to add a BlackOutside node in an appropriate place in your script. |
Nuke fills everything outside the bounding box area with black.
Bounding Box Warnings
Zooming into the Viewer to work on a shot means that you can't always see the extent of the bounding box in relation to the format, which can result in unnecessary processing.
To make it easier to see the state of your bounding box, Nuke can display visual warnings on the nodes that affect the bounding box.
Warning: If you enable the Bounding Box Warning, Nuke performs extra processing steps to identify problematic nodes, which may result in performance degradation.
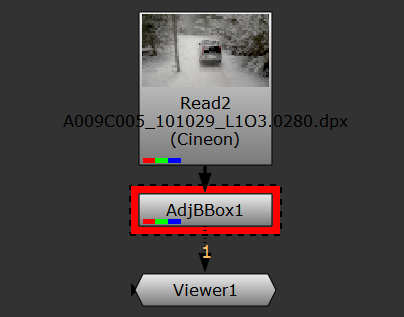
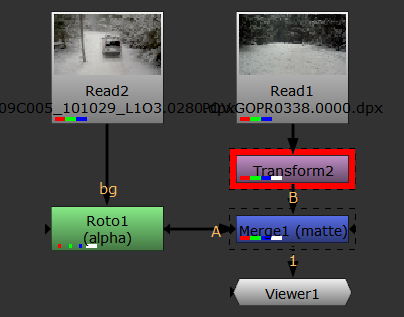
To enable the warnings, in Nuke's Preferences under Panels > Node Graph, enable Bounding Box Warning:
• red rectangle with dotted stroke - the indicated node creates a bounding box greater than the format.
• dotted stroke without the red rectangle - the bounding box size is greater than the format at the indicated node, but the bounding box size has been set by an upstream node.
The bbox warning threshold controls how far past the edge of the format the bounding box can expand before the warning is displayed in the Node Graph. For example, if you're working with UHD_4K footage and the default 10% threshold, you can expand the bounding box horizontally by 384 pixels before the warning is displayed.
Tip: You can set the color of the warning rectangle in the Preferences under Panels > Node Graph > Bounding Box Warning.