Transforming in 2D
This section describes how to apply 2D transformations including translations, rotations, scales, and skews to elements using a number of Nuke nodes. All transforms, except translations, change the size of the image bounding box.
Tip: You can enable a warning to indicate when the bounding box is greater that the format in Nuke's Preferences. See Bounding Box Warnings for more information.
Using the 2D Transformation Overlay
Several of the nodes discussed in this section display a Viewer overlay for executing spatial transformations. This overlay is often a faster alternative to the properties panel. The figure below shows you how to use Nuke 2D transformation overlay.
|
|
| Transformation overlay. |
• A) Drag to skew the frame (see Skewing Elements).
• B) Drag to scale the frame uniformly - simultaneously on x and y (see Scaling Elements).
• C) Drag to translate the frame (seeTranslating Elements).
Shift+drag to constrain the translation to x or y.
Ctrl/Cmd+drag to reposition the pivot point (the point that acts as the center to transformation operations).
• D) Drag to scale the frame on x.
• E) Drag to rotate the frame around the pivot point (see Rotating Elements). The transform overlay snaps to typical values. To prevent the snapping, press Shift while dragging.
• F) Drag to scale the frame on y.
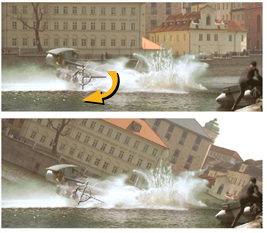
Translating Elements
To translate an element is to slide it on x or y.
![]()
You can use the Transform, TransformMasked, or Position nodes to translate elements.
Using the Transform Node
The Transform and TransformMasked nodes let you not only translate elements, but also rotate, scale, and skew them from a single properties panel.
TransformMasked is identical to Transform except that it offers controls for assigning a mask to protect certain areas of the frame from translations. For the sake of brevity, this chapter only discusses the use of Transform, but keep in mind you can use TransformMasked any time you need to process a transformation through a mask. The mask controls work in the same fashion as those described in Masking Color Corrections.
To translate an element using the Transform node:
| 1. | Click Transform > Transform to insert a Transform node at the appropriate place in your script. |
| 2. | Connect a Viewer to the output of the Transform node so you can see the effect of your changes. |
| 3. | In the Transform properties panel, increment or decrement the translate x and y fields to slide the element along either axis. |
Or drag on the center of the transformation overlay.
Using the Position Node
The Position node gives you just bare-bones parameters for translating an element.
To translate an element using the Position node:
| 1. | Click Transform > Position to insert a Position node at the appropriate place in your script. |
| 2. | Connect a Viewer to the output of the Position node so you can see the effect of your changes. |
| 3. | In the Position properties panel, increment or decrement the translate x and y fields to slide the element along either axis. |
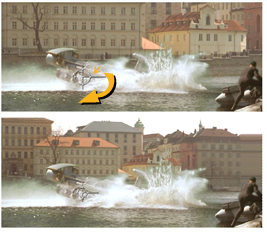
Rotating Elements
To rotate an element is to spin it around the pivot point.
To rotate an element using the Transform node
| 1. | Click Transform > Transform to insert a Transform node at the appropriate place in your script. |
| 2. | Connect a Viewer to the output of the Transform node so you can see the effect of your changes. |
| 3. | In the Transform properties panel, select the appropriate filtering algorithm from the filter dropdown menu (see Choosing a Filtering Algorithm). |
| 4. | Position the pivot point as necessary: |
• Increment or decrement the center x and y fields to move the axis in either direction.
• Or press Ctrl (Cmd on a Mac) while dragging on the center of the transformation overlay.
| 5. | Increment or decrement the rotate field. |
Or drag on the horizontal bar of the transformation overlay.
Scaling Elements
To scale an element is to resize it by adding (upsampling) or removing (downsampling) pixels.
Nuke offers several nodes for scaling elements. Transform is designed primarily for scaling the background plate up or down in a composite. The scaling functions for transform are described below.
Reformat is designed for writing out elements with specific resolutions and pixel aspect ratios. Adding Motion Blur describes the use of this node.
To scale an element using the Transform node
| 1. | Click Transform > Transform to insert a Transform node at the appropriate place in your script. |
| 2. | Connect a Viewer to the output of the Transform node so you can see the effect of your changes. |
| 3. | In the Transform properties panel, select the appropriate filtering algorithm from the filter dropdown menu (see Choosing a Filtering Algorithm). |
| 4. | Position the pivot point as necessary: |
• Increment or decrement the center x and y fields to move the axis in either direction.
• Or press Ctrl (Cmd on a Mac) while dragging on the center of the transformation overlay.
| 5. | To scale the frame uniformly (on both x and y): |
• Increment or decrement the Transform node’s scale field.
• Or drag the circle-portion of the transformation overlay.
| 6. | To scale the frame asymmetrically (on x or y): |
• Click scale parameter’s channel chooser ![]() to reveal the x and y fields, then increment or decrement each individually.
to reveal the x and y fields, then increment or decrement each individually.
• Or drag any of the four points on the circle-portion of the transformation overlay. The top and bottom points scale on y; the left and right points, on x.
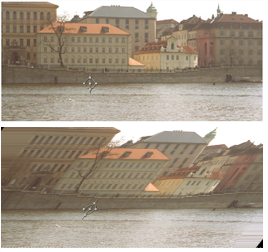
Skewing Elements
To skew an element is to rotate its pixel columns around the pivot point.
To skew an element using the Transform node
| 1. | Click Transform > Transform to insert a Transform node at the appropriate place in your script. |
| 2. | Connect a Viewer to the output of the Transform node so you can see the effect of your changes. |
| 3. | In the Transform properties panel, select the appropriate filtering algorithm from the filter dropdown menu (see Choosing a Filtering Algorithm). |
| 4. | Position the pivot point as necessary: |
• Increment or decrement the center x and y fields to move the axis in either direction.
• Or Ctrl+drag (Cmd+drag on a Mac) on the center of the transformation overlay.
| 5. | Increment or decrement the skew field to rotate the pixel columns around the pivot point. |
Or drag the vertical bar of the transformation overlay.
To Invert a Transform Effect
You can invert the effect you’ve created with the Transform node by checking the invert box in the Transform properties panel. This uses the inverse values of your translate, rotate, scale and skew values. When the box is checked, a small transform handle appears next to the standard transform handle in the Viewer.
Bounding Box Warnings
Zooming into the Viewer to work on a shot means that you can't always see the extent of the bounding box in relation to the format, which can result in unnecessary processing.
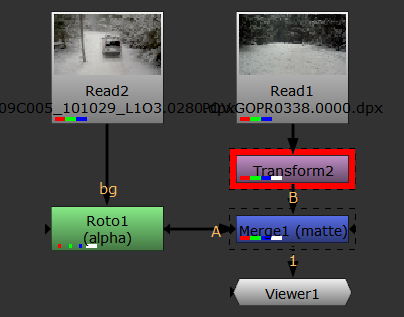
To make it easier to see the state of your bounding box, Nuke can display visual warnings on the nodes that affect the bounding box. To enable the warnings, in Nuke's Preferences under Panels > Node Graph, enable Bounding Box Warning:
• red rectangle with dotted stroke - the indicated node creates a bounding box greater than the format.
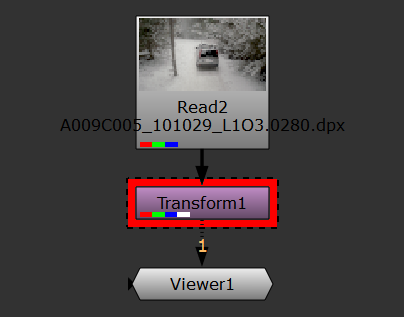
• dotted stroke without the red rectangle - the bounding box size is greater than the format at the indicated node, but the bounding box size has been set by an upstream node.
The bbox warning threshold controls how far past the edge of the format the bounding box can expand before the warning is displayed in the Node Graph. For example, if you're working with UHD_4K footage and the default 10% threshold, you can expand the bounding box horizontally by 384 pixels before the warning is displayed.
Tip: You can set the color of the warning rectangle in the Preferences under Panels > Node Graph > Bounding Box Warning.