Changing the Numbering of Rendered Frames
By default, when you render an image sequence, Nuke assumes an exact relation between the currently processed frame and the numbering of the frame written out. Therefore, if you choose to render frame 15, the resulting file is numbered accordingly, for example image.0015.rgb. However, the frame parameter on the Write node lets you change this behavior. For instance, if you have a sequence that runs from image.0500.rgb to image.1000.rgb, you may want to render it so that the frame numbering in the resulting files runs from image.0001.rgb to image.0501.rgb. You can do so via expressions, specified start frames, and constant offsets. Each method is described below.
Using Expressions
|
1.
|
Select Image > Write to insert a Write node into your script. |
|
2.
|
In the Write properties panel, click the file folder icon  , then navigate to the directory path where you want to save the rendered image sequence. Enter a name for the image sequence. , then navigate to the directory path where you want to save the rendered image sequence. Enter a name for the image sequence. |
|
3.
|
Set frame to expression. Enter an expression in the field on the right. The expression changes the relation between the currently processed frame and the numbering of the frame written out. The resulting file name for the current frame is displayed on the Write node in the Node Graph. |
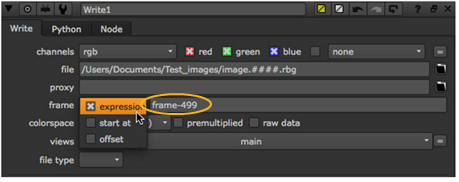
For example, if your clip begins from frame 500 and you want to name that frame image.0001.rgb rather than image.0500.rgb, you can use the expression frame-499. This way, 499 frames are subtracted from the current frame to get the number for the frame written out. Frame 500 is written out as image.0001.rgb, frame 501 is written out as image.0002.rgb, and so on.
Another example of an expression is frame*2. This expression multiplies the current frame by two to get the number of the frame that’s written out. At frame 1, image.0002.rgb is written out; at frame 2, image.0004.rgb is written out; at frame 3, image.0006.rgb is written out; and so on.
|
1.
|
Select Image > Write to insert a Write node into your script. |
|
2.
|
In the Write properties panel, click the file folder icon , then navigate to the directory path where you want to save the rendered image sequence. Enter a name for the image sequence. |
|
3.
|
Select start at from the frame dropdown menu. Enter a start frame number in the field on the right. This specifies the frame number given to the first frame in the sequence. The numbering of the rest of the frames is offset accordingly. |
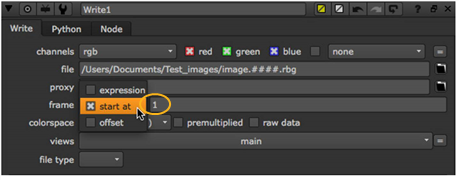
For example, if your sequence begins from frame 500 and you enter 1 in the field, frame 500 is written out as image.0001.rgb, frame 501 as image.0002.rgb, and so on. Similarly, if you enter 100 in the field, frame 500 is written out as image.0100.rgb.
|
1.
|
Select Image > Write to insert a Write node into your script. |
|
2.
|
In the Write properties panel, click the file folder icon , then navigate to the directory path where you want to save the rendered image sequence. Enter a name for the image sequence. |
|
3.
|
From the frame dropdown menu, select offset. Enter a constant offset in the field on the right. This constant value is added to the current frame to get the number for the frame that’s written out. |
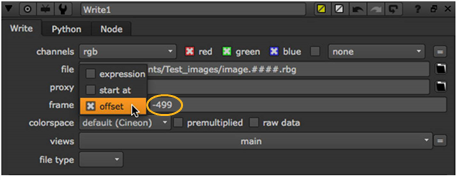
For example, if your clip begins from frame 500 and you want to render this first frame as image.0001.rgb rather than image.0500.rgb, you can use -499 as the constant offset. This way, 499 is subtracted from the current frame to get the number for the frame that’s written out. At frame 500, image.0001.rgb is written out; at frame 501, image.0002 is written out, and so on.