Interpolation
Time distortions that slow down a clip require the creation of additional, or interpolated, frames. For example, suppose you want to slow down the collision, shown in the clip below, by a factor of two. This requires the creation of one interpolated frame for every existing frame in the clip.
|
|
| Interpolating frames. |

The simplest way for Nuke to interpolate is to duplicate existing frames and increase the length of the clip - this is the default method of interpolation. However, this method can create jittery playback, especially when the image depicts very fast motion and the clip is retimed to be considerably longer than its original length. For such cases, Nuke provides different nodes for smoothly interpolating the frames.
Frame-Blending
The FrameBlend node interpolates frames by generating an additive composite of the frames that precede and follow it, rather than creating mere copies between the existing frames.
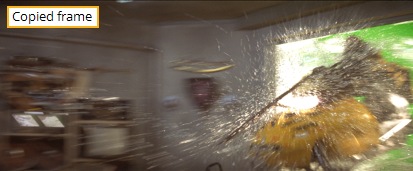
Here is an example of the difference between frame-copy and frame-blend interpolation. In the first frame of the figure below, you see a copy of the preceding frame. In the second frame, you see a new image generated by blending the previous and subsequent frames.
|
|
| Frame-copied versus frame-blended interpolation. |
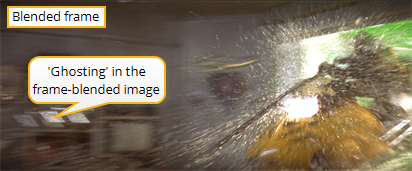
The latter method creates “ghosting” around all fast moving features (the window frame and the pages on the desk, for example). This may look odd when viewed as part of a still frame, but contributes to smoother motion during actual playback.
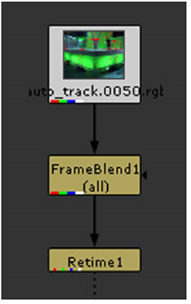
You can enable frame-blending by manipulating the shutter value of a retiming node. Higher shutter values generate more frame-blending. Or, you can insert a FrameBlend node before the temporal effect you want to influence. The below figure shows an example of frame-blending with the Retime node.
To Insert a FrameBlend Node
| 1. | Select Time > FrameBlend from the toolbar. |
Remember to place it upstream from the temporal effect you want to influence.
| 2. | Enter the number of frames to blend in the Number of frames field. |
or
Check the Custom box and enter the starting and ending frames that you want to blend. To use the input range as your custom frame range, click Input Range.
| 3. | If necessary, check Foreground matte and select the channel to limit the blending effect. |
The output Image count to option saves a floating point alpha image to a channel you specify; the result indicates the number of images that contributed to each pixel of the matte. To normalize the alpha, divide the number 1 by the number of frames averaged, and then multiply the alpha channel by this result. You can also use the inverse of this matte for additional degraining.