ParticleWind
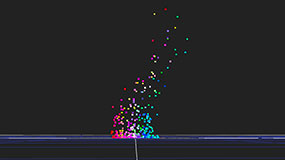
With ParticleWind, you can simulate a wind blowing on the particles. When you connect the ParticleWind node to your particle stream, an arrow appears in the Viewer, which you can then use to determine direction and velocity of the wind. The bigger and longer the arrow, the stronger the wind effect.
Inputs and Controls
|
Connection Type |
Connection Name |
Function |
|
Input |
particles |
The particle system to which you intend to apply wind. |
|
Control (UI) |
Knob (Scripting) |
Default Value |
Function |
|
ParticleWind Tab |
|||
|
display |
display |
unchanged |
Adjust the display characteristics of the particles. These settings don’t affect the render output of the scene; these are for display purposes only in the 3D Viewer. • off - hides the particles. • wireframe - displays only the outlines of the particle. • solid - displays all particles with a solid color. • solid+wireframe - displays the particles as solid color with the particles outlines. • textured - displays only the surface texture. • textured+wireframe - displays the wireframe plus the surface texture. • unchanged - doesn't change the particles display mode. The Viewer can override this setting. |
|
selectable |
selectable |
enabled |
When enabled, you can select the particles in the Viewer by clicking on them. |
|
render |
render_mode |
unchanged |
Sets how the particles will render. This control is independent from the display selection, but has the same settings. |
|
from xyz |
from |
0, 0, 0 |
Sets the point of origin for the arrow on the x, y, and z axes. The arrow determines the direction and velocity of the wind effect. The bigger and longer the arrow, the stronger the effect. |
|
to xyz |
to |
0, 1, 0 |
Sets the point of destination for the arrow on the x, y, and z axes. The arrow determines the direction and velocity of the wind effect. The bigger and longer the arrow, the stronger the effect. Note: Particles are gradually accelerated, they aren’t emitted at full speed. |
|
drag |
drag |
0.2 |
Sets the amount of simulated drag applied to particles. Higher values drag the particles further from their origin, and vice versa. |
|
air resistance |
air_resistance |
disabled |
When enabled, simulated resistance is added to the drag control progressively slowing particles down over time in a similar way to ParticleDrag. |
|
Conditions Tab |
|||
|
probability |
probability |
1 |
Sets the probability that this node affects your particles. If you set this to zero, the node won’t affect any particles, and if the value is 1, the node will affect every particle. |
|
min age |
min_age |
0 |
Limits the effect of this node to particles above this minimum age. The age of the particle is its lifetime normalized between 0 and 1. |
|
max age |
max_age |
1 |
Limits the effect of this node to particles below this maximum age. The age of the particle is its lifetime normalized between 0 and 1. |
|
random seed |
seed |
0 |
Sets the integer to change the results of generated randomness in your particles. You can achieve slightly different effects by changing this number. |
|
channels |
channels |
all |
Specifies which particle channels the effect of this node should be applied to. Channels a and b are arbitrary names for channels which are useful if you want different ParticleEmitter nodes or other particle force nodes to have an effect on separate channels. |
|
Region Tab |
|||
|
region |
region |
none |
Sets the region which you want to use to confine the particle effect to. For example, if you choose a sphere, only particles inside that sphere shaped region will be affected by particle effects. • none - all particles are affected as normal. • sphere, box, half-space, and cylinder - controls the region’s boundary shape. |
|
invert region |
region_invert |
disabled |
When enabled, particles outside the region are affected rather than those inside it. |
|
|
file_menu |
N/A |
Select to import or export a channel file: • Import chan file - import a channel file and transform the region marker according to the transformation data in the channel file. Channel files contain a set of Cartesian coordinates for every frame of animation in a given shot. You can create and export them using Nuke or 3D tracking software, such as 3D-Equalizer, Maya, or Boujou. • Export chan file - export the translation parameters that you’ve applied to the region marker as a channel file. This is a useful method of sharing setups between artists. |
|
|
snap_menu |
N/A |
• Match selection position - the region marker is snapped to a new position depending on the points selected. • Match selection position, orientation - the region marker is snapped to a new position and orientation depending on the points selected. • Match selection position, orientation, size - the region marker is snapped to a new position, orientation, and size depending on the points selected. |
|
transform order |
xform_order |
SRT |
Sets the operation order for scale (S), rotation (R), and translation (T). The possible operation combinations are SRT, STR, RST, RTS, TSR, TRS. |
|
rotation order |
rot_order |
ZXY |
Sets the order of rotation. The possible axial combinations are ZXY, XYZ, XZY, YXZ, YZX, ZXY, ZYX. |
|
translate |
translate |
0, 0, 0 |
Lets you translate the region marker along the x, y, and z axes. You can also adjust translate values by clicking and dragging the axis in the 3D Viewer. |
|
rotate |
rotate |
0, 0, 0 |
Lets you rotate the region marker around the x, y, and z axes. You can adjust rotate values by holding down Ctrl/Cmd and dragging in the 3D Viewer. |
|
scale |
scaling |
1, 1, 1 |
Lets you scale the region marker on the x, y, and z axes. |
|
uniform scale |
uniform_scale |
1 |
Lets you scale the region marker simultaneously on the x, y, and z axes. |
|
skew |
skew |
0, 0, 0 |
Lets you skew the region marker on the x, y, and z axes. |
|
pivot |
pivot |
0, 0, 0 |
When you make changes to the region marker’s position, scaling, skewing, and rotation, these occur from the location of the object’s origin point or pivot. The pivot x, y, and z controls allow you to offset the pivot point and move it anywhere you like - you can even move it outside of the object. Subsequent transformations applied will then occur relative to the new pivot point location. You can also hold down Ctrl/Cmd+Alt and drag the pivot point to a new location in the 3D Viewer. |
|
Local Matrix |
|||
|
specify matrix |
useMatrix |
N/A |
Enable this control to specify matrix values for the object you’re transforming as an alternative to setting transform, scale, skew and pivot values above. |
|
matrix |
matrix |
N/A |
The matrix displays values from the object’s transform, rotate, scale, skew, and pivot controls. Check specify matrix and copy or drag-and-drop matrix values from another object to apply those values, for example, if you wanted to align objects in a scene. |

Step-by-Step Guides
Adding a Wind Effect to Particles
Video Tutorials
NUKEX 6.3 Particles Tutorial: Fundamentals part 1 from Foundry on Vimeo.
Hi, everybody, and welcome to this video taking a look at the brand new particle system inside of Nuke 6.3. In this video, covering the basic fundamentals of the particle system, we are going to cover these four main regions that you can see in front of you. So, you have a basic particle set up over here, then we will take a look at how you can use bounding boxes and regions to customize the flow of particles throughout your script. We will then take a closer look at the channels system embedded in the particles, which allow you to apply a much more custom effects to particle groups. Then finally, we will take a look at subframe particles within your scene. With that said, let’s get going.
Let’s start by taking a look at the basic particle setup. At the top, I am defining my particle image, which is going to be this Nuke logo. But at 1534 x 1534 it is perhaps a little bit on the big side, so I have reformatted that down to 100 x 100. Down from this, I am defining my emission geometry, which can be any object you bring into Nuke via .fbx or .obj files. In this case, I am using a sphere. If we take a look at the sphere, you can see that I have textured it with a ramp, running from black at the bottom to pure white at the top. This is going to come in handy in a second when we go and take a look at the ParticleEmitter settings. Speaking of that, down from here, I have brought in the ParticleEmitter itself. I have plugged our geometry in the emit pipe, and our Nuke logo in the particle pipe. If we now take a look at this, what we should see, if I zoom out and hit play, is that we have our full 3D particle system playing back nicely.
Now, there are a couple of things to note with this system. First of all, all of the particles are sprites, so they will rotate and face the camera constantly. The second thing is that it is fully 3D, so you can zoom in and out, and you will get a correct depth of field when you render out the ScanlineRender node. The third thing of note is the particles being emitted from the top of our sphere are much bigger than the ones being emitted from the bottom. And, if you haven't already guessed, this is taking in the size channel from the ParticleEmitter, and it’s taking the color information from that Ramp (rgba.red) to act as a multiplier of size on the particles. So, where the ramp is white at the very top we are basically getting the full size of the particles, which are 0.5, and where it is black at the bottom of the sphere, we are getting 0% of that 0.5, so size 0. Because we are ramping up between the black and the white, we are getting a nice gradient of sizes between the two. So you can actually use this color information on these channel fields on the rate, lifetime, velocity, rotation velocity, size, and mass of your particles.
Now, going on from that - within the ParticleEmitter node itself, you have control over all the things that you would expect from your actual emitting system, so things like rate, velocity, size, etc. Obviously, at the moment, we are using that sprite texture. What if we were to go in and change this from taking an image for a piece of geometry? Well, it works exactly as you would expect. We are now putting geometry on every single particle. The good thing about this is, because they are not always rotating to face the camera, we do have a nice bit of rotational velocity on these guys as well. With that in mind, I am going to put that back on our sprite and zoom down further in our scene. Once our emitter is set up, we are going to add in some particle forces. Now, in this case, I am going to add in a ParticleGravity node. So if I take a look at that, straight away you can see these particles are being affected by gravity. So, we can go in to the ParticleGravity node itself and take a look at the settings in here. You can see that we have a from field and a to field. Now, the best thing to know is if you imagine the from is set at the origin, the to field is defining the strength of, and the direction of, your gravity. In this case, we are going straight down on the y with a value of 0.02. If I was to add in a field on the x axis as well, you can see the gravity is not only falling down, it is also falling down the x axis. So, gravity, in this case, is more of a directional force. You have much more control of it than you would with just a standard gravity node.
Moving on down, we are going to add in another node, which is a ParticleBounce. If I view the result of this, we will see the particles are bouncing and if I double-click, we can actually see the bounce plane itself. I have added in a little bit of rotation in here, on the rotate value of our ParticleBounce node. So you can see this plane is nicely bouncing around and the particles are bouncing, as you would expect. Now inside of the ParticleBounce node, there are some settings you should take note of. Right now we can bounce off any custom geometry you bring into Nuke. However, you do have three options for bouncing: you can bounce off a plane, a sphere, or a cylinder. You can bounce on either side of those objects as well, and that’s where this external bounce mode and internal bounce mode comes in. Now I have my bounce set to 1, and my friction set to 0, so you can see the bounce is pretty big off of here. If I was to turn that down to 0.5, these particles would bounce much less, and you get very interactive feedback as you change these values.
I have set our particle bounce setting back to 1. We are going to go ahead and look at our next node, which is the ParticleCurve. Now, if I go into this node and take a look, you can see we get curve control over the r, g, b, and a channels of our particles, as well as the size and mass. Now this exists for the life of the particle from 0, which is birth, to 1, which is death. At the bottom, here, we can see I am only applying these curves to the alpha and the size values. Let’s take a look at the curve for our size. You can see at birth, at value 0, the particle size is set to 1. As the particle goes through its life towards 1, which is death, the size is slowly going to get smaller and smaller before, at death, it has a value of 0. So, if we take a look at our particle curve, what we should see is that at the very start these particles have a size of 1, and as they bounce and zoom off to the side, they get smaller and smaller before they fade out completely and die. Now, the other value in here is the alpha but, unfortunately, at the moment, it doesn't seem to be having much of an effect on the sprites in our scene. The reason behind this is that we need to add one extra node here, at the top, when we created our original image. Underneath the Reformat, I am going to create a BlendMat node. I am going to go into its properties and change the surface blend option to modulate. This is going to allow us to change the color, the alpha, and the opacity of our particles over time. As you can see now, not only is the size changing, but the particles are also fading out as they zoom off over here into the side. So, it’s very important to get that BlendMat node in place and correctly set to modulate. With that done, both of our curves are having the effect that we want.
Now, I do have one more node, which we will get back to once I have explained a couple more concepts. But other than that, there is one more final thing to take note of about this system. Right now we are only using a single image as a source sprite and, if we move this over to the geometry, we are only using a single geometry object. However, in the ParticleEmitter node at the very bottom here, you have this input order and advance setting. This allows you to bring in both object sequences and image sequences, and have the ParticleEmitter intelligently choose how it’s going to use those within the scene. You can choose to attach a random image or a random object to each particle and have it stick with that single image or object throughout the system, or you can have a random image or object applied, and have it advance in steps for the entire system. All of this is very well-documented, but the best thing you can do is go and play with the different settings down here to see exactly what they do. With that done, we are going to move onto the second setup.
In this section, we are going to be taking a look at the bounding boxes or regions of forces within the force nodes. The initial setup for this is very similar to the one we created in our basics section. All we have done is applied our sprite and our geometry into our ParticleEmitter, and applied a basic ParticleGravity node to that. So, you can see the particles are being emitted and falling down along the -y axis. Now, below this, we are going to start experimenting with regions. The first one I have here is a ParticleWind node. I am going to open up the ParticleWind node and inside you will see we have a Region tab. When we open this up, you will see we have this bounding box within the 3D space. Now, the region can be a number of geometrical objects. You can set it to none, in which case it will act across the global space within Nuke. You can set it to sphere, box, half-space, or cylinder. In this case, I have set it to box, and you can really go in here and tweak where that is positioned within your scene. You can animate it over time - the scale, the translate or the rotation values - as much as you want. The important thing to know is that the bounding box is defining where that force will act. In this case, I have set up our ParticleWind to be pointed along the +z axis. If I go into our Region, we take a look at our box and I view our wind. We will see the wind will only take effect as soon as the particles fall into the region of this box. If I was to move this box out of the way - so I go into our Region tab and move this box along the z axis - because the particles are not falling into this box anymore, they are not being affected.
So, after moving that original box back into the top, I have also brought in these other two ParticleWind nodes, which as you can see, have their regions applied. Also this ParticleGravity node, just to prove it is there on all of the force nodes within this system, it’s not only the ParticleWind. So, as you can see, it’s a very nice way to dictate the flow of particles throughout your entire scene and it’s available on all of the force nodes within Nuke 6.3.
That's it for video 1. In video 2 we are going to be delving a little bit deeper in the system and taking a look at channels and subframe techniques as well, and we will also be going back to have a look at particle spawning. So, thank you very much and I will see you in video 2.
NUKEX 6.3 Particles Tutorial: Fundamentals part 2 from Foundry on Vimeo.
Hi, everybody, and welcome back to this second video, taking a look at the fundamentals of Nuke 6.3’s particle system. Now, in the second part, we’re going to take a look, first of all, at the channels. Now, channels can be thought of as subsets of particles, onto which you can apply different effects and forces. The good thing is you don't have to split them off into separate pipes. They can all be maintained in a single particle system. Let’s take a look at exactly what I mean.
So, underneath here, I have our basic particle setup - very similar to the ones we had in video 1. We have our Nuke logos falling down with a little bit of gravity and underneath this, the first thing I am going to do is add in a ParticleBounce node. Let’s double-click this and view it to have a look at where it sits within the scene. Our particles should be expected to fall down with gravity, bounce off the plane, and go from there. Let’s take a look at what happens. As you can see, the particles are falling through the bounce plane. Don’t worry; this is actually a feature, it is not a bug. Within the ParticleBounce node, we have an external bounce mode and internal bounce mode that we have seen before, and I have set both of these to none. The important part is that, next to both of these modes, we have this new channels setting. This basically says whenever a particle falls through this bounce plane, change its channel from its original one into channel b. When we emit particles, if we look up in the scene at the ParticleEmitter, we can see that channels are going to emit into channel a. So, the way it works is when they emit, they are in a, they fall down with gravity and as soon as they pass through this point, they change from channel a to channel b. Now underneath that ParticleBounce node, I have another one. If we go in and take a look at the properties for this guy, we can see that when particles fall through this plane they are going to change from channel b to channel c and, underneath this, I have a final one. You can see that our new channel, in this case, is channel d. So, just to clarify, from the very top we are emitting in channel a, we fall through the first bounce plane and change to channel b, then we fall through the second one and change to c, then we fall through the last one and, finally, our particles are stuck in channel d. So, what we are going to do is use all of these channels and provide different effects to each set.
Underneath this, we have a node that we haven't seen before and this is the ParticleExpression node. I will be doing a short video on this one alone and this will be coming up shortly. For now, all you need to know is that the ParticleExpression node is basically going to allow you to affect any of these variables of the particles over time. So, right now, I have this value in our first expression node, v(1,0,0), and what this is saying is change the color to an r value of 1, a g value of 0, and a b value of 0. Because we have our BlendMat applied further up in our scene, with the color set to modulate, the color is going to be affected. So, if I view our ParticleExpression node, what we will see is that particles get emitted and keep our Nuke logo, and as soon as they fall into this set they become red. The reason they are only getting affected at this point and not at emission is because on the Conditions tab, at the very bottom, I have set our channels to b. Now, if I was to set this back to say, none, and then set it to a, it would affect all of the particles from the point of emission. What I am going to do is set this back to b and just turn off our a channel as well so we maintain our Nuke logo at the top, fall through the plane, and turn red. Our second ParticleEmission node, if we go to Conditions, is set to c. In the ParticleExpression tab itself, we have set the color to 0 on r, 1 on g, and 0 on b, using the expression v(0,1,0). So this should, if we view it, change particles from red, to green as soon as they fall through this bounce plane. Let’s have a look, and you can see that’s exactly what’s happening.
Now, another thing of note is if we take a look at the actual nodes themselves. Underneath the node name, in parentheses, we have the channel that’s currently being affected. This is a very quick way of seeing exactly what's going on within your particle setup. So, on our third ParticleExpression node, you can see that whatever is going on inside this node is only going to affect channel d. It’s only going to affect particles once they fall through this final bounce plane. Let’s view that, and you can see that what I am doing is turning the particles back to their original color but, in here, I have also set the size to take the current size on this frame and multiply it by 1.04 on the next frame, using the expression size* 1.04. Now I will be explaining this in a lot more detail in the expressions video, however, for now, all you need to know is that this will increase the size of particles over time.
This doesn't only affect the ParticleExpression node. If we go on down here, I have a ParticleWind node. The first thing you can tell by looking at it is it’s only going to be affecting the d set, or d channel of particles. So, if I view this ParticleWind, this force is only going to come into effect as soon as there are d particles within our scene. They are only being blown by this wind as soon as they fall through this final bounce plane.
Now that we understand particle channels, I’m going to quickly return to my basic particle setup tree and show you that node that I promised to show you earlier. That was, in fact, the ParticleSpawn node. If we take a look under the name, you can see that we have a b in parentheses, which means whatever is happening inside this ParticleSpawn node is only affecting the b channel of particles. As we have already experienced within the ParticleEmitter node, by default the particles are set to emit in channel a, so where is this mysterious channel coming from? Well, it’s actually being generated within the ParticleBounce node. If we have a look at this, next to starting my internal bounce mode, I have set new channels to b. Now, what this means is, the particles will be emitted in channel a, they will fall down with gravity, and as soon as they bounce on this plane they will move from channel a to channel b. It is at this point when the ParticleSpawn node can come into play.
So, let’s not wait any further. I’m going to go down and view the result of my ParticleSpawn node. What you can see is that we get these kind of trails, or tails, coming off these bouncing particles. If we go into the ParticleSpawn node itself, we can see a couple of things of interest that tell us why this is happening. First of all, in the Conditions tab, the channels are set to b, so that explains why we are only getting these tails as soon as we hit this bounce plane, because that’s when the particles are being moved into channel b. In the ParticleSpawn node itself, we have things very familiar to the values you find in the ParticleEmitter node - things like rate, halflife, velocity, size, and spread - all of those kinds of settings are available to use separately on the spawn particles as well as the originally emitted particles. Finally, in this section we have the channels at the top here, and that is currently set to c. So as soon as we get these spawn particles, there are going to be three sets of particles existing within your scene simultaneously. That will be the originally emitted particles in channel a, bounced particles in channel b, and spawned particles in channel c. Now, there are a couple of ways we can change the look of these particles now that we have set this up. On the ParticleSpawn node itself, we actually have this particle pipe. If you did want to change the texture being applied to these spawned sprites, you would just plug it into here and that would happen instantly, but because we have put these into a separate subset or a separate channel, we could actually go in and add something like a ParticleExpression node and have this only affect our spawned particles. In the Conditions tab, over here, I am going to go into my channels and I will set it to none, and then set it to only exist on my spawned particles, which is channel c. Then, in the ParticleExpression node, I am going to set the size down to 0.25 and, as you can see, we are only affecting the size of the spawned particles within the scene. There are a lot of different ways you can utilize this - by putting particles into different subsets, changing the forces, changing the looks affecting your spawned particles - I am sure you are going to have a lot of fun with it.
Finally, in this video we are going to take a look at the sub frame settings you can apply to your particle systems. Right now, in scene, I have a very simple particle setup. It does look more complicated than previous ones - that’s only because I have an animation attached to our emission geometry, so it’s going to travel up this spiral over time. The one thing you will notice about this setup is that, in between the particles, there is a little bit of a gap. The reason behind this is that when the ParticleEmitter is set with an emission rate of 1, we are going to emit 1 particle per frame. We don't emit particles in between frames and that’s what causes this gap.
To fix this, what we can do is bring in a ParticleSettings node and within this node there is one control, that is steps per frame. If we take a look at these first three particles in this setup, right now, we have a steps per frame value of 5. As soon as I view this node, we are going to take this first particle and replace it with five new particles that will be evenly spread out between this first particle and this second one. It will then do exactly the same thing for the next gap in our sequence, so this particle will be replaced by five, which will be evenly spread out to fill in this gap. It will just iterate down through filling in every particle with five new ones, evenly spread out to create a nice streak of particles. Now there is one more thing to this. If I view the ParticleSettings node right now, even though we have set our steps per frame, we are not seeing that nice, full streak. The reason being is that while we have told the particles to have a steps per frame of 5, we haven't actually generated that many particles yet. So, we need to go back into our ParticleEmitter and use our steps per frame as a multiplier of our original emission rate. So, in this case, our emission rate is 1 and we are emitting one particle per frame. I am going to multiply this by our steps per frame value, which is 5. This is going to emit five particles per frame, which will then get spread out and give us a result that looks a little bit like this. We get a much more filled in streak now, which if I zoom out and click play, is going to travel all the way up this spiral in our scene. Now, it is worth noting that because this is essentially a multiplier of the number of particles within your scene, the ParticleSettings steps per frame setting is something you do want to keep an eye on. If you do put this up to 100, you will find that your scene will slow down a little bit. You want to keep it at the bare minimum for the amount you need in the final render. In this case, 5 looks pretty good, so I’m going to leave it at that. Now one other thing, just quickly, to notice is because this is a sprite setup, we are getting these little hotspots at the front here. This is not visible in the final render.
That’s it for this video, showing the fundamentals of the brand new particle system in Nuke 6.3. We have covered basic setup, bounding boxes and regions on forces, channels and subsets of particles, as well as subframe settings, and spawning settings as well. Hopefully you will have enough to get up and running as quickly as possible. I will see everybody in the next video.
Example Nuke Scripts
Simulating a wind blowing on the particles