Import Pre-Trained PyTorch Models
The CatFileCreator node (NukeX and Nuke Studio only) creates custom .cat files from PyTorch TorchScript .pt files within Nuke, opening up a wide range of pre-existing, trained models. You can import TorchScript files from GitHub, Model Zoo, or your own internal R&D department and slot them into your existing pipeline through NukeX's CatFileCreator.
For more details on Machine Learning with CopyCat in NukeX, see https://learn.foundry.com/nuke#machine-learning.
CatFileCreator allows you to add user knobs to your .cat files that are automatically passed to NukeX's Inference node so that you can have complete control over your pre-trained machine learning models. To create .cat files with exposed user knobs, you need a valid TorchScript .pt file containing correctly defined variables that link to the user knobs you define in Nuke.
Warning: It is important to note that not all PyTorch models work without modification. In order to correctly construct a TorchScript model from a PyTorch model please follow the guidelines laid out in the PyTorch user guide at https://pytorch.org/docs/stable/jit.html and the information provided by Foundry in the Nuke .cat File Creation Guide here: https://learn.foundry.com/nuke/developers/17.0/catfilecreationreferenceguide/index.html
Converting .pt Files into .cat Files
PyTorch models must be converted to TorchScript .pt file so that CatFileCreator can convert them to Inference-readable .cat files. In order to create a custom .cat file with exposed user knobs, you will first need a valid TorchScript .pt file that contains correctly defined variables. These variables will be linked to the user knobs you define in Nuke. The combination of a custom TorchScript and user knobs enables you to create and use a wide variety of different PyTorch architectures in the Inference node, as well as the ability to control their function within Nuke using the user knob definitions.
As noted previously, not all PyTorch models can be converted without modification, so have a look at the Introduction to TorchScript guide provided by PyTorch.
To convert a valid .pt file into a .cat file:
-
Navigate to AIR Tools > CatFileCreator in the left-hand node toolbar,
-
Enter the location of the valid .pt file on disk in the Torchscript File field or browse to the location.
-
Enter the location to save the converted .cat file in the Cat File field or browse to the location.
-
Enter a comma separated list that defines the names of the Channels In that your model computes. For example: rgba.red,rgba.green,rgba.blue
-
Enter a comma separated list that defines the names of the Channels Out that your model outputs. For example, if your model automates object selection you might want to output a matte into the rgba.red channel.
-
Enter a user-defined Model ID that you can use to identify the model. The Model ID is encoded in the .cat file.
-
The Output Scale defines how much the width and height of the input images are scaled by the model. For example, setting the Output Scale to 1.5 would mean that you are expecting the model to scale up the input by 50% so that a 512x512 input image would create a 768x768 output.
-
If your model doesn't require any artist interaction, such as upscale or deblur, click Create .cat file and Inference to convert the specified .pt file into an Inference-readable .cat file,
OR
Press Tab in the Node Graph and start typing CatFileCreator to display a list of selectable nodes.
A CatFileCreator node is added to the Node Graph and its Properties panel is displayed.
Note: Refer to the Nuke .cat File Creation Guide https://learn.foundry.com/nuke/developers/17.0/catfilecreationreferenceguide/index.html for more information on supported channels.
Note: Leaving this field blank stores an empty string in the .cat file.
Note: This value is model-dependent.
OR
If your model contains variables in TorchScript that need to be controlled using knobs, such as object labels that the model has been trained to recognize, proceed to Adding User Knobs to find out how to add knobs to control the output of your model.
Adding User Knobs
CatFileCreator allows you to add user knobs to your .cat files that are automatically passed to NukeX's Inference node so that you can have complete control over your pre-trained machine learning models.
Note: Any user knobs you add must be associated with variables in the TorchScript file and have the same name.
In this example, we'll be adding a dropdown to allow artists to choose from a number of objects in a semantic segmentation model, but there are several other types of user knob available. See Adding Knobs Using Drag-and-Drop for more information.
To add user knobs to CatFileCreator:
-
Click the
 pencil icon above the node Properties panel to display the available user knobs.
 -
Drag a Pulldown Choice knob from the toolbar into the Properties panel to add it to the node.
-
Click the orange edit button to display the knob's properties.
-
Enter the required properties:
-
Click the edit button again to close the knob properties.
-
Proceed to next section to apply the model to your source footage.


A new User tab is added and the user knob is displayed.
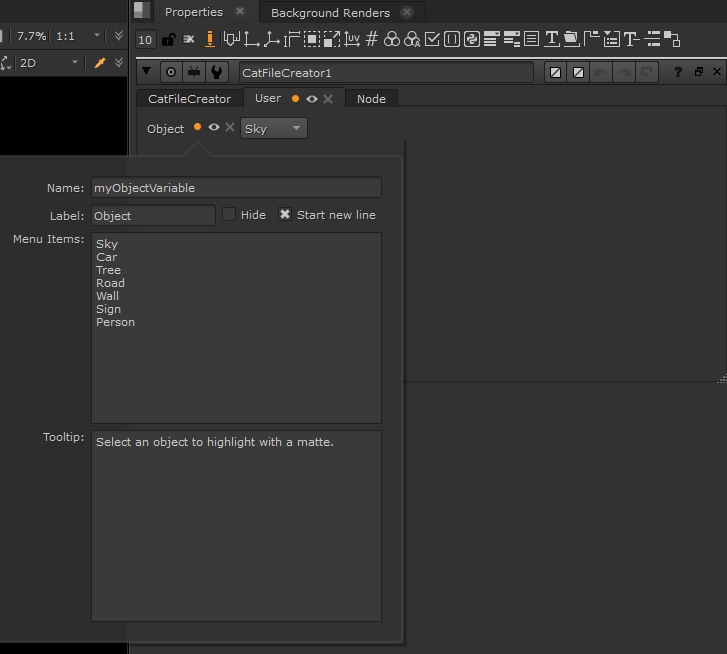
• Name - the name of the variable used in the forward() function in PyTorch to control the output of the model. See https://pytorch.org/docs/stable/jit.html and the Nuke .cat File Creation Guide https://learn.foundry.com/nuke/developers/17.0/catfilecreationreferenceguide/index.html for more details.
• Label - the label displayed in the node Properties panel for this user knob.
• Menu Items - the selectable items that are displayed in the dropdown menu.
• Tooltip - an informational message to help artists by providing a little extra information when they hover over the knob.
Applying the Model to Your Footage
To apply the result of your model conversion, either:
-
Click the Create .cat file and Inference button in CatFileCreator,
-
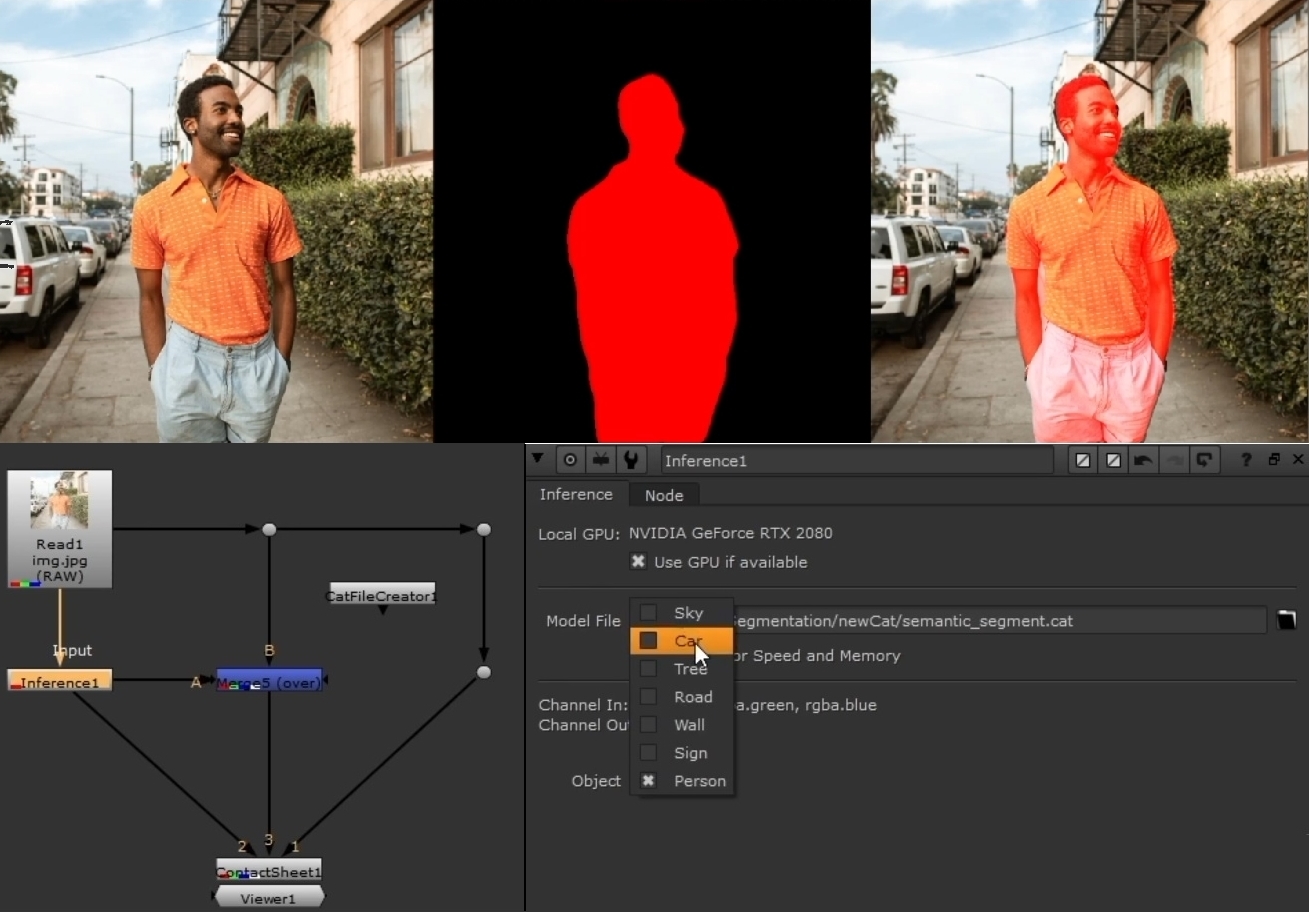
Connect the Inference node to your input image and then select the required operation, if your model contains more than one variable.
OR
If you have already converted a file, add an Inference node to the Node Graph and enter the location of the .cat file in the Model File field or browse to its location on disk.
For example, if your model performs semantic segmentation your user knob could be named Object, causing your model to output a matte to rgba.red. You could then merge the Inference output over the original plate to highlight the selected objects in the Viewer, or create a ContactSheet node to output several variations.