Search is based on keyword.
Ex: "Procedures"
Do not search with natural language
Ex: "How do I write a new procedure?"
Contact Support
Publishing From Editorial to Flix
Note: Flix 5 supports Avid Media Composer 8.8, 8.9, and 8.10 and Adobe Premiere CC 2015.5, CC 2017, and CC 2018. See Application Dependencies section.
Importing files back into Flix 5 can be done from both within the application and using the Flix Editorial UI, and depends entirely on which method you are using.
Preparing the MOV and EDL
Note: When exporting a .mov file from Avid using the Scale from Legal to Full Range option, set the colorCorrectionFromAvid parameter to 1 for Flix 5 to color correct the frames when conforming the sequence. See Avid Workflow Parameters.
Within Media Composer, do the following:
| 1. | Depending on the version of Avid you are using: |
Select Output > List Tool.
OR
Select Tools > List Tool.
Avid's List Tool opens.

| 2. | In the Input tab, select your sequence, and click Load… |
| 3. | In the Tracks panel, select the video tracks you want to import in Flix 5, and make sure the audio tracks aren’t selected. |
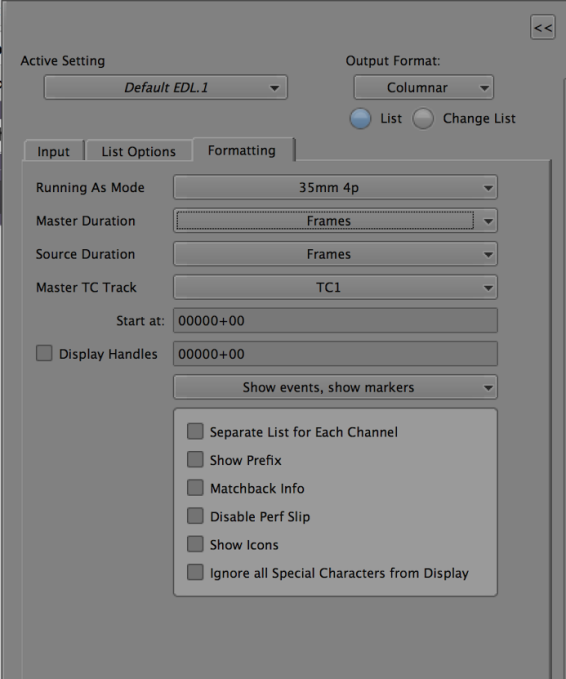
| 4. | In the Formatting tab, make sure the following options use the listed settings: |
• Output Format - Columnar
• Running As Mode - 35mm 4p
• Master Duration - Frames
• Source Duration - Frames
• Master TC Track - TC1
Make sure that the Show Icons option isn’t selected.
Note: If you want to import markers from Avid to Flix 5, make sure the Shot events, show markers parameter is set.
| 5. | In the List Options tab, make sure the Assemble and Optical options are selected. |
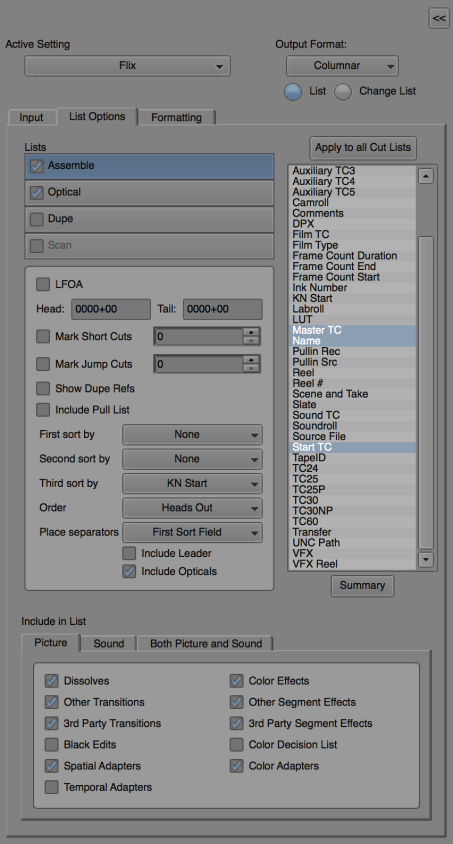
| 6. | Select the Assemble option and make sure the Include Opticals option is selected. |
| 7. | Make sure to only highlight the Master TC, Name and Start TC fields. |
| 8. | Select the Optical option. Click on the Same as Assemble List button and make sure the following options are not selected: |
• Key Frames,
• Optical Footage, and
• Page Breaks Between Opticals.

Once you've finished making changes within Premiere and you are ready to publish the version back to Flix 5, follow the steps below:
| 1. | In Premiere, with the sequence selected, navigate to File > Export > Final Cut Pro XML. |
The Save Converted Project As dialog opens.
| 2. | Save the sequence to a location on your machine or network. |
| 3. | In Premiere, with the sequence selected, navigate to File > Export > Media. |
The Export Settings dialog opens.

| 4. | Select the Video tab. |
| 5. | Select a video codec. Photo JPEG or Avid DNxHD are recommended. |
Note: If you encounter problems with certain codecs, please contact Customer Support directly through the Support Portal at the following address: https://support.foundry.com.
| 6. | Select the Audio tab. |

| 7. | Once you have set all the options above, click Export. |
The Mov is created.
Publishing Back to Flix 5
Once you've reviewed the artists' work in Avid, Premiere, or Nuke Studio, you need to publish the sequence back to Flix 5 for them to see the changes and comments you've made.
Note: If the Flix 5 launchers are installed on your machine, click on the Flix Options context menu and select New Editorial Tab, see Flix Options Context Menu
To publish back to Flix 5 using the Flix Editorial UI, do the following:
| 1. | Click on Flix_Editorial launcher. |
The Flix Editorial interface opens.
| 2. | Click on the To Flix tab and click on the Flix Project Browser |
The Project Browser dialog opens.
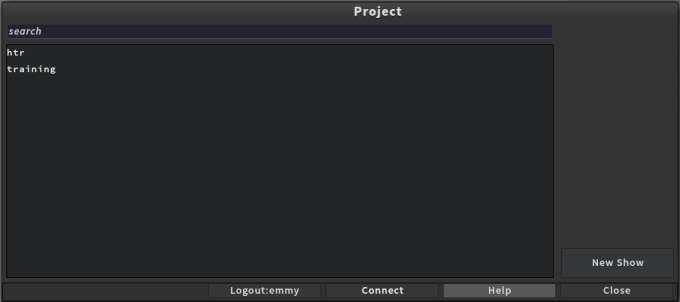
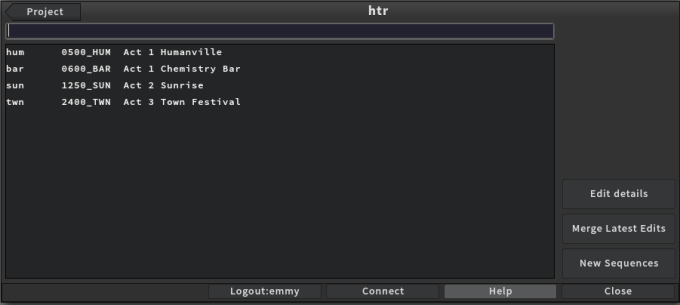
| 3. | Click on a project from the list, or search for a project by typing the name in the search bar. |
Once you click on a project, the dialog updates to show you the available sequences for that project.
| 4. | Click on a sequence from the list, or search for a sequence by typing the name in the search bar. |
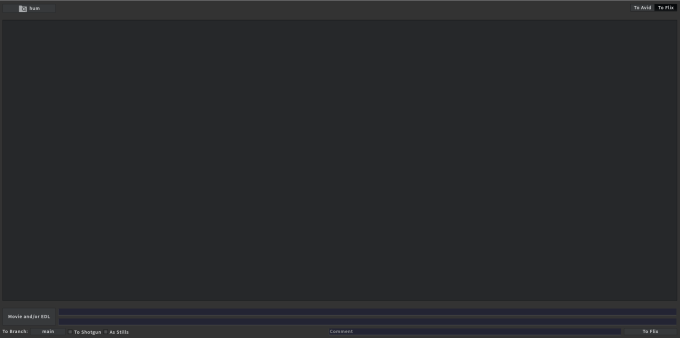
The Project Browser dialog closes and the Flix Editorial interface opens.
| 5. | Click on Movie and/or EDL button and select the required MOV and EDL. |
The MOV path is populated in the top field and the EDL path is populated in the bottom field.
Note: If the MOV and EDL files are stored in two different locations, click on Movie and/or EDL button to select the MOV then click again on Movie and/or EDL button and select the EDL.
If you are using Nuke Studio or Premiere, the EDL is an .xml file. If you are using Avid, the EDL is a .txt or .ctl file.
Tip: If you want to save storage space, you can set a maximum .mov file size for the movies coming back from Editorial, see Editorial QuickTime Movie Parameters.
| 6. | Use the following parameters if required: |
|
Control |
Action |
|---|---|
|
Comment |
Adds a note to the version. ’From Editorial’ is automatically appended to this by default. |
|
To Branch |
Selects the branch to publish the sequence into. Sets the published version to have restricted access. Only users who are on the list of restricted users are able to see this version within Flix 5. |
|
As Stills |
Sets the option for files with no recognizable file extension to be imported as still images. Unchecking this option imports all frames of the movie file and convert them to .jpg files. |
|
To Shotgun |
Publishes the sequence to Shotgun after it's been imported as a new version in Flix 5. |
| 7. | Click on the To Flix button to publish the sequence back into Flix 5. |
Once the publish is complete, the message Imported in Flix appears along with the following information:
• Whether a panel comes in as a ref or relinks to an existing panel.
• In the case of a ref, whether it is a still or animated panel.
• The frame range for each panel.
• In the case of a ref, the existing panels to which the refs are related to.
• In the case of a ref, why it comes in as a ref and not as an existing Flix 5 panel.
The new version of the sequence published from Editorial is displayed in your Project Browser.
Note: When an effect is added to a panel in Editorial, sending it back to Flix 5 creates a ref panel. To find the original panel to which a ref is related, use the Related control pop-up.