Flix for Editorial
Flix allows for roundtripping with your editorial department. This means an editor can make timing changes, rearrange shots, add camera moves and audio to the Flix sequence, as well as adding in external media such as Adobe After Effects compositions or a Maya playblast. All these changes to the sequence can then be imported back to Flix and appear as a new Revision.
Setting up Flix with Adobe Premiere
| 1. | Make sure Premiere is your default Editorial Tool. For more information, see Third-Party Apps in the Preferences page. |
| 2. | In the General tab, go to the Editorial Tool dropdown menu and select Adobe Premiere. |
| 3. | Enter the Publish Directory path or click Browse and then select a folder. For example, T:\flix_publishes[show_tracking_code][sequence_tracking_code]. |
Note: Make sure you have write permission to the publish directory. Contact your Systems Administrator for more information.
Tip: Environment variables can be used to construct publish and export paths. For example, %USERPROFILE% on Windows and ${HOME} on macOS.
| 4. | In the Adobe Premiere tab, set your preferences for exporting .xml files to Premiere. See the table below for details. |
| Adobe Premiere | |
| Marker Type | Choose whether Flix sends and receives Timeline or Clip markers to and from Premiere. • Timeline markers apply to a particular timestamp in the sequence and appear on the timeline. • Clip markers apply to a whole clip within a sequence and appear at the beginning of the clip. Note: The Marker Type you choose means that Flix only reads that type. For example, if you have Clip selected and Editorial add Timeline markers in Premiere, they are ignored by Flix. |
| Highlight New Panels | Sets whether new panels appear as highlighted clips in your Premiere sequence. |
Setting up Flix with Avid Media Composer
| 1. | Make sure Avid Media Composer is your default Editorial Tool. For more information, see Third-Party Apps in the Preferences page. |
| 2. | In the Third-Party Apps > General tab, go to the Editorial Tool dropdown menu and select Avid Media Composer. |
| 3. | Enter the Editorial Clip Name and Editorial Sequence Name, use the chips at the bottom of the screen to build your own, or use the defaults provided. |
| 4. | Enter the Publish Directory path or click Browse and then select a folder. For example, T:\flix_publishes[show_tracking_code][sequence_tracking_code]. |
Note: Make sure you have write permission to the publish directory. Contact your Systems Administrator for more information.
Tip: Environment variables can be used to construct publish and export paths. For example, %USERPROFILE% on Windows and ${HOME} on macOS.
| 5. | In the Avid Media Composer tab, set your preferences for exporting .aaf files to Media Composer. See the table below for details. |
|
Avid Media Composer |
|
|
Codec |
Specifies the type of Avid video codec used for exporting to Media Composer: DNxHD 36 (DNxHD LB) DNxHD 45 (DNxHD LB) DNxHD 115 (DNxHD SQ) DNxHD 120 (DNxHD SQ) DNxHD 145 (DNxHD SQ) Note: Higher data bit rates generally produce higher quality images, but the files exported require more storage space and take longer to transfer. |
|
Clip Duration |
Specifies the default duration for clips sent to Media Composer in frames. (For example, 480 frames or 20 seconds for a 24fps show). |
|
Use Flix Timing |
Toggle ON to send every panel as a clip retaining its duration set within Flix. This is useful to retain the timing established by a recorded pitch, saving you time and avoiding redoing work. See Preserve Sequence Timings from Flix for more details. Warning: Use Flix Timings must be enabled if you want to send camera move keyframes from Storyboard Pro to Avid. If you disable this control, you can only send .mov files to Avid and the Panels with Camera Move control is disabled. |
|
Enable Mark In |
Toggle ON to include a Mark In point on each clip. |
|
Mark In |
When Enable Mark In is ON, sets the frame on which to set the Mark In point. The default is 120 (5s in for a 24 fps show). |
|
Enable Mark Out |
Toggle ON to include a Mark Out point on each clip. |
|
Mark Out |
When Enable Mark Out is ON, sets the frame on which to set the Mark Out point. The default is 360 (15s in for a 24fps show). Warning: Setting your Mark Out point to a value lower than the Mark In point may create an unreadable .aaf file. |
|
Panels with Camera Move |
Choose whether to deliver panels with camera moves from Storyboard Pro to Avid Media Composer as a .png file with the Motion Effect applied, or as a QuickTime. • PNG and 3D Warp - this option preserves the camera move keyframes from Stroyboard Pro so that you can edit them in Avid and send them back to Flix without having to reproduce the effect. • MOV - the camera moves from Storyboard Pro are burned into the clip so you can't adjust the keyframes. Warning: Use Flix Timings must be enabled if you want to send camera move keyframes from Storyboard Pro to Avid. If you disable this control, you can only send .mov files to Avid and the Panels with Camera Move control is disabled. |
|
New Clip Color |
Sets the color of new clips in your sequence. |
|
Color Range |
Sets either Full or Legal range color for publishes to Avid. Note: The default color range is set to Full. |
|
Enable Audio |
Controls whether audio is available in Avid Media Composer or not. |
Preserve Sequence Timings from Flix
Flix integration with Storyboard Pro allows you to import camera moves and panel timings and pass them on to Avid Media Composer, saving you time and giving your editor a head start. Of course, some editors prefer to receive all panels with their default durations, so that's why in Flix you can control this behavior with a single preference.
-
Enable Preferences > Third-Party > Avid Media Composer > Use Flix Timing to send every panel as a clip retaining its duration set within Flix.
-
Disable Use Flix Timing to send every panel with the default duration.
Warning: Use Flix Timings must be enabled if you want to send camera move keyframes from Storyboard Pro to Avid. If you disable this control, you can only send .mov files to Avid and the Panels with Camera Move control is disabled.
Publishing a Sequence to Editorial
The following steps apply to both Adobe Premiere and Avid Media Composer. Publishing to Premiere creates .xml files and publishing to Media Composer creates .aaf files.
| 1. | On the main toolbar of your Revision, click the Publish to Editorial button. |
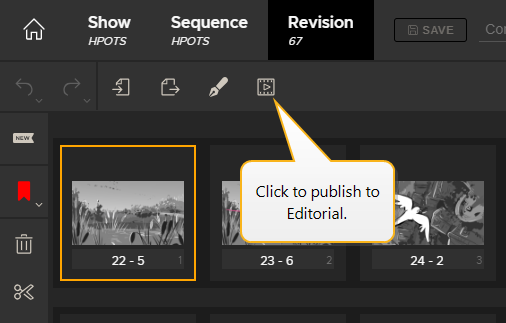
The Publish to Editorial dialog appears.
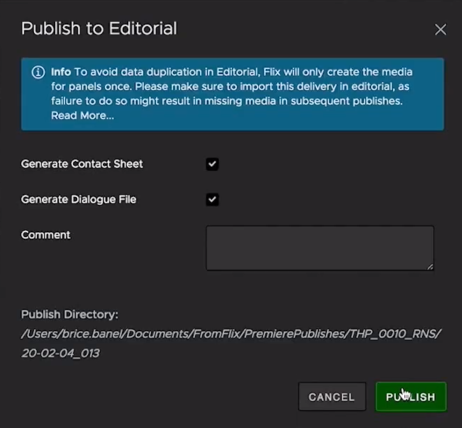
Note: If you attempt to publish to a directory for which you do not have sufficient permissions, a warning appears. You will need to ask a Systems Administrator to ensure the permissions on the publish directory to allow you to publish.
| 2. | Specify if you want to generate a Contact Sheet of the panels in your Revision by checking on Generate Contact Sheet. This is saved as a .pdf file. |
| 3. | Use the dropdown to the right to select a Contact Sheet template to use. |
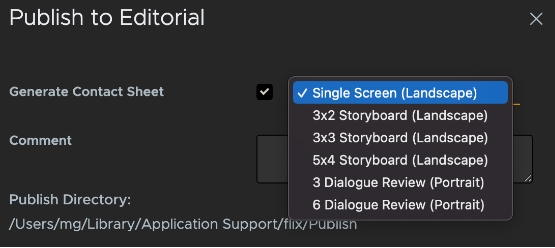
There are several defaults to choose from and administrators can create their own templates. See Customizing Contact Sheet Templates for more information.
| 4. | Specify if you want to generate a text file of the dialogue in your Revision by checking on Generate Dialogue File. This is saved as a .txt file. |
| 5. | Enter a Comment if needed. This appears in the email notification. |
| 6. | Click Publish. |
The directory to which your .pdf and .xml/.aaf files have been published opens.
• <filename>_all.xml/.aaf - This file contains the panel information of your entire sequence as well as any new or existing audio.
• <filename>_new.pdf - This file (Contact Sheet) contains the panel thumbnails of your entire sequence with New labels on panels that have been added or edited since the last publish. The Contact Sheet also contains dialogue. This is only created if you enabled Generate Contact Sheet.
• <filename>_new.xml/.aaf - This file contains only information and audio of panels that have been added or edited since the last publish.
Note: If no new changes have been made to the sequence revision, clicking the Publish to Editorial button opens the directory to which your files have been published. If files are missing from the publish directory, Flix automatically downloads them from the server and stores them in the publish directory.
Note: If a Publish fails, it may be because Flix Server needs access to a font. Check Running Flix Server for more information.
Filtering a Sequence by Published/Unpublished Panels
To check which panels have previously been included or excluded from publishes to editorial:
| 1. | Click on the |
| 2. | Either: |
• Check the Published option to see only panels that have been included in a previous publish to editorial.
OR
• Check the Unpublished option to see only panels that have not been published to editorial previously.

Importing Your Sequence to Adobe Premiere
| 1. | Open an existing project or create a new one. |
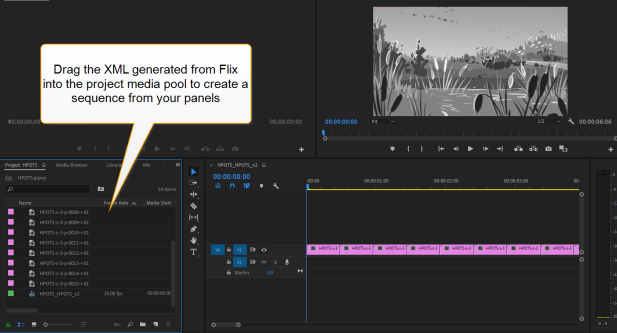
| 2. | Drag the .xml file into your project window. |
A sequence is automatically created using the imported clips. Any new panels are highlighted in your sequence if you have set the Highlight New Panels preference in Preferences > Third Party Apps > Adobe Premiere.
Note: Recorded pitches embed shot duration metadata in the .xml file, so panels appear in the sequence with their recorded timings.
Note: Animated panels originating from Storyboard Pro are sent to Premiere with the keyframe information intact, so they can be adjusted further in Premiere's effect editor.
Importing Your Sequence to Avid Media Composer
Article: Have a look at Knowledge Base article Q100650 for more detailed information on Storyboard Pro camera animations in Avid Media Composer.
| 1. | Open an existing project or create a new one. |
Note: If you're creating a new project, make sure your media creation settings match the AAF export setting in Flix. For example, DNxHD 36 (DNxHD LB).
| 2. | Drag either the all.aaf or the new.aaf file into a bin. |
If you choose the all.aaf, every panel is in the generated sequence. If you choose the new.aaf file, only new Flix panels will appear in your bin. New clips are highlighted (green is the default color but you can change this in Flix Preferences) and a sequence is automatically created using the imported clips.
Note: AAFs generated by Flix only contain new media. This is to avoid duplicate media files from previously imported AAFs. If you import an all.aaf of a sequence you have worked on previously, Media Composer displays an alert saying some of the embedded media failed to import. This is expected and only the new panels appear in your bin. The other clips appear as offline media which can be relinked using Media Composer's relink tool.
Tip: When importing a AAF from Flix, you can determine where new panels belong in an existing edit by using the Flix Sort and Flix Sort per Revision column options in your bin.
Importing Your Dialogue File as Captions in Avid Media Composer
Once you have exported your dialogue out of Flix as a .txt file, you can import that file to Avid as captions.
Tip: You can export your dialogue from your Flix revisions by using either Publish to Editorial, or the Export from Flix button.
To import caption data in Avid:
| 1. | Create a new Video Track. |
| 2. | Open the Effect Palette and click the Filters tab, then search for SubCap (Generator). |
| 3. | Drag the SubCap (Generator) onto your new video track. |
| 4. | OpenTools > Effect Editor. |
| 5. | Under Caption Files, click Import Caption Data. |
A file browser appears for you to select your caption data.
| 6. | Use the file browser to select your exported dialogue file and click Open. |
A clip is created on your video track for each dialogue item which can then be edited independently from panels in your edit.
Sending a Sequence Revision back to Flix from Editorial
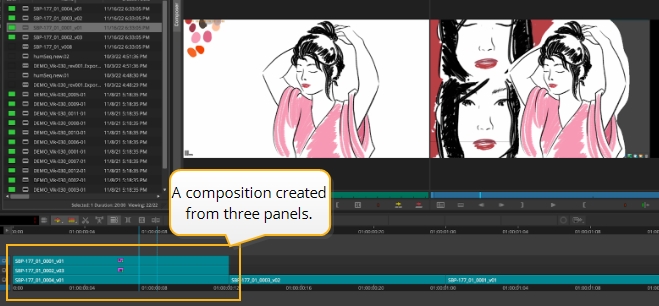
Once you've finished editing a sequence and adding in external media such as Adobe After Effects compositions or a Maya playblast, you can re-import the sequence in Flix and it appears as a new Revision.
If you've created a composition from multiple panels in the edit, the related panels are also sent to Flix as REF panels. REF panels provide easy access to all the images used in editorial to allow Flix to re-create a composition in the original PSD, improving collaboration and cooperation between Story and Editorial.
Warning: Do not mix down the composition panels in the edit or Flix will not recreate the REF panels as expected.
See View Related Panels from Editorial in Flix for more information.
Exporting Your Sequence Revision from Adobe Premiere
Flix requires both a .xml file and a .mov reference movie file to update your Sequence with a new Revision incorporating the changes made by editorial.
• To create the .xml:
| 1. | Select your sequence and click File > Export > Final Cut Pro XML. |
| 2. | Choose a location to save your file. |
| 3. | Click Save. |
• To create the .mov:
| 1. | Click File > Export > Media. |
| 2. | Select a codec that uses QuickTime, such as Apple ProRes. |
Warning: Check that the framerate and aspect ratio of your export matches those of your Show in Flix, otherwise your sequence will not be imported.
| 3. | Choose a location to save your file. |
| 4. | Click Save, then Export. |
Note: Markers created in Adobe Premiere display in the Flix panel browser at the beginning of the corresponding shot.
Exporting Your Sequence Revision from Avid Media Composer
Article: Have a look at Knowledge Base article Q100650 for more detailed information on Storyboard Pro camera animations in Avid Media Composer.
To export an AAF of your edit back to Flix:
| 1. | Right-click on your sequence and select Output > Export to File or right-click on the Sequence Viewer and select Export... |
A Save dialog opens.
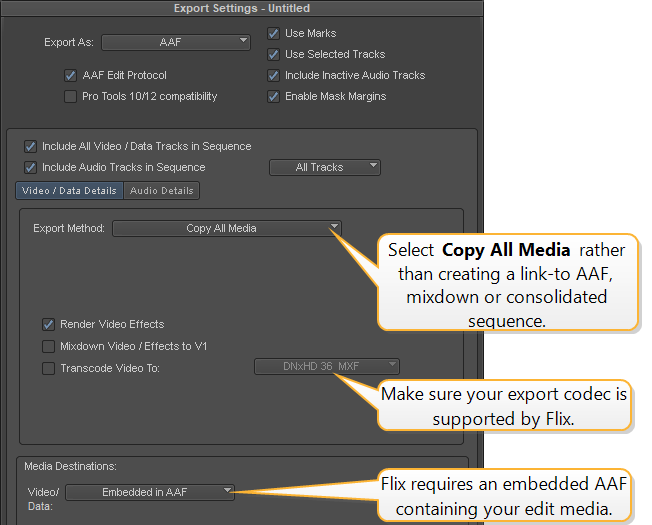
| 2. | Click Options to open the Export Settings window. |
Set the Video/Data Details first.
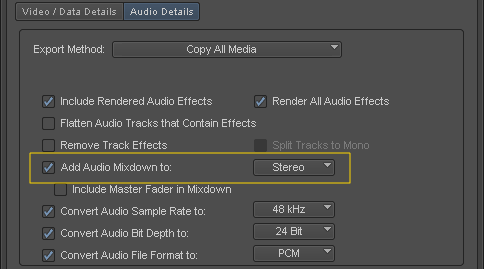
The Audio Details tab controls how audio is exported from Avid. Audio can severely impact the file size of AAFs exported from Avid to Flix.
You can:
• Disable Add Audio Mixdown (recommended) - manually mixdown the audio before export to AAF.
Note: We recommend manually mixing down audio in Avid before exporting the AAF back to Flix. See the Audio Mixdown in Avid Knowledge Base article (Q100581) for more information.

OR
• Enable Add Audio Mixdown - use Avid to mixdown the audio automatically before export to AAF.
Warning: Enabling Add Audio Mixdown includes all the source media for all audio clips in the edit, which can result in long processing times.
| 3. | Click Save to finalize the video and audio export settings. |
| 4. | Choose a location to save your file and click Save. |
Note: Markers created in Avid Media Composer display in the Flix panel browser at the beginning of the corresponding shot.
Updating your Sequence in Flix
| 1. | In the breadcrumb, click Sequence. |
This takes you to the Revisions level.
| 2. | Click the Editorial button. |
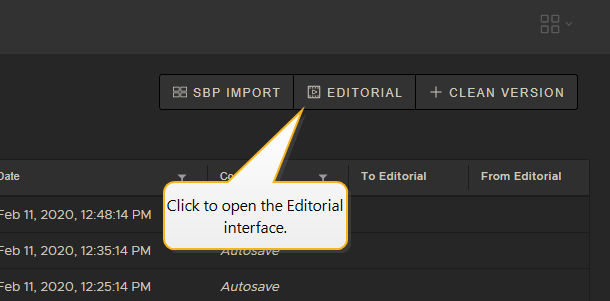
This opens the Editorial Interface.

| 3. | If you're using Adobe Premiere: |
• Browse to your .xml and .mov files to populate the Movie Path and XML Path. You can select both files at the same time in your file browser.
If using Avid Media Composer:
• Browse to your .aaf file to enter the AAF Path.
| 4. | Enter a Comment if required and click Import. The comment appears on the sequence revision in the Revisions list. |
The import details appear in the Import Logs so you can check what's changed on a panel by panel basis.
| 5. | Go to the Revisions level to open the newly-imported sequence revision.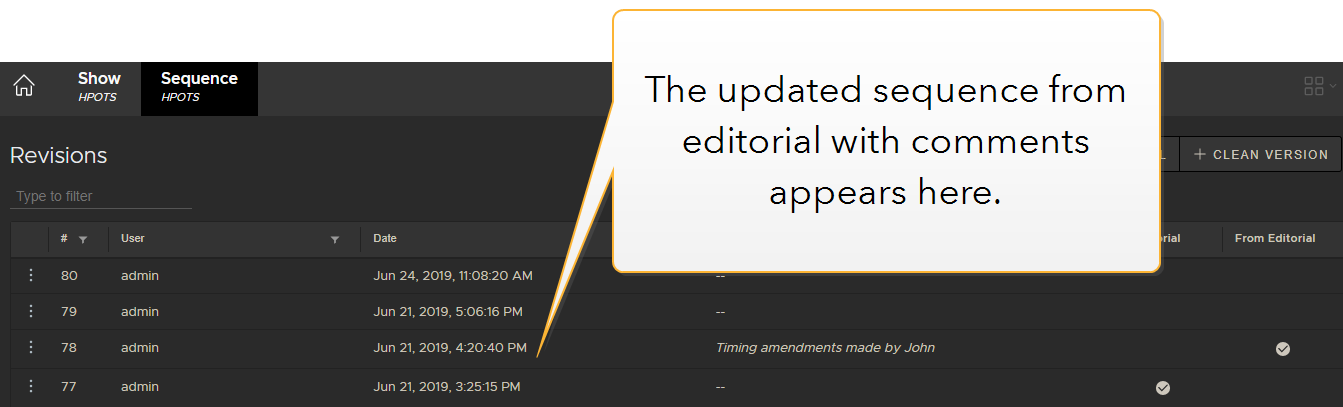 |
View Related Panels from Editorial in Flix
If you've created a composition from multiple panels used in the edit, the related panels are also sent to Flix as Ref panels. Reference panels provide easy access to all the images used in Editorial to allow Flix to re-create a composition in the original PSD, improving collaboration and cooperation between Story and Editorial.
Warning: Do not mix-down the composition panels in Editorial or Flix can not use its versioning system to create panel relations
Panels in Flix that include reference panels from Editorial are marked with the Ref tag. You can view the panels used in the composition in Flix by clicking on the panel ID and browsing through the Related section.
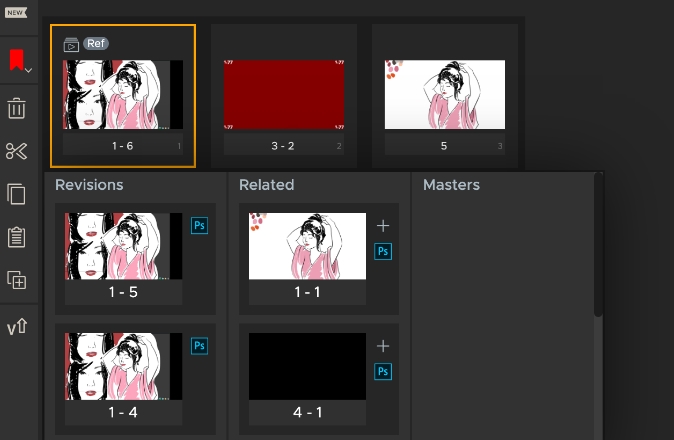
Note: You may find that the Related panels column includes one or more versions of the same versioned-up reference panel ID. This is to ensure that the link between related panels and their artwork is maintained if the reference panel is duplicated.
Access Editorial Publish Information from Your Inbox
Publishing from Editorial automatically notifies you with an easy to read email containing a breakdown of what’s changed. No one can access the links without the correct Flix credentials, so your changes stay confidential and protected within your production.
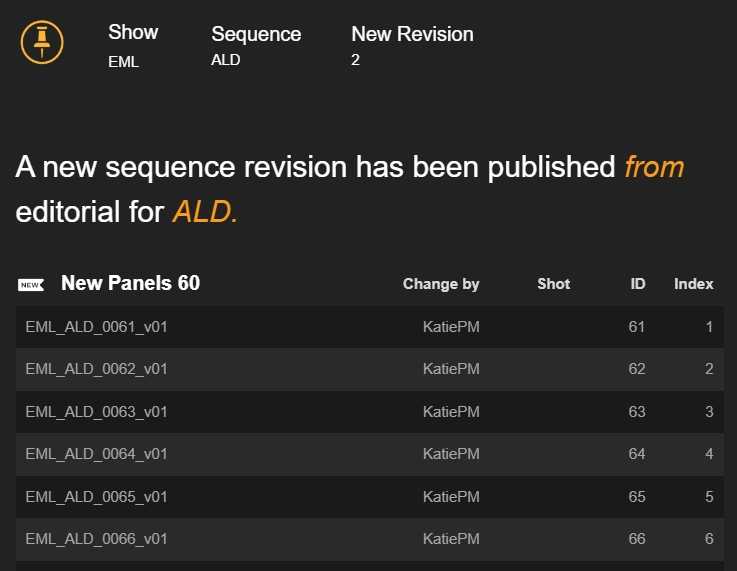
Each publish email contains the following links and information:
• Clickable redirects to the relevant show, sequence, or revision in Flix.
• Sequence revision comments.
• Publish to Editorial only: A link to published files and Contact Sheet.
Note: The link redirects you to Flix Client and requires you to log in for security purposes before you can access the link.
• Publish to Editorial only: Panel comments added or resolved since the previous publish to Editorial.
• Information on:
• New panels.
• New panel revisions.
• Deleted panels.
• Panel duration changes.
• Publish from Editorial only: Camera move changes.