Installing Flix Server
The following instructions are a guide to get your Flix Server up and running quickly.
Note: If you're new to Flix Server installation, please read Flix Server Technical Overview to familiarize yourself with server requirements and architecture before getting started. The following System Requirements are recommendations only. Actual server specifications vary greatly depending on factors such as the number of users and the server usage required for different productions.
Flix Server System Requirements
Warning: For security reasons, the date and time for the machine on which Flix Server is installed needs to be set correctly. This also applies to virtual machines. For more information, please refer to this Knowledge Base article.
Recommended Requirements
Note: Flix Server is built and tested exclusively on Intel processors. Running the Flix Server on AMD processors may lead to unexpected runtime errors.
|
Linux |
|
|
Operating System |
• CentOS 7 64-bit (this will be deprecated in future releases) • Rocky 9 |
|
RAM |
At least 16 GB |
|
Note: The volume where the /tmp directory resides should have at least twice as much free space as the largest AAF imported into Flix. We recommend at least 16 GB, which is enough for most studios. |
|
|
CPU |
A 64-bit Intel processor @ 3.2 GHz, or higher 8 cores, or more |
Minimum Requirements
Note: Flix Server is built and tested exclusively on Intel processors. Running the Flix Server on AMD processors may lead to unexpected runtime errors.
|
Linux |
|
|
Operating System |
• CentOS 7 64-bit (this will be deprecated in future releases) • Rocky 9 |
|
RAM |
8 GB |
|
Note: The volume where the /tmp directory resides should have at least twice as much free space as the largest AAF imported into Flix. We recommend at least 8 GB, which is the minimum storage requirement. |
|
|
CPU |
A 64-bit Intel processor @ 2 GHz, or higher |
Installing and Running MySQL 5.7
Flix Server is the server application for Flix. Installation of MySQL 5.7 is required for Flix Server to run.
Warning: Flix MySQL server now requires the innodb_autoinc_lock_mode global variable to be set to 1, consecutive mode. If MySQL is configured to use interleaved mode, the server will not start.
- Install MySQL and check that your MySQL server is running. Instructions for this can be found in this Knowledge Base article or online.
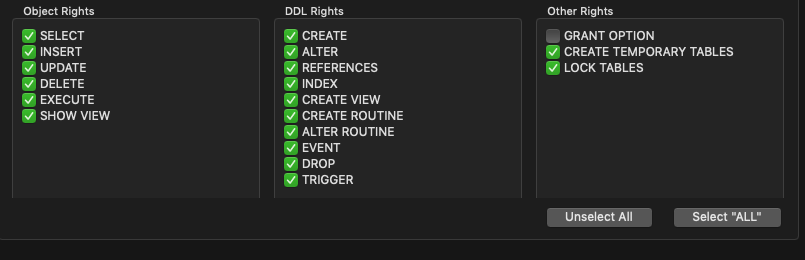
- Ensure the username that Flix uses to connect to the MySQL database has the following permissions:
Note: The MySQL database doesn't need to be running on the same machine as the Flix Server. However, it must accept external connections over a network to allow for communication with your Flix Server(s). Refer to this Knowledge Base article for more information.
Download Flix Server
- Download Flix Server at https://www.foundry.com/products/flix/download.
For Mac, a .dmg file is downloaded.
For Linux, a .tar.gz file is downloaded.
Note: You must be logged in to your Foundry account to download Flix Server.
- Open/untar the downloaded archive.
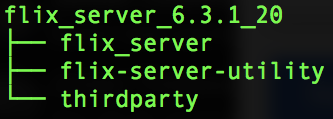
The folder contains the following:
• flix_server - a binary file which you execute to start server Flix Server.
• flix-server-utility - a helper binary which Flix Server starts upon startup.
• thirdparty - a folder containing thirdparty libraries Flix Server relies on.
Example of extracted archive:
- Place these files wherever you want Flix Server to be installed.
Configuring Flix Server
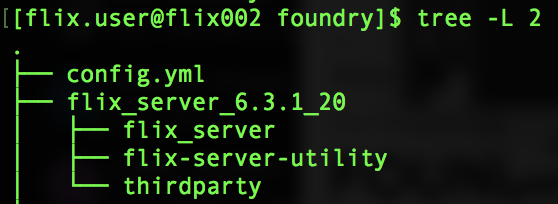
You need to set up a config.yml file before you can run Flix Server. By default, Flix Server reads the config file from the same directory as its binary file (flix_server). In order to make upgrading to future versions of Flix easier, we strongly recommend storing the config file in a different location and pointing to it when running Flix Server using the --config-file CLI argument.
Example of config.yml stored alongside the Flix Server directory:
See Running Flix Server for more information.
Here's an example config.yml. You can download and edit a sample here.
hostname: flix001.mycompany.com
http_port: 8080
mysql_hostname: db1.mycompany.com
mysql_username: root
mysql_password: password
Note: Ensure that the hostname option is set to a publicly available hostname or IP address. We recommend a fully qualified domain name and unique hostname for each server.
Note: The mysql_username and mysql_password are for the user specified in Installing and Running MySQL 5.7 with those permissions.
Tip: You may need to add a firewall port exception to allow access on the ports through which Flix communicates with clients. See your OS documentation for more information on firewalls.
The Flix Server Address end users require is in the following format: http://[hostname]:[port]. Using the example config.yml above, the Flix Server Address is: http://flix001.mycompany.com:8080.
Warning: macOS users: If you're installing the server on Mac OS, hostnames contain .local and aren't supported. Multicast DNS (mDNS) domains are not supported. As a workaround, set the public IP and hostname in your /etc/hosts file, for example: 172.168.3.42 flix.local
Tip: See Flix Server Options for a full list of configuration options.
Article: For a best practice guide on adding new servers and upgrading Flix, check out the following Knowledge Base Article.
Licensing Flix Server
Single Server
If you plan on using only a single Flix Server then all you need is a node-locked license for the Flix Server machine.
Note: Please refer to our Licensing Documentation for instructions on installing a node-locked license.
For more information on setting up a Flix 6 license, see the following Knowledge Base article: Flix 6 Licensing Setup and Troubleshooting.
Multiple servers
If you plan on using more than one Flix server, we recommend using a floating license, either hosted on one of the Flix Servers or from another dedicated license server.
Note: Please refer to our Licensing Documentation for instructions on installing a floating license.
You will then need to point all of your Flix Servers to use the license floating from your Foundry License Server by setting the floating_license_hostname and floating_license_port config options.
For example, if your Foundry License Server is running on a machine called "my_license_server" and using the default port 4101 then you would set the following:
floating_license_hostname: my_license_server
floating_license_port: 4101
Note: If you’re unsure about the hostname and/or port to point your Flix Server to, you can refer to this section in our Licensing Documentation.
You have now completed the minimum steps for setting up Flix Server. The following instructions guide you through more advanced set up options. If you want to return to these custom options later, you can jump to Running Flix Server.
Setting a Custom Assets Directory
By default, your Flix assets are stored in an 'assets' directory, which is located in your install folder alongside the flix_server binary. We strongly recommend that you change this to a custom location, to make the upgrading process easier for all future releases of Flix. To do this, set the asset_directory option in your config.yml file. For example:
asset_directory: /mnt/flix-assets
Note: If you were previously using Flix without specifying the asset directory, or changed the value of the asset_directory option, see Migrating Assets When Switching to a New Assets Directory to import assets from the original directory.
Note: From Flix 6.3.0 onwards, assets are stored in sub-directories per show.
Setting up Shared Storage
Flix can be configured to store assets on shared storage, accessible by all servers. This way assets aren't siloed across multiple servers. To switch to shared storage, add the shared_storage setting into the config.yml file.
By default, under the assets directory, each server will have its own directory specified by the server identification number (a long string of numbers/characters) where it stores its own assets. If you want all the servers to store assets in a shared directory, set the shared_storage option to true. Every Flix Server stores the assets in the same directory specified by the asset_directory folder.
Note: If you were previously using Flix without shared storage and want to switch, see Migrating Assets When Switching to a New Assets Directory to import assets from each server’s asset directory to the shared one.
OAuth
The OAuth configuration allows users to log in to Flix using their credentials provided by an OAuth service. Using the example below, configure your Flix server config file to use OAuth. Once the configuration is enabled, restart your Flix Server, and users should now be able to log in using the Sign In with Google button.
use_oauth - This determines whether to use OAuth authentication or not.
username - This determines whether artists are authenticated by 'username' or 'email' address and is used to create their Flix username. Setting the username parameter to email forces Flix to create unique usernames.
Note: If the username parameter is blank, misspelled, or omitted, authentication defaults to 'username'.
domain - This specifies the domain name for your OAuth provided credentials.
providers - This specifies the OAuth provider.
Example of OAuth:
oauth:
  use_oauth: true
  username: email
  domain: my_domain.com
  providers:
    - Google
Warning: Please be certain not to have LDAP and OAuth both enabled.
OAuth doesn't currently obtain the user groups from Google like it does for LDAP, so group management for project access needs to be done using Flix's built-in Group Management.
Warning: OAuth is not supported when using HTTPS. Due to the design of OAuth, it requires making a HTTP callback to the Flix Server. With HTTPS enabled, this callback would also need to be via HTTPS, however without external access to your certificate authority, this request would fail. Currently this limitation prevents OAuth and HTTPS from being used at the same time.
Note: Currently the only OAuth provider supported is Google.
Setting Up Email Notifications
Flix can be configured to send email notifications to members of the production when publishing a sequence to and from editorial.
To do this, Flix uses your SMTP server. To set up email notifications, set the following options in your server's config.yml file:
smtp_hostname - Hostname of the SMTP server to use.
smtp_port - Port number of the SMTP server to use.
smtp_username (optional) - Username of the account to authenticate with the SMTP server.
smtp_password (optional) - Password of the account to authenticate with the SMTP server.
smtp_send_from (optional) - Sets the email address Flix uses for notifications.
Example of Email Notifications config:
smtp:
 smtp_hostname: smtp.mystudio.com
 smtp_port: 465
 smtp_username: example@mystudio.com
 smtp_password: MyP@ssword
 smtp_send_from: flix_publishes@mystudio.com
Note: If the smtp_username and smtp_password config options are not set, Flix Server attempts to connect to the smtp server without authenticating when sending notification emails.
Note: If the option for smtp_send_from is not set, Flix sends email notifications from the email address of the user publishing to and from editorial. If the user doesn't have an email address, no email notifications are sent.
Setting Up HTTPS
By default, Flix’s security relies on every request between Client and Server being signed. For added security, you have the option to run Flix over HTTPS, so that all communication between Flix Client and Flix Server is encrypted. This would be preferable if, for example, running Flix on a publicly available server.
To set up HTTPS, you will need to set the following options in your server’s config.yml file:
ca_file - Add this option and the path to a CA certificate file if using self-signed certificates.
cert - Add this option and the path to a TLS certificate file (public key).
key - Add this option and the path to the TLS key file (private key).
Note: Flix supports TLS 1.0 and TLS 1.1
Example of HTTPS config:
tls:
 ca_file: /Foundry/cert/ca.crt
 cert: /Foundry/cert/cert.crt
 key: /Foundry/cert/server.key
Note: The ca_file option should only be set if using self-signed certificates, otherwise only the cert (public key) and the key (private key) need to be set.
Note: When using self-signed certificates, make sure these have been installed on your end users' machines to enable communication with Flix Server. For more information, go to Setting Up Flix Client for HTTPS.
Warning: OAuth is not supported when using HTTPS. Due to the design of OAuth, it requires making a HTTP callback to the Flix Server. With HTTPS enabled, this callback would also need to be via HTTPS, however without external access to your certificate authority, this request would fail. Currently this limitation prevents OAuth and HTTPS from being used at the same time.
How to Set Up a Reverse Proxy Server
Making use of integrated cloud platform features such as auto-scaling and load balancing can be challenging, because Flix Clients require direct access to all Flix Servers to run effectively. Flix supports reverse proxy servers to simplify this process, which are commonly used intermediary servers that manage requests for resources across the internet. Using a reverse proxy server allows you to customize the connections between Flix Clients and Flix Servers to fit your needs, including:
• Load Balancing - distribute Flix Client requests across the available Flix Servers to maximize efficiency and avoid any one server being overloaded. Without load balancing, all Flix Client asset requests in your studio might be directed to a single Flix Server despite there being more servers available to handle requests.
• Web Acceleration - compress inbound and outbound data, as well as cache commonly requested content, both of which speed up the flow of traffic between clients and servers.
• Security and Anonymity - hide the identities of Flix Servers, acting as an additional defense against security attacks, by masking the IP address in a similar way to a VPN.
|
|
|
The reverse proxy server handles server load bearing and hides |
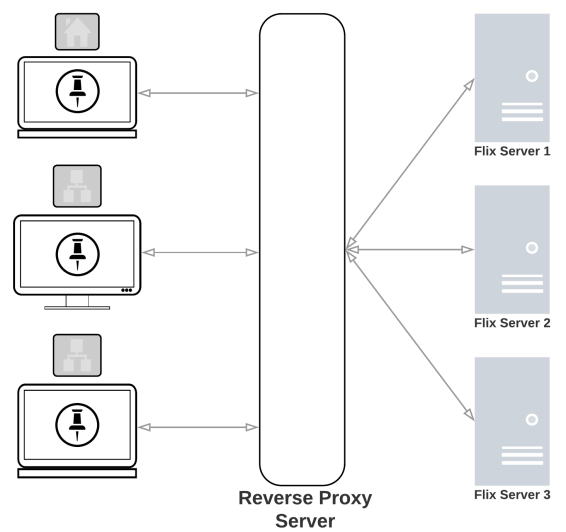
Flix includes a health check to determine if a server is "healthy" and ready to handle remote procedural calls (RPCs) and then the reverse proxy server can act accordingly. For example, if one Flix Server reports as unhealthy, the remote proxy server can redirect Flix Client RPC requests to another available server.
Tip: The gRPC health check protocol in use by Flix is available from GitHub: https://github.com/grpc/grpc/blob/master/doc/health-checking.md
Here's an example code snippet from the Flix config.yml showing you how to set up the proxy and security options:
proxy:
  host: flix.company.com
  port: 8989
  transfer_port: 8881

security:
  disable_hostname_check: true
  skip_transfer_tls: true
• host - The hostname of the reverse proxy server. This is the URL that Flix Client uses to connect to the server HTTP API.
• port - The HTTP(s) port the reverse proxy server is listening on.
• transfer_port - The grpcs port the reverse proxy server is listening on for file transfers.
• disable_hostname_check boolean [default: false] - If set to true, Flix Server does not check that the host header requested by the Flix Client matches the hostname of the server. This can be used for reverse proxy setups where the reverse proxy's public URL does not match the Flix Server's hostname.
• skip_transfer_tls boolean [default: false] - If set to true, Flix Server listens for insecure (non-TLS) RPC connections. This can be used for reverse proxy setups where the reverse proxy terminates the TLS connection (grpcs://) from the Flix Client and uses an insecure connection upstream to the Flix Server.
Note: Flix Clients always communicate using gRPCs, never using insecure (non-TLS) RPC connections.
Running Flix Server
Your operating system may not give run permission to the flix_server binary by default. To ensure you can run it, enter the following command:
chmod +x flix_server
If your server config file is located in the same directory as your Flix Server binary, you can run the server as follows:
./flix_server --verbose
Note: The --verbose flag is optional, but is useful as it displays a more detailed log output in the console.
You should see a readout like the screen shot below once Flix Server is successfully running. Using the --verbose flag would display more information than shown here.
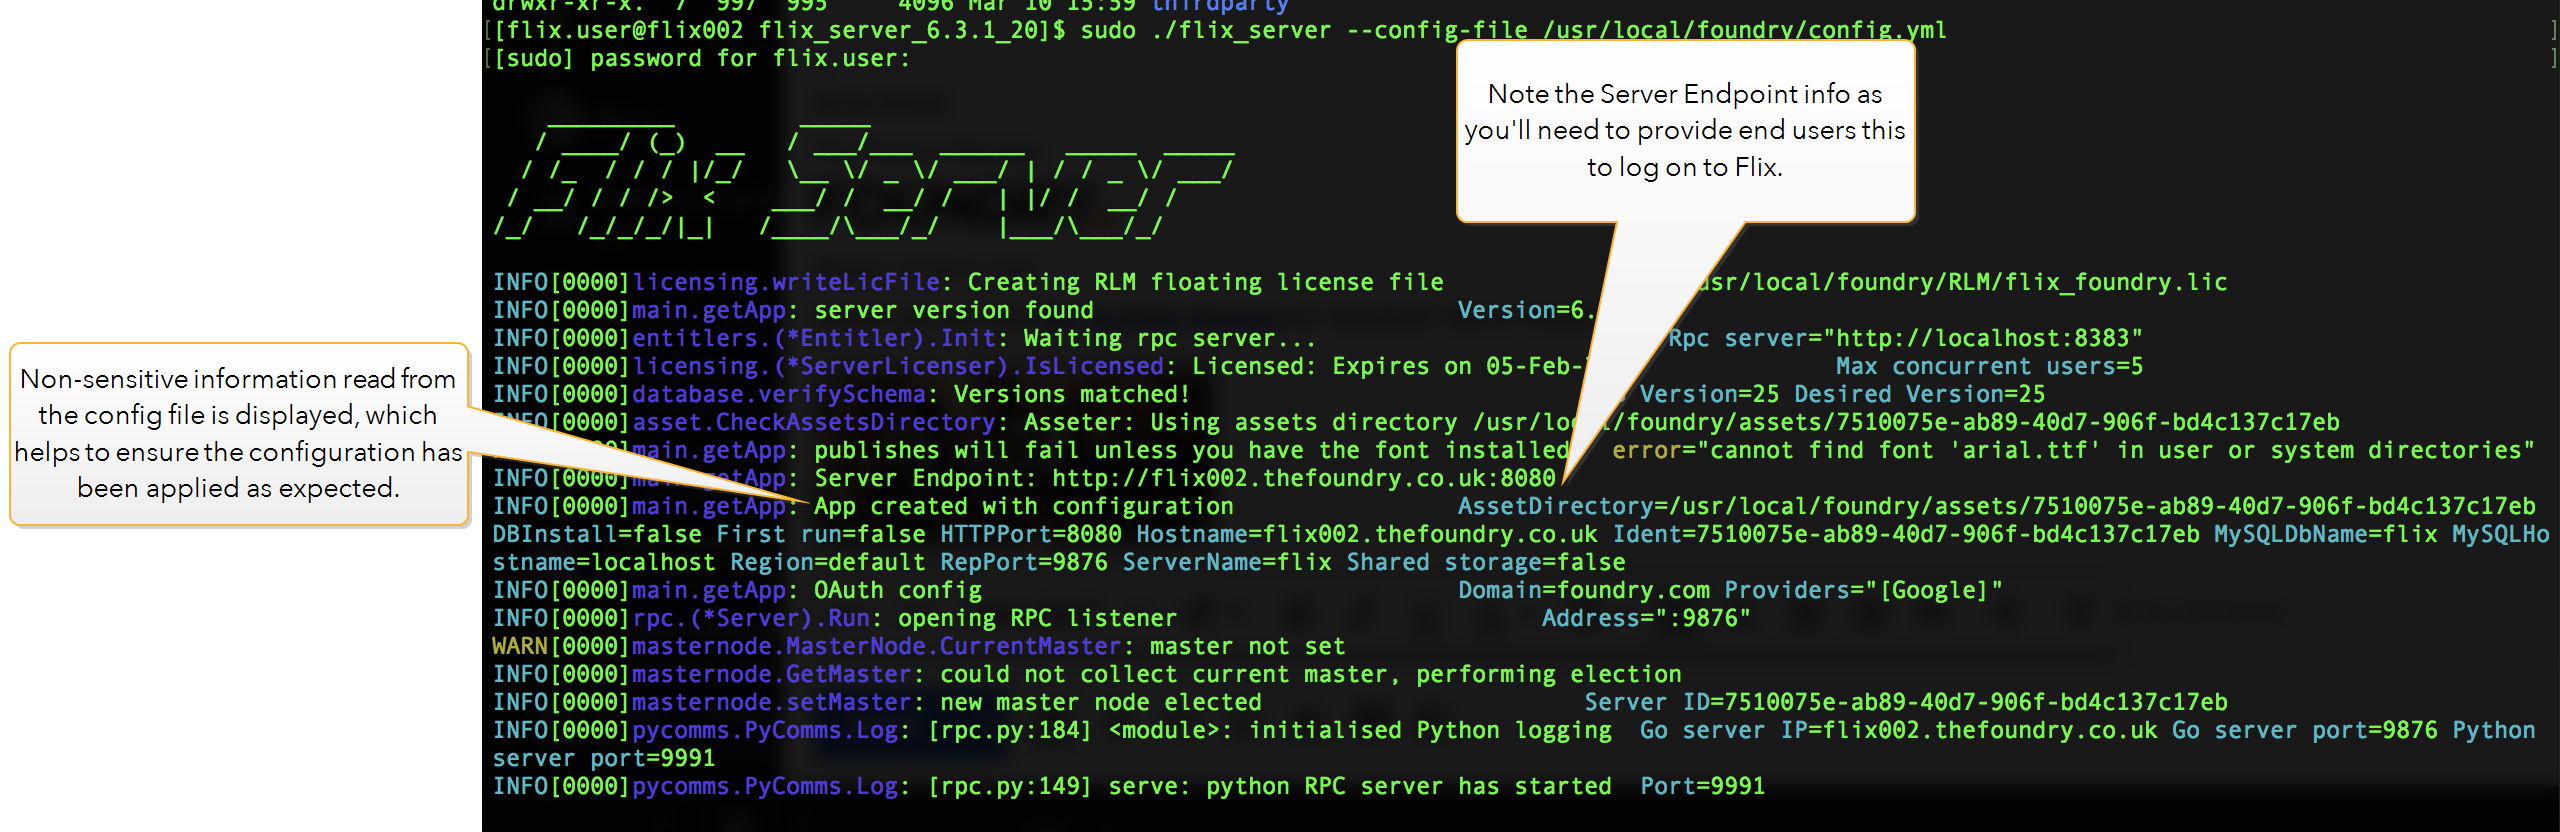
As mentioned above, we strongly recommend storing the server config file outside the Flix Server directory. To point Flix Server to the location of the server config file, use the --config-file CLI flag. For example:
./flix_server --verbose --config-file /mnt/flix/flix_config_prod.yml
Warning: If Arial font is not installed or cannot be located on the operating system running Flix Server, publishes will fail with the following error: “cannot find font ‘arial.ttf’ in user or system directories”. We recommend that you install the Arial font into your system's default font directory, or specify a custom font directory using the font_directory option. For example: font_directory: /mnt/flix-fonts.
Note: The first time the Flix Server is run, it automatically creates an admin user with the username and password both set to admin, which you can use to log in to Flix for the first time. It is recommended that you change the default password after the first log in.
Tip: You can set up Flix Server as a service, so that it starts automatically along with the server on which it's installed. Instructions on how to do so can be found in this Knowledge Base Article.
Testing the Connection to Flix Server
Now that Flix Server is running, it's a good idea to ensure it's accessible by other computers, as end users only access it from another computer at the studio (on the same network), or remotely (over VPN).
To test the connection:
- Log in to another computer that can communicate with Flix Server, either on the same network or over VPN.
- Open a Web Browser.
- In the URL field, type in the Server Endpoint followed by "/info". Using the example from Running Flix Server, the URL would be:
http://flix002.thefoundry.co.uk:8080/info
You should see something like this:

If you receive a connection error in the web browser, try the following:
• Ensure Flix Server is running on the server
• Ensure the computer you're on can resolve the hostname/IP of the server (flix002.thefoundry.co.uk in this example)
• Ensure the port is open through any firewall that might be running on the server
- Once Flix Server is running and accessible by other computers on the network, you can install the Flix Client app and connect it to Flix Server. See Installing and Launching Flix Client for more information.
Tip: Depending on the size of your Flix user base, a single server may not be enough to provide satisfactory performance and speed. Having multiple servers in your Flix Deployment helps ensure better performance across all users, with HTTP(S) requests being spread across all the available resources. For more information on adding another server to your Flix Deployment, see Adding Servers.