Flix for Story
Top Five Things to Onboard New Story Artists
1. Importing Artwork into Flix
Flix is designed to speed up and manage the various workflows feeding into the creation of a story. Storyboards, Dialogue, Notes from the director, annotations, every version sent and received from Editorial; it's all fed in and managed within Flix. As a Story Artist, you'll be working primarily in your sketching app, like Storyboard Pro. Flix makes your life easier as it tracks every version of a story sequence, acting as the hub that brings together everyone working on the story.
Here are the top five things that will help Story Artists get up and running quickly, so they can get back to focusing on creative tasks.
1. Importing Artwork into Flix
The first thing you need to do is make sure your boards are in Flix. This makes sure they are backed up securely and that everyone in the production can see them. Once the boards are in Flix, they can be arranged into a sequence and the director can make notes, add annotations or send the sequence on to Editorial.
Flix supports multiple image formats, so artists can bring boards directly into Flix to construct shots and sequences. Imports can be flattened JPGs, PNGs and TIFFs you’ve already created, and PSDs from Photoshop or .sboard and .sbpz (packaged project) from Storyboard Pro, if your artwork has layers you’d like to retain.
Note: Importing .sbpz files provides an optimized experience using less storage and reducing backup issues or loss of data.
Importing Image Files
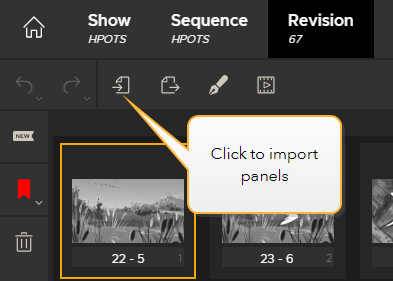
To import image files, simply drag and drop them directly into Flix's panel browser, or use the Import to Flix button at the top of the panel browser.
Importing PSD Files
You can import a PSD using the drag/drop method or the Import to Flix button, however, we recommend using the Flix interactive toolset in Photoshop to send the PSD file to Flix. This toolset can send layers, layer comps, thumbnails and frames directly from Photoshop’s canvas into Flix’s panel browser. See Flix & Photoshop for more information or check out the Flix & Photoshop online video course.
Note: Transferring panels from Photoshop to Flix locks the target Flix revision and you cannot open a new panel in Photoshop or use any of the replace actions during the transfer process.
Flix/Photoshop toolset
Check out the video below for a brief overview of how Flix and Photoshop work together.
Importing Storyboard Pro Files
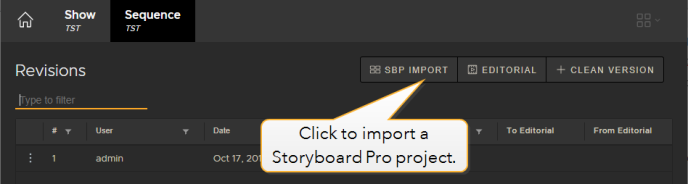
You can easily import an entire project file from Storyboard Pro using the SBP Import button to browse for the desired .sboard or .sbpz (packaged project) file. This creates a new sequence revision which contains only panels from the Storyboard Pro file. Panels from other sequence revisions can be found in Flix’s Library tab, and drag/dropped into this new revision.
Note: Importing .sbpz files provides an optimized experience using less storage and reducing backup issues or loss of data.
See Flix & Storyboard Pro for more information or check out the Flix & Storyboard Pro online video course. For more information on importing panels and Flix workflows with Photoshop and Storyboard Pro, see https://learn.foundry.com/flix#story.
2. Panel ID vs Panel Index
What is the difference between a Panel ID and a Panel Index?
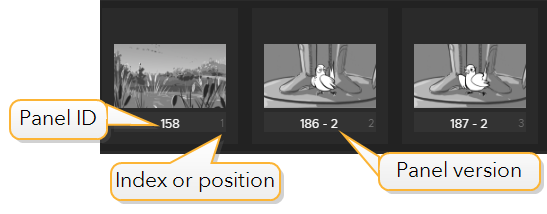
Each panel in Flix is assigned a unique Panel ID. This number never changes, so everyone on a production can trust they are always referring to the exact same panel.
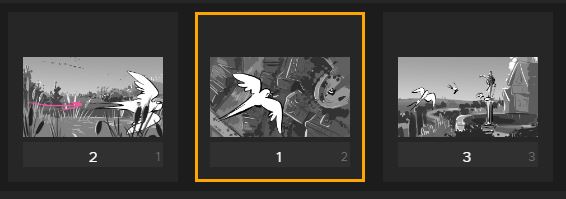
Default positions of Panel ID and Panel Index.
The Panel Index is simply the number that indicates the order of panels. It's always sequential. In other words, if you rearrange the order of panels, the indexes will change but the IDs will not.
If you prefer, you can swap the position of the Panel ID with the Panel Index.
Go to File > Preferences > Panel Browser > Swap Panel ID with Index and toggle the switch ON.
The Panel Index now appears in the center of the panel and the Panel ID is shown on the right.
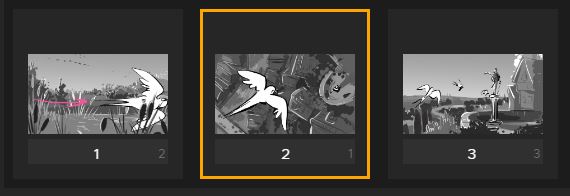
Panel ID and Panel Indexin swapped positions.
3. Editing Existing Panels
Throughout the storyboarding process, your director and colleagues will add annotations and comments in Flix to let you know that a panel or sequence revision needs changes. You can just open up the board straight from the sequence in Flix, rather than digging through folders on your local machine to find the original.
To edit the original Photoshop file:
| 1. | Make sure Photoshop is your default sketching app. To check this, go to File > Preferences > Third-Party Apps > General and check the Sketching Tool is set to Photoshop. |
| 2. | In Flix's panel browser, select the panel you would like to edit in Photoshop. |
| 3. | Double-click the panel or use the Open in Sketching App button. |
The master Photoshop document opens in Photoshop.
To send existing panels to Storyboard Pro for further editing:
| 1. | Make sure Storyboard Pro is your default sketching app. To check this, go to File > Preferences > Third-Party Apps > General and check the Sketching Tool is set to Storyboard Pro. |
| 2. | Select the panel in Flix. |
| 3. | Double-click the panel or use the Open in Sketching App button. |
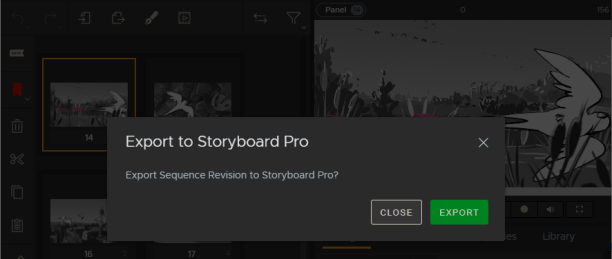
Flix prompts you to export the full sequence revision as an XML file.
| 4. | Click Export. |
You can manually import the XML into Storyboard Pro, which reconforms the sequence with all the latest changes you made in Flix.
Switching Panel Versions
Each time you make changes to a panel within Flix, your previous Flix edits are still available to you as panel versions. If it turns out that your team prefers the previous iteration of a panel, just click on the space at the bottom of the panel and select the desired version from the Revisions list.
4. Adding Dialogue Text
If you receive script changes or decide to add different dialogue options to shots, you can use Flix to add dialogue to panels.
| 1. | Click on a panel you’d like to add dialogue or other text to. |
| 2. | Type your dialogue in the text field in the Dialogue tab. |
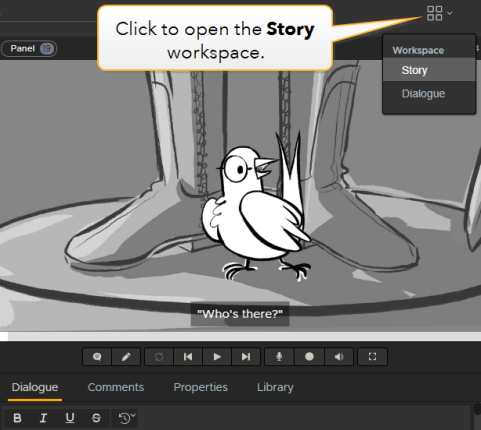
The text appears as subtitles in the Viewer.
Note: You can also select multiple panels and enter text in the Dialogue tab to have that text applied across all selected panels.
Tip: You can switch to use the Dialogue workspace if you prefer. Click on the Switch Workspace button at the top right of the panel browser.
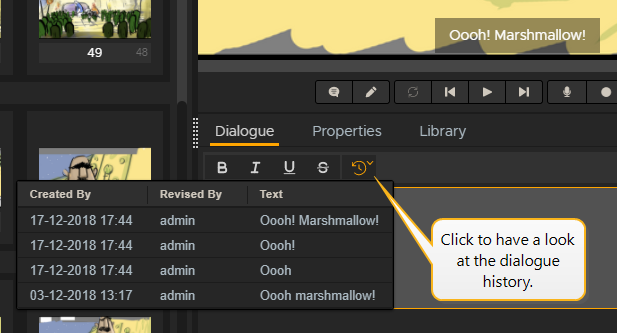
Each time you revise a panel’s dialogue, the panel’s previous text is saved in Flix’s Dialogue History. If you’d like to revert to an earlier version of a panel’s dialogue, click on the Dialogue History button above the text field, and select the desired iteration.
For more information on working with dialogue in Flix, see Adding or Editing Dialogue.
5. Adding Audio to a Pitch
Flix allows artists to add vocals and sound effects to a sequence revision. This means you can get the sequence as close as possible to a worthy representation of the story, so decisions are made without any guesswork. Playing out your sequence in Flix can help artists determine if the pacing for each panel is right, or if the duration of certain panels should be adjusted to fit the overall timing of the sequence. You can even add the silhouette of an audience at the bottom of the viewer, so you're always reminded of the end goal.
| 1. | Press the Record button underneath the Viewer. |
Flix plays through the sequence.
| 2. | Record your audio in time with the sequence revision. |
Note: You can use pre-recorded audio to add background music or other sound effects by importing MP3 or WAV files, which are added in time with the panels.
Tip: When playing the sequence, press A to add an audience to the bottom of the viewer.
For more information on recording audio, see Recording a Pitch or the Flix for Story online video course.
Pitching the Final Sequence Revision
You can really only know how it plays when you screen it to a group. So, once your sequence is developed to a point where you're ready to show, you can play it to your team in Fullscreen/Pitch Mode. While in Pitch mode, annotations are not available, but you can toggle dialogue on or off, loop the playback, record additional audio, and adjust the volume.
If you prefer to pitch the sequence the traditional way, you can also simply step forward or backward through the sequence, using either your keyboard arrows or the Go-to buttons.
Check out the video below for a demonstration on using Flix's pitch mode.
Importing Panels into Flix
You can import panels and other file formats using the file browser or by dragging directly into Flix.
| 1. | In the main toolbar, click the Import to Flix button. |
This opens a file browser.
| 2. | Select one or multiple files. |
Note: You can import the following files: .png, .psd, .jpeg, .jpg, .mov, .mp3, .ogg, .tiff and .wav.
| 3. | Click Open. |
OR
From your file browser, drag one or more files directly into the Flix Panel Browser. You can also drag folders into the Panel Browser for Flix to import their contents.
Your files are imported in the sequence.
Warning: Make sure that you click the  button when the import is complete or the new panels may not be added to the sequence.
Note: Flix keeps track of every imported image and reuses an existing panel instead of creating a new one. In cases where you need to reimport images that have been worked on previously, Flix recognizes which images it's seen before and only process the new ones.
When audio, such as .mp3 or .wav files are imported, Flix displays an audio icon in the Status bar.

Note: If you import a .mov file to the panel browser, any embedded audio contained in the file is not retained. Please see Flix for Editorial for details on importing movie files from editorial with audio.
See Import Progress at a Glance in the Transfer Queue
The Flix file transfer system allows you to easily transfer files between Flix Server and Flix Client quickly and reliably. The transfer queue's interface provides up-to-date reporting of the transfer process and allows you to view and manage transfers more easily.
The Transfer Queue provides visual feedback of the files being imported into Flix. Regardless of the method you currently use to import files, the transfer progress of those files is visible by clicking on the ![]() cloud icon at the bottom right of the Revision window.
cloud icon at the bottom right of the Revision window.
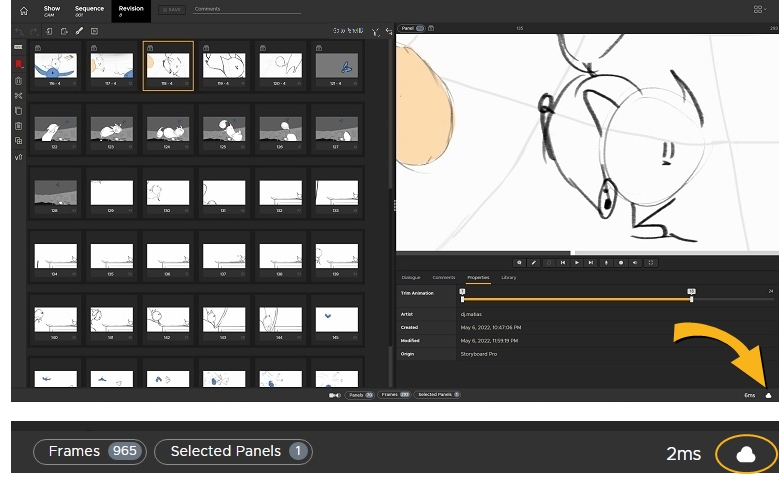
The Total Transfer progress is shown when the Transfer Queue is closed, giving you an overall picture of the state of your file transfers.

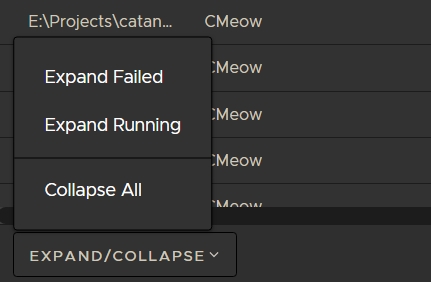
Clicking the ![]() cloud icon opens the queue interface. At the bottom of the window, the Expand/Collapse allows you to quickly check on the status of running and failed imports or collapse all entries in the queue.
cloud icon opens the queue interface. At the bottom of the window, the Expand/Collapse allows you to quickly check on the status of running and failed imports or collapse all entries in the queue.
Expanding entries displays detailed information on individual files in the transfer, such as Show, Panel ID, Progress, and Status.
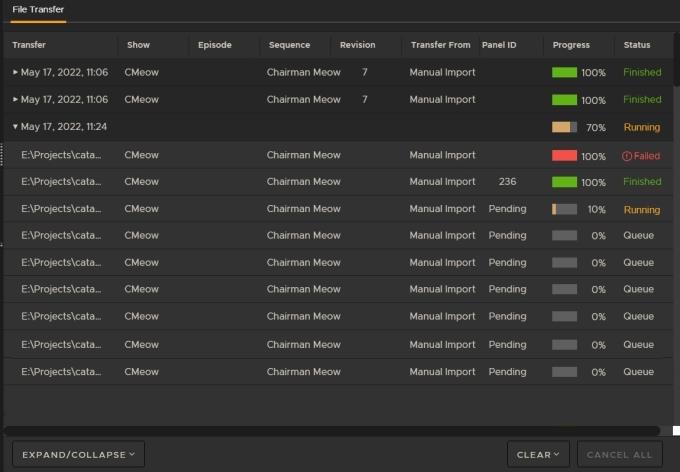
Tip: You can click the Clear button to remove Finished, Canceled, or Failed transfers or cancel any current transfers by clicking the Cancel All button.
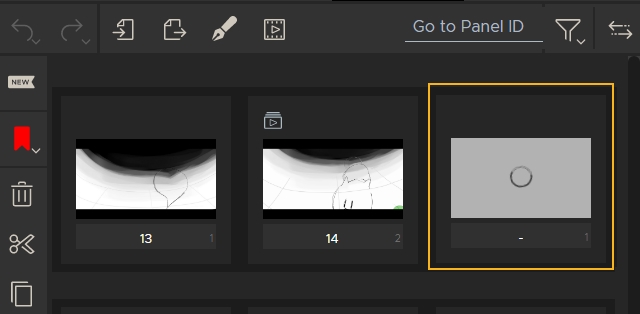
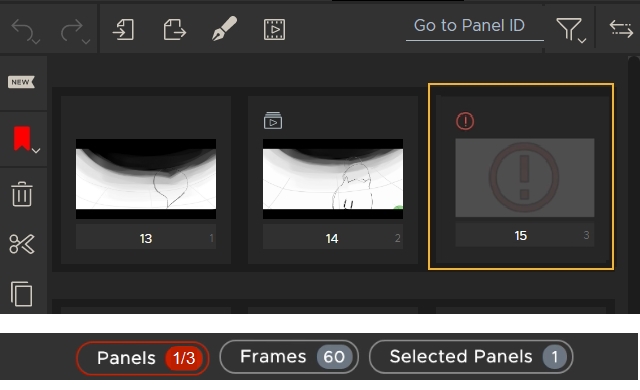
Transfers that display a Status of Finished may still need time to render the thumbnails associated with the file as this is the last step of the transfer process. Panels in the browser waiting for a thumbnail appear as follows:
Transfers that display a Status of Failed are displayed in the panel browser with an exclamation point and are highlighted red in the Panels count at the bottom of the Flix Client.
If a panel fails to import correctly, you can delete the panel and restart the import or look at the logs to determine the cause of the failure. See Transfer Logs for more information.
Tip: You can use the ![]() filter button at the top of the Panel Browser to quickly select failed transfers, or if the Panels button turns red to indicate failed transfers, click the button to automatically display failed imports.
filter button at the top of the Panel Browser to quickly select failed transfers, or if the Panels button turns red to indicate failed transfers, click the button to automatically display failed imports.
Keep Working During File Transfers
The Flix transfer system gives you the freedom to do other tasks while the transfer is in progress. As files are imported in the background, you can continue to work, rather than having to wait for the import process to finish. The following functions are all still available during file transfer:
|
Function |
Conditions |
|
Workspace |
|
|
Resizing, menu operation, Preferences, and so on |
Always enabled. |
|
Panel Browser |
|
|
Reorder panels |
Always enabled. |
|
Add panels |
Always enabled. |
|
Markers |
Always enabled. |
|
Highlight panels |
Always enabled. |
|
Double click to open a panel in Photoshop |
Disabled until thumbnails are created on a per-panel basis, rather than per sequence. Note: Only available if Photoshop is set as the Sketching Tool in the Preferences. See Third-Party Apps for more details. |
|
Double click to send a sequence revision to Storyboard Pro |
Disabled until thumbnails are created on a per-panel basis, rather than per sequence. Note: Only available if Storybaord Pro is set as the Sketching Tool in the Preferences. See Third-Party Apps for more details. |
|
Delete panels |
For completed transfers: • Enabled, but leaves orphan assets in the DB. For Incomplete transfers: • The user can only delete panels when the ID is created. The delete action cannot be undone. Note: The incomplete transfer for deleted panels continues in the background. |
|
Cut panels |
Disabled until all panel IDs are created. |
|
Copy panels |
Disabled until all panel IDs are created. |
|
Paste panels |
Disabled until all panel IDs are created. |
|
Duplicate panels |
Disabled until all panel IDs are created. |
|
Create a new version |
Disabled until all panel IDs are created. |
|
Top Toolbar |
|
|
Undo/Redo |
Disabled until the transfer batch is completed. Enabled for editing only. |
|
Import |
Enabled, the user can always add to the transfer queue. |
|
Export |
Disabled until all transfers are complete. |
|
Publish |
Disabled until all transfers are complete. |
|
Open in Sketching app |
Disabled until thumbnails are created on a per-panel basis, rather than per sequence. Tip: With multiple panel selections if one of the panels doesn't have the thumbnail yet, no panels open until all of the selected panels have thumbnails. |
|
Compare tool |
Disabled until panel IDs are created. |
|
Panel filter |
Always enabled. |
|
Viewer Tabs |
|
|
Dialogue |
The input box is disabled until selected Panel ID is created. |
|
Comments |
The input box is disabled until selected Panel ID is created. |
|
Properties |
Trim animation is disabled until selected Panel ID is created and thumbnail generated. |
|
Library |
Always enabled. |
In addition to the Panel Browser functionality, Flix's transfer system allows you to leave the revision that is importing files and open other sequences or shows, ensuring there is no wasted downtime waiting for files to import. The File Transfer window is always available in any revision of any show that you are working on, and display any current and past imports that have not already been cleared from the queue.
Actions That Stop File Transfers
Canceling imports using the Cancel All button, stops transfers manually. There are also a number of actions that cancel transfers that aren't so obvious:
-
Closing the Flix Client window,
-
Logging out of Flix,
-
Exiting Flix,
-
Reloading the Revision to which files are being transferred, and
-
Flix closing unexpectedly due to an error.
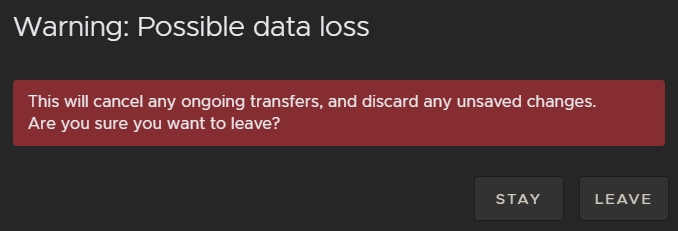
Note: Closing, logging out, and exiting Flix during a transfer displays a warning. Click Stay to avoid canceling transfers and possible data loss. If you select Leave, any ongoing transfers are stopped.
Preview Artwork and Movies from Panels in a Sequence
You can set the default preview setting in the Panel Browser section of preferences to show either the full animation or the first frame only. You can quickly change this setting on each individual panel without having to go back to preferences, but any panel you override in the browser is no longer affected by changes to the Animated Panels preference.
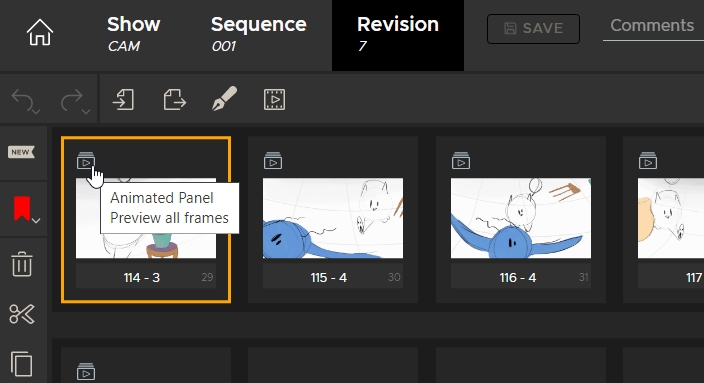
Animated panels are set to Preview all frames by default, but you can change the default behavior to Preview the first frame as follows:
-
On Windows, navigate to File > Preferences or press Ctrl+, (comma) to open the Preferences,
-
In the Preferences dialog, navigate to Panel Browser.
-
Set the default preview behavior for animated panels:
OR
On macOS, navigate to Flix > Preferences or press Cmd+, (comma) to open the Preferences.
• Preview all frames - Animated panels show all available frames in the panel viewer.
• Preview first frame - Animated panels only show the first frame in the panel viewer and the Trim Animation control is disabled.
To manually override a panel's preview settings:
In the Panel Browser, click the icon in the top left to select the preview mode for that panel.
•
![]() Preview all frames - Animated panels show all available frames in the panel viewer.
Preview all frames - Animated panels show all available frames in the panel viewer.
•
![]() Preview first frame - Animated panels only show the first frame in the panel viewer and the Trim Animation control is disabled.
Preview first frame - Animated panels only show the first frame in the panel viewer and the Trim Animation control is disabled.
Note: Changing the default preference does not affect individual panels that you have set manually.
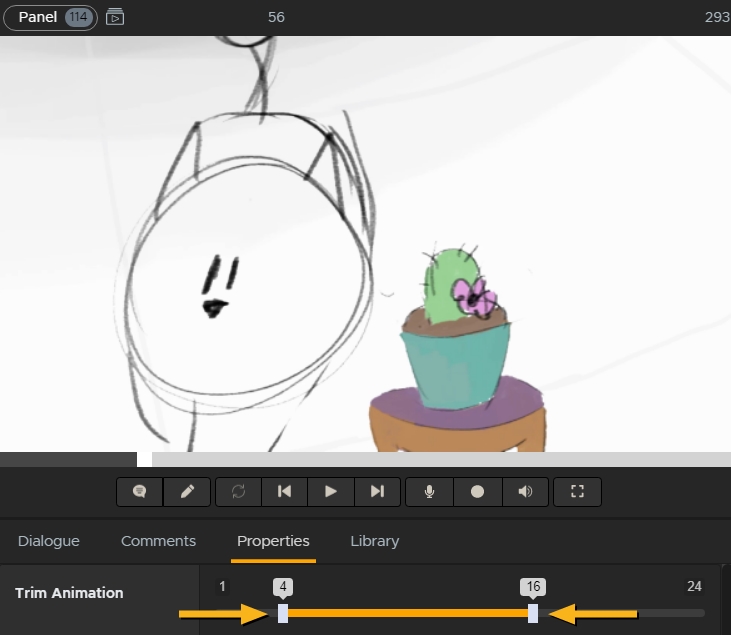
You can trim panels set to Preview all frames using the Trim Animation slider. Adjusting the in and out points causes the animation to play between only those frames.
|
|
|
This trimmed animated panel only plays between frames 4 and 16. |
Making Changes to the Edit
In Flix, you'll be working primarily in the Panel Browser. The following video gives a brief overview of how to navigate and work with your sequence in the Panel Browser.
In the video:
• Importing panels. For more information, please refer to Importing Panels into Flix.
• Each panel displays a unique Panel ID and Index, or position number. If the panel has been updated, a new version is created and numbered.
Note: You can swap the position of each panel's unique ID with its Index number. See Swap Panel ID with Index in Preferences.
• Move panels around by selecting one or more, and dragging them where you want to place them. Hold Shift and click to select a sequence of panels, or Ctrl/Cmd and click to select individual panels.
• Remove panels from your current edit by clicking the Trashcan icon in the Edit toolbar.
• Re-use panels by using the Copy and Paste buttons in the Edit toolbar. This creates new panels re-using the same panel, timing, and dialogue.
• Using the annotation tool. For more information, see Annotations.
• Adding and versioning dialogue.
Tip: Duplicate selected panels with the  Duplicate button.
Editing Panels Already in Flix
To make changes to panels in your edit (sequence revision), you can open and edit them in third-party applications. See the Flix & Photoshop section.
Adding or Editing Dialogue
You can easily add dialogue to your panels in both the Story and Dialogue workspaces. Dialogue is displayed as subtitles in the Player, which you can turn on and off.
Method 1
Flix's Story workspace (default) contains the Dialogue controls in the Panel Properties pane in the Dialogue tab.
To add and edit dialogue:
| 1. | Select the required panel and enter text in the Dialogue box. Press Enter to add new lines. |
This adds dialogue to the selected panel, which is displayed as subtitles in the Player.
Note: If you select multiple panels, the same dialogue is added to all selected panels.
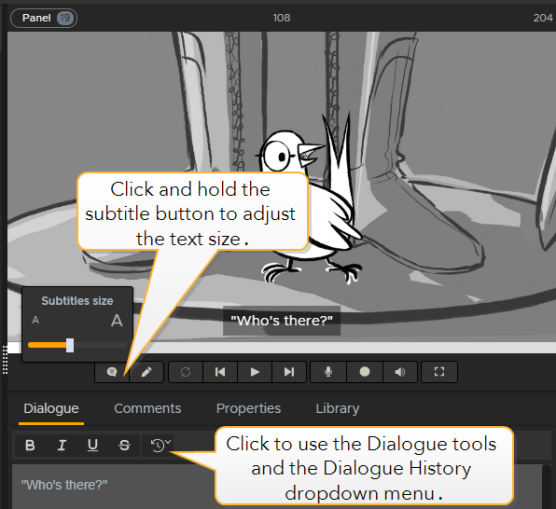
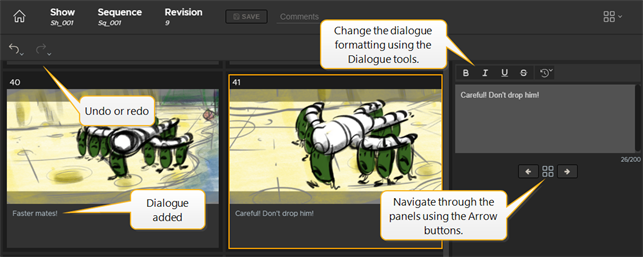
| 2. | Use the Dialogue tools to modify the formatting of your text. |
| 3. | Click the Toggle Subtitles button to turn the subtitles on and off. Click and hold on the button to display the text size slider control. |
Tip: Use the Undo and Redo buttons, located under the breadcrumb, to undo or redo your recent actions.
| 4. | Click Save to save all new dialogue. |
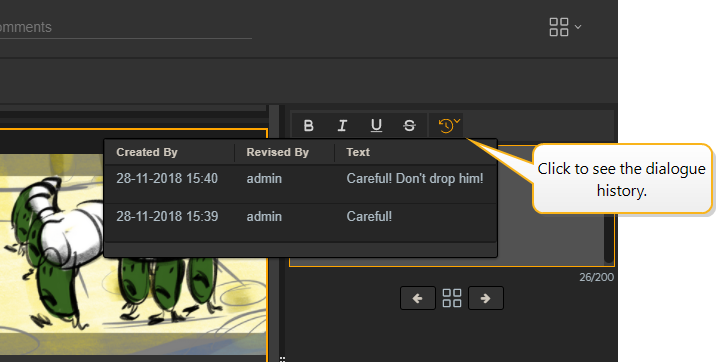
| 5. | Keep track of the dialogue history by clicking on the Dialogue History dropdown menu. |
Method 2
In the Story workspace at the top-right corner, click the Switch Workspace button and select Dialogue workspace. The Dialogue workspace contains a Panel Browser and a Dialogue pane.
To add and edit dialogue:
| 1. | Select the required panel and enter text in the Dialogue box. Press Enter to add new lines. |
This adds dialogue to the selected panel.
Note: If you select multiple panels, the same dialogue is added to all selected panels.
Tip: Press Tab to move to the next panel and Shift+Tab to move to the previous panel when entering dialogue on the Dialogue workspace.
| 2. | Use the Dialogue tools (Bold, Italics, Underline, and Strikethrough) to modify the formatting of your text. |
| 3. | Save your sequence revision to save all new dialogue. |
Note: Keep track of the dialogue history by clicking on the Dialogue History dropdown menu.
Annotations
You can annotate your panels directly in the Player, which is located at the top-right corner of the application in the Story workspace.
Note: To add an annotation to a panel using Photoshop, refer to Annotating a Panel Using Photoshop.
| 1. | In the Panel Properties pane, toggle the annotations on by clicking the Pencil button at the bottom of the Player. |

| 2. | Click the Color Palette button then click again to select a color. |
| 3. | Click and hold the Pencil button then drag the slider to adjust the thickness of the pencil. |
| 4. | Make annotations on your panel. |
| 5. | Use the Eraser tool to partially erase your annotations or use the Trash tool to completely remove the annotations. |
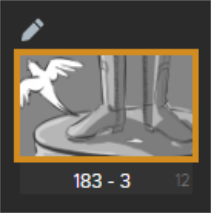
Annotated panels are tagged with the pencil icon and display a border around the thumbnail.
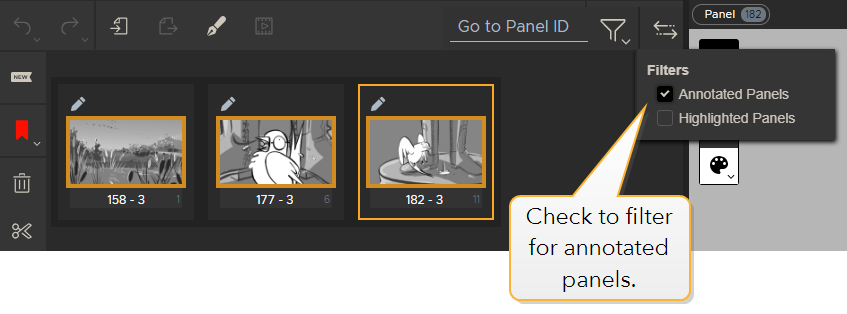
| 6. | To display only panels containing annotations, click the filter |
Tip: By default, annotations appear as an extra layer in PSD files open in Photoshop. You can disable this by going to File > Preferences > Third Party Apps > Adobe Photoshop and disabling the Send Annotation as Layer preference.
Panel Comments
You can add comments to individual panels, which allows Flix users to create a feed of notes and feedback on a sequence. Any comments written on a panel are flagged, so you can see at a glance which boards require attention.
To add a comment:
| 1. | Click on Comments under the Player. |
| 2. | Type your comment into the Comment window and press Enter to post it. |
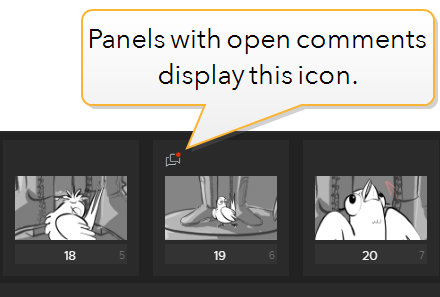
The panel on which you've commented now displays a comment icon. Hover over the icon to see the latest open comment.
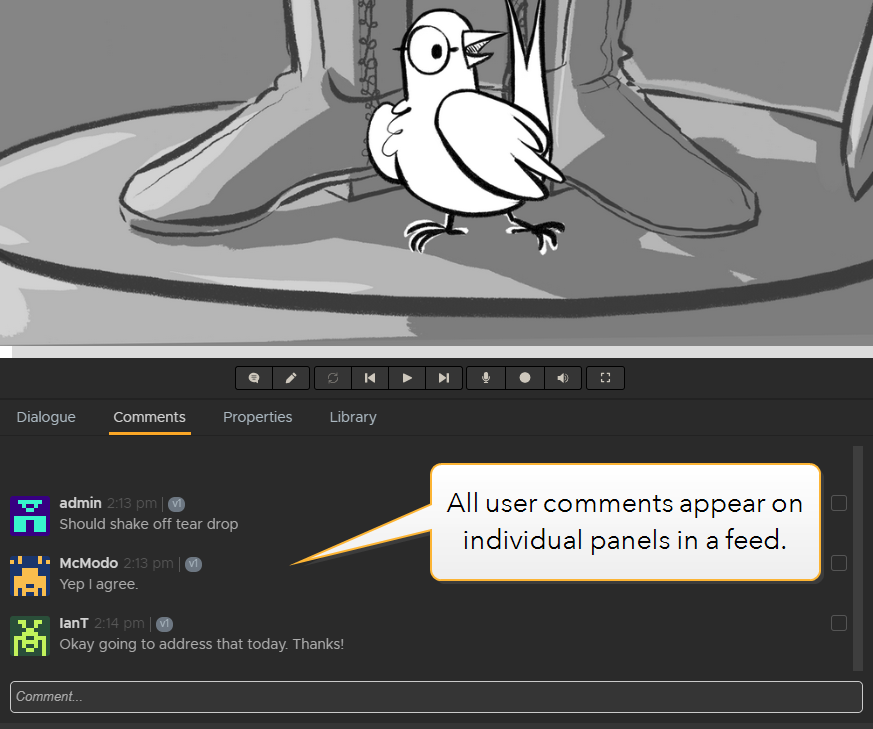
Your comment appears in a feed with any other comments other users have added to that panel.
Every comment has a checkbox which allows users to mark as resolved. For example, once feedback in a comment has been addressed, the person approving the change would tick the comment so everyone in the production knows that feedback has been actioned.
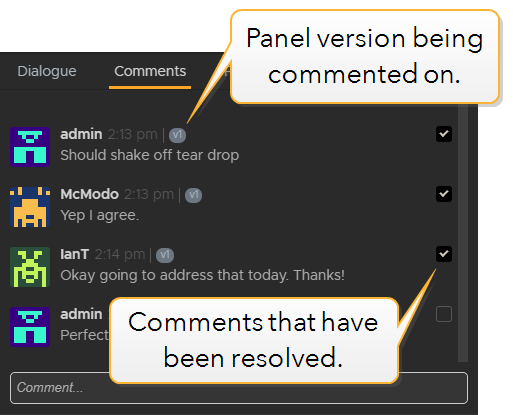
Note: Once all the comments in a feed have been resolved, the comment icon disappears from the panel.
Filtering a Sequence by Comment
You may want to quickly filter your sequence to display only panels with open comments made on them.
To filter by comment:
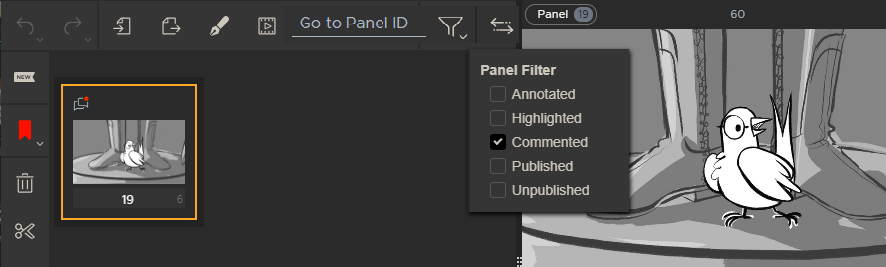
| 1. | Click on the |
| 2. | Select Commented. |
Flix displays only panels with open comments on them.
Recording a Pitch
Periodically, you may want to pitch sequences to others involved in the project to present your work. Pitching allows you to do a rough timing for your sequence, for example depending on the action you may want to stay longer on one panel.
You can access the Pitch workspace through the Player in the Panel Properties pane.
| 1. | If you want to record audio while pitching, navigate to File > Preferences > Audio and select an Input Device. If you already have audio in your sequence and don't want to override it, in the Player click the Microphone button to disable it. |
Note: When pitching with audio, use the Volume button to make sure the volume is set properly.
Tip: You can switch to Full Screen mode by clicking the Full Screen button. Press Esc to exit the Full Screen mode.
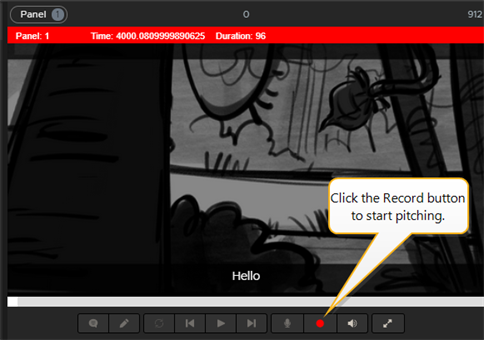
| 2. | Click the Record button to start pitching. |
In the red bar at the top of the Player, the Time and the Duration timers are running.
| 3. | As soon as you reach the required duration, press the right arrow key to move to the next panel. |
By switching to the next panel, you stop the recording of the duration for the current panel and start the recording for the next one.
| 4. | Keep recording the duration for each panel until the end of the sequence or click the Record button again to stop recording. |
In the Panel Properties pane, select the Properties tab to check the updated duration for your panels. You can also change the duration in the Properties tab directly by entering a new duration or using the arrows.
Tip: When playing the sequence, press A to add an audience at the bottom of your panels.
Flix & Photoshop
The following video provides an overview of how Flix and Photoshop work together.
Setting Up Flix to Work with Photoshop
To use Photoshop with Flix, you first need to select Photoshop as your sketching tool then set up the required version and install the plug-in.
| 1. | Ensure Photoshop is closed while setting preferences in Flix. |
| 2. | Navigate to File or Flix > Preferences > Third Party Apps > General. |
| 3. | Under Sketching, select Photoshop from the dropdown menu. |
| 4. | In the Adobe Photoshop tab: |
• set the Executable preference by browsing to the version of Photoshop you want to use with Flix.
• set the Panel Open Behavior:
• Open as Separate PSD - Opens the selected panels in Photoshop as separate .psd files.
• Open in Layer Comps - Opens the selected panels in Photoshop as layer comps.
• Open in Timeline - Opens the selected panels in Photoshop in the Timeline.
Tip: If you use the Open in Timeline option, make sure in Photoshop the New Layers visible in All Frames option is off. It is available in the hamburger menu in the timeline.
• enable or disable Always Open Master Image - This opens the .psd file in Flix as a master image, which means that all information is saved, such as hidden layers and empty groups.
• enable or disable Send Annotation as Layer - This option sets annotated panels to open in Photoshop with their annotations shown on an additional layer.
• click Install Plugin. This installs the Photoshop scripts to run the Photoshop actions.
Warning: If you're using Photoshop 2022, refer to Installing Plug-ins for Photoshop 2022.
Note: Installing the Photoshop plug-in may require admin privileges. Ask your system administrator for assistance, as they can install these manually if needed. Steps for this can be found in Manually Installing the Photoshop Plug-in for End Users.
| 5. | To open the Photoshop actions, in Photoshop, navigate to Window > Extensions > Flix. |
The Photoshop Actions open in a new tab called Flix.
Installing Plug-ins for Photoshop 2022
Photoshop 2022 support requires some extra set up before you install the plug-in.
Article: Have a look at Knowledge Base article Q100649 for more detailed information on installing Photoshop plug-ins.
macOS
-
Launch Photoshop 2022 through the Creative Cloud application before you start the Flix Client.
-
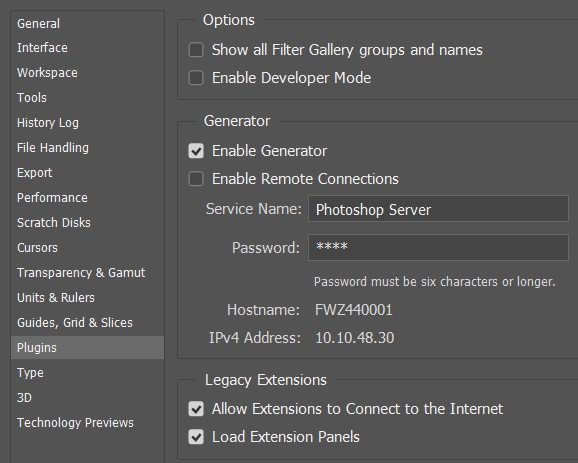
Go to Photoshop > Preferences > Plugins and enable:
-
Then, in the Flix Client, navigate to Flix > Preferences > Third Party Apps > Adobe Photoshop.
-
In the Adobe Photoshop tab, click Install Plugin.
• Allow Extensions to Connect to the Internet, and
• Load Extension Panels.
The Photoshop scripts to run Photoshop actions are installed.
Windows
-
Launch Photoshop 2022 through the Creative Cloud application before you start the Flix Client.
-
Go to Edit > Preferences > Plugins and enable:
-
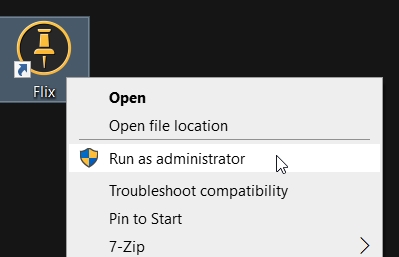
Right-click the Flix desktop shortcut.
-
Click Run as administrator.
-
Navigate to File > Preferences > Third Party Apps > Adobe Photoshop.
-
In the Photoshop tab, click Install Plugin.
• Allow Extensions to Connect to the Internet, and
• Load Extension Panels.
Warning: You must run the Flix Client with Administrator permissions to install the plug-in.
The Flix Client starts up as normal.
The Photoshop scripts to run the Photoshop actions are installed.
Assigning Keyboard Shortcuts to Flix Commands
From Flix 6.3.3 onwards you can assign keyboard shortcuts or 'hotkeys' to the list of Flix commands in Photoshop. The video below shows you how.
Note: If you do not have administrator privileges, you will need to contact your IT department to help you with the following steps.
To set up Flix keyboard shortcuts in Photoshop:
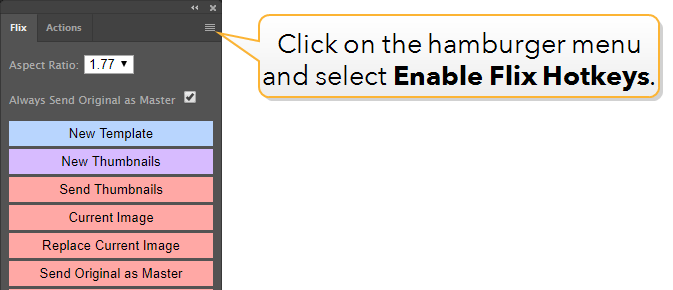
| 1. | In Photoshop, click the hamburger menu on the Flix toolset. |
| 2. | Select Enable Flix Hotkeys. |
An alert with instructions appears and two windows open automatically.
| 3. | Click OK to close the alert. |
| 4. | Copy the Flix 6 Hotkeys folder from the temp directory to the Scripts folder in Photoshop's directory. |
Note: We recommend copying rather than cutting or moving the Flix 6 Hotkeys folder from the temp directory. If you mistakenly delete or misplace the folder, restart the process from step 4, and the folder is recreated in the temp directory.
| 5. | Restart Photoshop. |
You can now assign keyboard shortcuts to Flix commands in Photoshop. If you're already familiar with assigning keyboard shortcuts in Photoshop, you can skip the rest of these steps.
| 6. | In Photoshop, navigate to Edit > Keyboard Shortcuts... |
The Keyboard Shortcuts and Menus window opens.
| 7. | In the Application Menu Command column, expand the Filesection and scroll down to the Scripts subsection. |
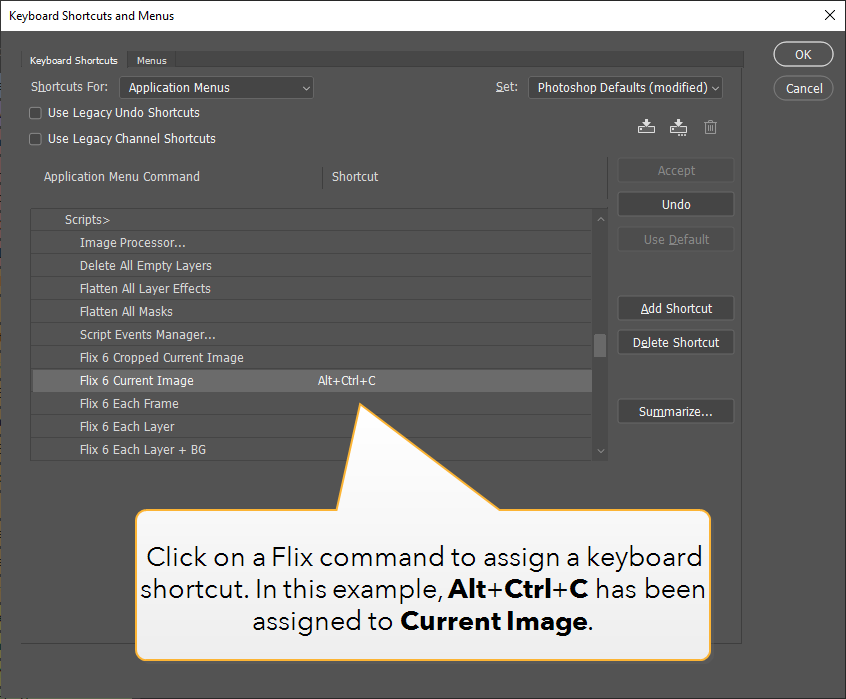
| 8. | Click on a Flix command to add a shortcut. Click Accept once you've entered the shortcut commands you want to use. |
Note: If you assign a shortcut to a pre-existing one, Photoshop alerts you to a conflict. You can overwrite the original shortcut with your new one by clicking Accept, or click Accept and Go to Conflict to assign a new shortcut to the pre-existing one.
| 9. | Click OK to close the Keyboard Shortcuts and Menus window. |
Tip: You can check the scripts that have been installed in Photoshop by going to File > Scripts. Any assigned hotkeys are also listed here.
Creating a New Panel and Sending it to Flix
Note: Transferring panels from Photoshop to Flix locks the target Flix revision and you cannot open a new panel in Photoshop or use any of the replace actions during the transfer process.
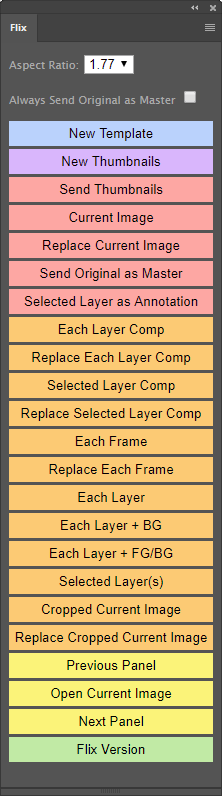
| 1. | In Photoshop, in the Flix tab, select the aspect ratio at the top of the list to match the one of your show: |
• 1.0:1
• 1.77:1
• 1.85:1
• 2.2:1
• 2.35:1
• 2.39:1
Note: Select whether you want to Always Send Original as Master. This sends the original file, unedited, as a Master file to Flix. This does not insert anything in the edit (sequence revision).
| 2. | Select New Template. |
| 3. | Draw on the panel. |
| 4. | Select Current Image. |
Flix sends the panel to the edit (sequence revision). The panel is inserted after the currently selected panel
Creating Thumbnails and Sending them to Flix
| 1. | In Photoshop, open the Flix tab and select the aspect ratio at the top of the list to match the one of your show. |
OPTIONAL: Select whether you want to Always Send Original as Master. This sends the original file, unedited, as a Master file to Flix. This does not insert anything in the edit (sequence revision).
| 2. | Click New Thumbnails. |
| 3. | Draw on the thumbnails. |
| 4. | Click Send Thumbnails. |
Flix sends the thumbnails to the edit. The thumbnails are inserted as nine new individual panels after the currently selected panel, if any.
Note: Make sure the File > Preferences > Always Open Master Image preference is disabled, otherwise when you open one of the nine thumbnails from Flix to Photoshop it will open the original panel containing the nine thumbnails.
Annotating a Panel Using Photoshop
This video demonstrates how to make annotations on Flix panels using Photoshop.
| 1. | In Flix, select a panel in your edit and click the |
The panel opens in Photoshop.
| 2. | In Photoshop, create a new layer and draw an annotation on that layer. |
| 3. | In the Flix toolbar, click Selected Layer as Annotation. |
| 4. | In Flix, click the |
Working with Flix and Photoshop's Layer Comps
OPTIONAL: Select whether you want to Always Send Original as Master. This sends the original file, unedited, as a Master file to Flix. This does not insert anything in the edit (sequence revision).
• In Photoshop, with your .psd file open, open the Flix tab and click Each Layer Comp or Selected Layer Comp.
Photoshop sends to Flix each (selected) layer comp as a single panel.
Making Revisions to Layer Comps
If a master image is available for your layer comps:
| 1. | Ensure the File > Preferences > Third Party Apps > Photoshop > Always Open Master Image is enabled. |
| 2. | Select the panel you want to work on. |
| 3. | In the main toolbar, click the Open in Sketching app |
In Photoshop, this opens the master image with all information including hidden layers and empty groups.
In Flix, this opens the Master file that the panel is linked to in Photoshop.
| 4. | After you are done working on your master image, save the .psd file and select Replace Each Layer Comp from the Photoshop actions. |
In Flix, this updates panels from the first selected to the last, going from the first layer comp to the last.
This video demonstrates how Master Images are created and where Flix stores them.
OR
If you haven't started your work with layer comps or don't have a master image:
| 1. | Navigate to File > Preferences > Third Party Apps > Photoshop > Panel Open Behavior and select Open in Layer Comps. |
| 2. | In your edit (sequence revision), select the required panels you want to open as layer comps. |
| 3. | In the main toolbar, click the Open in Sketching app |
This opens one .psd file containing a layer comp for each selected panel, each layer comp containing the layers associated to the selected panels.
| 4. | After you are done working on your layer comps, save the .psd file |
This automatically replaces the opened panels with the updated layer comps.
Working with Flix and Photoshop's Frame Timeline
Note: Select whether you want to Always Send Original as Master. This sends the original file, unedited, as a Master file to Flix. This does not insert anything in the edit (sequence revision).
• In Photoshop, with your .psd file open, open the Flix tab and click Each Frame.
Photoshop sends each frame in the Frame Timeline to Flix as a single panel.
Making Revisions to Frames
If a master image is available for your frames:
| 1. | Ensure the File > Preferences > Third Party Apps > Photoshop > Always Open Master Image is enabled. |
| 2. | Select the panel you want to work on. |
| 3. | In the main toolbar, click the Open in Sketching app |
In Photoshop, this opens the master image with all information including hidden layers and empty groups.
In Flix, this opens the Master file the panel is linked to in Photoshop.
| 4. | After you are done working on your master image, save the .psd file and select Replace Each Frame from the Photoshop actions. |
In Flix, this updates panels from the first selected to the last, going from the first frame to the last.
OR
If you haven't started your work with frames or don't have a master image:
Note: When you are working in a Frame Timeline without any original master image, in the Frame Timeline, click the Hamburger button and disable New Layers Visible in All Frames. This displays all the frames in the Frame Timeline, otherwise all the panels are the same.
| 1. | Navigate to File > Preferences > Third Party Apps > Photoshop > Panel Open Behavior and select Open in Timeline. |
| 2. | In your edit (sequence revision), select the required panels you want to open in a timeline. |
| 3. | In the main toolbar, click the Open in Sketching app |
This opens one .psd file containing one frame for each selected panel, each frame containing the layers associated to the selected panels.
| 4. | After you are done working on your frames, save the .psd file |
This automatically replaces the opened panels with the updated frames.
Working with Flix and Photoshop's Layers/Groups
OPTIONAL: Select whether you want to Always Send Original as Master. This sends the original file, unedited, as a Master file to Flix. This does not insert anything in the edit (sequence revision).
In Photoshop, with your .psd file open, open the Flix tab and click any of the following:
Note: Make sure the layers or groups you want to send are visible otherwise they will be ignored.
• Each Layer - Sends to Flix each visible layer in an image as a separate panel.
• Each Layer + BG - Sends to Flix each visible layer in an image as a separate panel but keeps the background the same for each one.
• Each Layer + FG/BG - Sends to Flix each visible layer in an image as a separate panel but keeps the background and foreground the same for each one.
• Selected Layer(s) - Sends to Flix only the selected layers of the image as a new panel.
Making Revisions to Layers and Groups
If a master image is available for your layers:
| 1. | Ensure the File > Preferences > Third Party Apps > Photoshop >Always Open Master Image is enabled. |
| 2. | Select the panel you want to work on. |
| 3. | In the main toolbar, click the Open in Sketching app |
In Photoshop, this opens the master image with all information including hidden layers and empty groups.
In Flix, this opens the Master file the panel is linked to in Photoshop.
| 4. | After you are done working on your master image, save the .psd file and select any layer actions (see above) from the Photoshop actions. |
In Flix, this updates panels from the first selected to the last, going from the first layer or group to the last.
OR
If you haven't started your work with layers or groups or don't have a master image:
| 1. | Navigate to File > Preferences > Third Party Apps > Photoshop > Panel Open Behavior and select Open as separate PSD. |
| 2. | In your edit (sequence revision), select the required panels you want to open as layers or groups. |
| 3. | In the main toolbar, click the Open in Sketching app |
This opens one .psd file containing a layer or group for each selected panel, each layer or group containing the layers associated to the selected panels.
| 4. | After you are done working on your layer comps, save the .psd file |
This automatically replaces the opened panels with the updated layers or groups.
Flix & Storyboard Pro
Setting Up Flix to Work with Storyboard Pro
To set Storyboard Pro as your Sketching Tool:
- Navigate to File > Preferences > Third Party Apps > General.
- Under Sketching, select Storyboard Pro from the dropdown menu.
- In the Storyboard Pro tab:
- In the Panel Browser tab, set the default preview behavior for animated panels:
• Set the Executable preference by browsing to the StoryboardPro (.exe on Windows, .app on Mac) executable file on your computer. The file path should look something like this:
C:\Program Files\Toon Boom Animation\Toon Boom Storyboard Pro <version>\StoryboardPro <version>.exe
/Applications/Toon Boom Storyboard Pro <version>/Storyboard Pro <version>.app
• Under the Import section, choose the default Store Source Files behavior during imports to Flix from Storyboard Pro:
• Enabled (default) - save all .sbpz source files on the Flix Server during import. Saving the Storyboard Pro .sbpz project to the server allows all artists to access the main source file and assets from one central location so that you always know you're working on the latest version.
• Disabled - do not save .sbpz source files on the Flix Server during import. If you don't save the source files to the Flix Server, you may find some artists are working on older versions of the Storyboard Pro source files that they have saved locally.
• Under the Export section, choose the behavior for exporting Flix sequences to Storyboard Pro.
• Export Path - Set the path for your exported Flix sequence.
• Export Camera Moves - Toggle ON to update Camera Moves in Storyboard Pro.
• Export Markers - Marker updates are not currently supported in Storyboard Pro.
• Preview all frames - Animated panels show all available frames in the panel viewer.
• Preview first frame - Animated panels only show the first frame in the panel viewer and the Trim Animation control the Properties is disabled.
Note: You can override this preference on individual panels by clicking the icon in the top left to select ![]() Preview all frames or
Preview all frames or ![]() Preview first frame. Changing this preference does not affect individual panels that you have set manually.
Preview first frame. Changing this preference does not affect individual panels that you have set manually.
Importing Storyboard Pro Projects into Flix
You can create a new sequence revision by importing your Storyboard Pro project directly into Flix.
Article: Have a look at Knowledge Base article Q100650 for more detailed information on Storyboard Pro camera animation.
To import your Storyboard Pro project into Flix:
Warning: Windows only: Check that you have QuickTime installed on your machine or imports from Storyboard Pro will fail.
- Save your Storyboard Pro project.
- In Flix, navigate to the Revisions page, either by clicking on your sequence or creating a clean version.
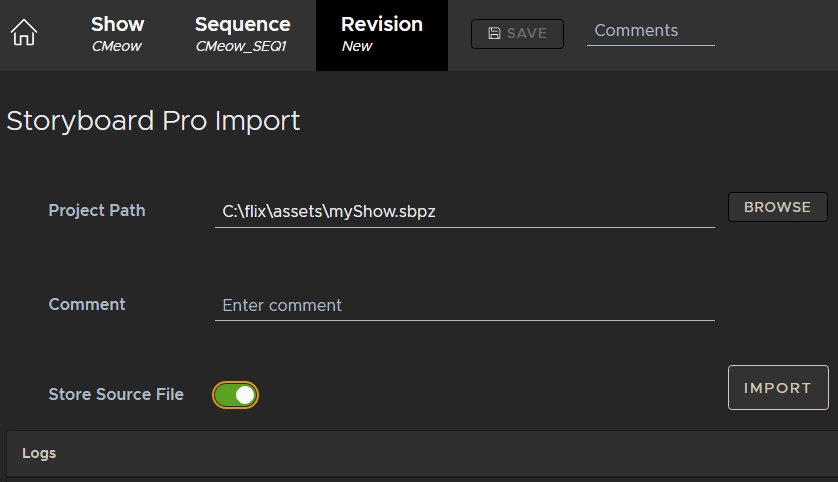
- Click on the SBP Import button.
- Click Browse and navigate to the Storyboard Pro project (.sboard or .sbpz) file you want to import. Select the file and click Open.
- Enable Store Source File to save .sbpz source files on the Flix Server. Saving the Storyboard Pro .sbpz project to the server allows all artists to access the main source file and assets from one central location so that you always know you're working on the latest version.
- Enter a comment if you want it to appear on the new sequence revision, then click Import.
- Click on Sequence in the breadcrumb to return to the Revisions page.
The Storyboard Pro Import page opens.
Note: If Storyboard Pro is not installed on the machine running Flix client or has not been set in your Preferences, the SBP Import button is disabled.
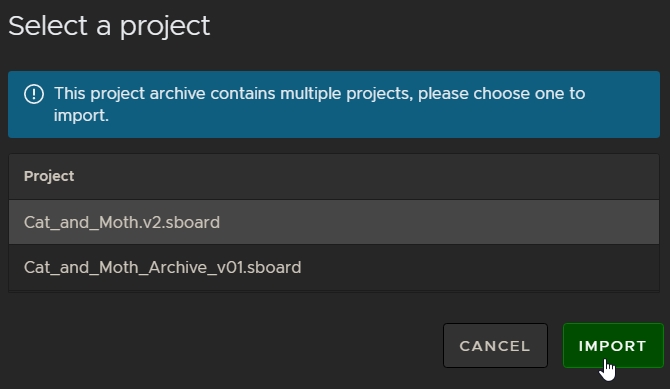
Importing .sbpz files provides an optimized experience using less storage and reducing backup issues or loss of data. On import, you can choose which .sboard to load from the available boards packaged within the .sbpz file:
The path to the project file appears in the Project Path when you've chosen the required file.
Note: The Store Source Files option is grayed-out if you browse to a regular .sboard file.
Tip: The Store Source Files option is enabled by default in the Preferences under Third-Party Apps > Storyboard Pro > Import > Store Source File.
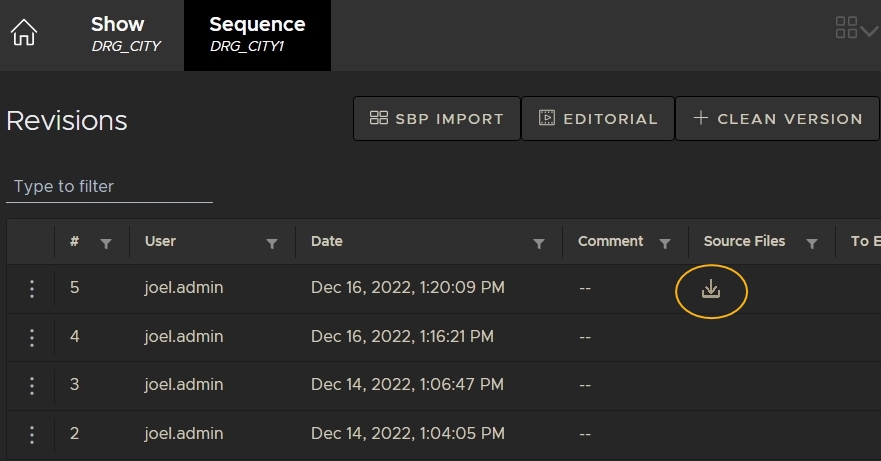
Once an .sbpz file is stored on a Flix Server, artists can download the source files quickly and easily by clicking the download button at the Sequence level.
Flix reports that the import was successful.
Note: Depending on the size of the project file, the import might take time.
A new sequence revision has been created from your Storyboard Pro import. If markers are set to display in the panel browser, scene numbers show as markers on sequences imported from Storyboard Pro.
Note: In Flix 6.4, transitions between two panels in Storyboard Pro caused the duration of the panels either side of the transition to change when imported back into Flix. Flix incorrectly updated the marker position of the first panel to the start of the transition between panels.
In Flix 6.5, transitions do not affect panel duration, but the marker denoting the start of the second panel is not displayed in the Flix UI, so you'll only see one marker at the start of the first panel with the transition. Marker and transition data is still available in editorial and Storyboard Pro when you export from Flix, but Flix does not currently support transitions natively.
Smart Panel Relinking Between Flix and Storyboard Pro
Flix's smart panel relinking system means panels can originate from anywhere. Flix sends its own panel metadata to Storyboard Pro to assess which panels need to relink, which ones need to version up, and which ones are completely new, and Flix recognizes them when re-importing those panels from Storyboard Pro.
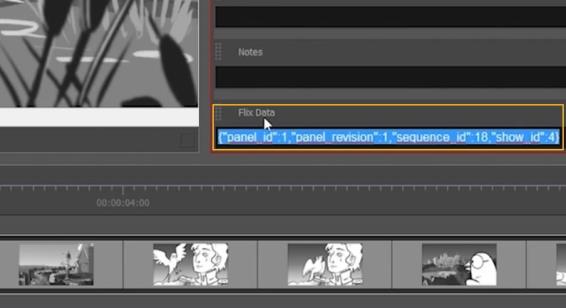
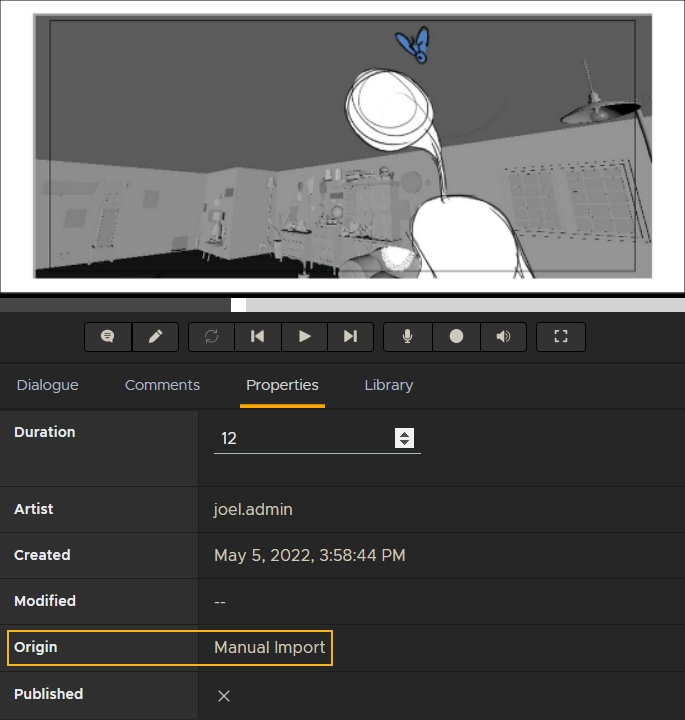
Exporting panels from Flix writes metadata into each panel containing its ID, revision, sequence, and show information. You can see that metadata in Storyboard Pro in the Flix Data field associated with each panel.
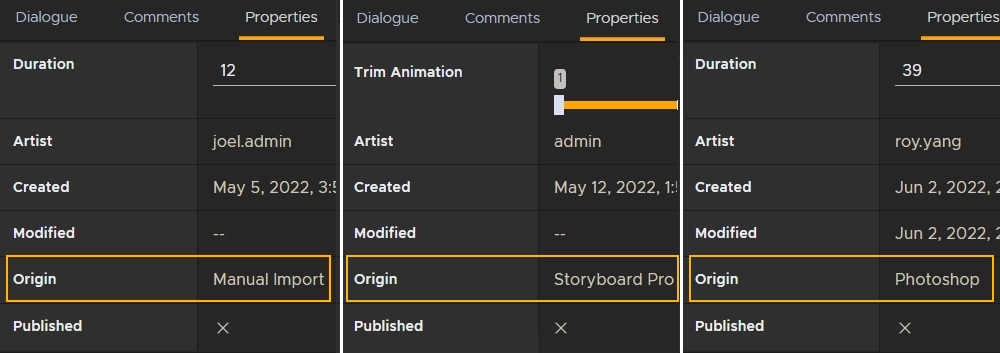
The same is true of panels in Flix. Each panel has an Origin in the panel Properties.
Exporting Flix sequences to Storyboard Pro
To open your Flix sequence in Storyboard Pro:
- Ensure Storyboard Pro is the default sketching tool. To check this, please read Setting Up Flix to Work with Storyboard Pro.
- Open the sequence revision you want to send to Storyboard Pro.
- Click on the
 Open in Sketching App button, or double-click on a panel.
 - Click Export.
- Flix creates a .xml file and saves it in the location nominated in your exports path.
Flix confirms if you want to send the selected sequence to Storyboard Pro.
The .xml Flix generates for the export includes Flix metadata for each panel in the revision, including new panels that Storyboard Pro has never seen. When these new panels are sent back to Flix from Storyboard Pro, Flix looks for that metadata to version them up instead of creating new panels with new IDs, which helps avoid confusion resulting from the ID change. The metadata is displayed in the panel Properties tab under Origin.
Note: New panels from Flix containing metadata are only versioned up automatically once, the first time that they are reconformed and sent back to Flix from Storyboard Pro. See Smart Panel Relinking Between Flix and Storyboard Pro for more information on panel relinking.

Note: To change the default path for exports, go to File > Preferences > Third Party Apps > Storyboard Pro > Export.
Re-conforming Your Project in Storyboard Pro
After creating an .xml file from your project in Flix, you can update your original project in Storyboard Pro and continue working when changes come back from editorial and Flix. This process is called reconforming, which aligns the original Storyboard Pro project with your changes from Flix and editorial.
To reconform your original Storyboard Pro project, follow these steps:
-
In Storyboard Pro, go to File > Conformation > Import Animatic Project.
-
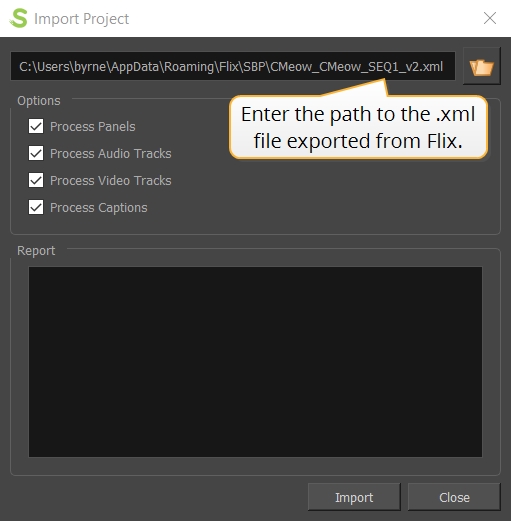
The Import Project dialog opens.
-
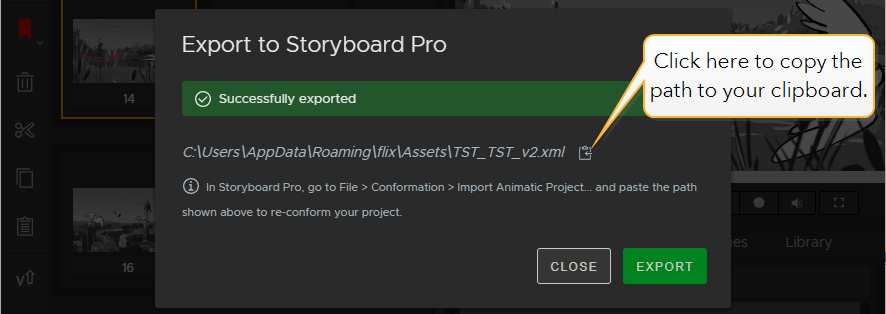
Enter the path to the .xml file exported from Flix, or click the
 icon and browse for the file.
 -
Click Import.
-
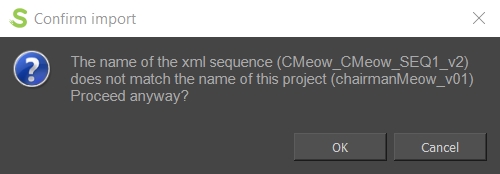
Click OK to proceed.
-
Tip: You can copy the path from the Export to Storyboard Pro menu in Flix by clicking the ![]() button and pasting the path in the Import Project dialog. See Exporting Flix sequences to Storyboard Pro for more information.
button and pasting the path in the Import Project dialog. See Exporting Flix sequences to Storyboard Pro for more information.
Storyboard Pro asks for confirmation of the sequence you are importing. You may see a warning that the project name is different to the file being imported. This is expected, as Flix is likely to have been set up with different export naming conventions.
Your Storyboard Pro sequence updates with any changes that came from Flix. From here you can make any changes to panels as you work and then re-export your work back to Flix as normal.
The .xml Flix generates for the export includes Flix metadata for each panel in the revision, including new panels that Storyboard Pro has never seen. When these new panels are sent back to Flix from Storyboard Pro, Flix looks for that metadata to version them up instead of creating new panels with new IDs, which helps avoid confusion resulting from the ID change. The metadata is displayed in the panel Properties tab under Origin.
Note: New panels from Flix containing metadata are only versioned up automatically once, the first time that they are reconformed and sent back to Flix from Storyboard Pro. See Smart Panel Relinking Between Flix and Storyboard Pro for more information on panel relinking.