Adding Effects on the Timeline
A soft effect is a real-time effect, such as Transform or TimeWarp, processed on GPU instead of CPU. You can add soft effects to your timeline in any of the workspaces.
You can add custom plug-in or gizmo soft effects to the Add Effect menu using Python. Valid custom soft effects must have a GPUEngine implementation using DD::Image::Iop::gpuEngine type functions. For more information see Hiero's NDK Reference Guide.
Soft Effects must also be registered after creation. An example of how to register a plug-in or gizmo as a custom soft effect is located in:
<install_directory>/pythonextensions/site-packages/hiero/examples/custom_soft_effect.py
Available Soft Effects
Below is a brief summary of the available soft effects. These are similar to the tools in Nuke's Node Graph. See the Nuke Online Help for more information about them.
|
Soft Effect |
Color Code |
Summary |
|---|---|---|
|
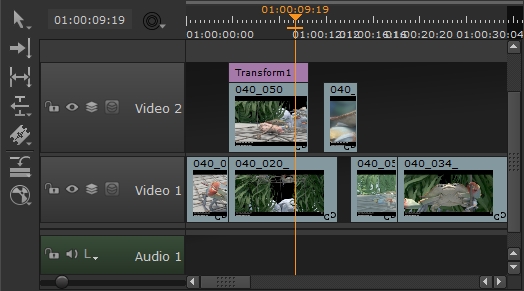
Transform |
|
Allows you to translate, rotate, scale, and skew shots from a single control panel. Alt+T inserts a Transform soft effect on any shot selections or at the playhead |
|
Mirror |
|
Allows you to flip the input image around the center of the format area. A flip on the x axis mirrors the image vertically. A flop on the y axis mirrors the image horizontally. |
|
Crop |
|
Allows you to cut out the unwanted portions of the image area. You can fill the cropped portion with black or adjust the image output format to match the cropped image. |
|
TimeWarp |
|
Allows you to slow down, speed up, or even reverse selected frames in a clip without necessarily altering its overall length. Sequences imported from .xml and .aff files also support non-linear retimes. Note: TimeWarp effects are only allowed on tracks with clips as they are linked to the clips. |
|
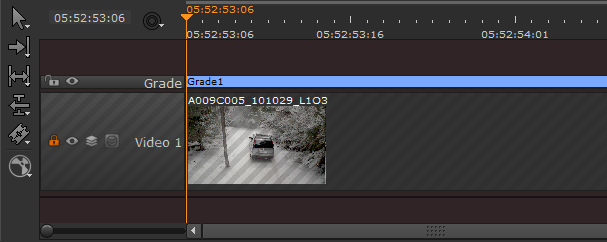
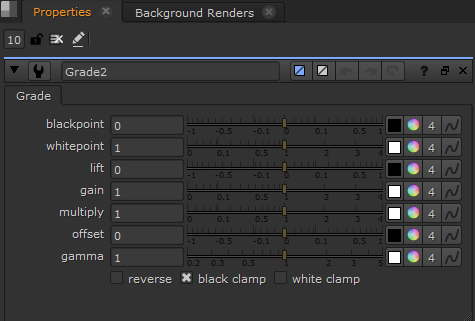
Grade |
|
Allows you to define white and black points by sampling pixels from the Viewer. For example, you can use this for matching foreground plates to background plates. Alt+G inserts a Grade soft effect on any shot selections or at the playhead |
|
OCIO Submenu |
||
|
OCIO CDL Transform |
|
Applies an ASC CDL (American Society of Cinematographers Color Decision List) grade based on the OpenColorIO Library. See OCIOCDLTransform in the Nuke Online Help for more information on the Properties panel for this effect. |
|
OCIO ColorSpace |
|
Converts images from the input colorspace of the shot on the timeline to an output colorspace more appropriate to a given process or intended display device. |
|
OCIO Display |
|
Applies a colorspace conversion to an image sequence so that it can be accurately represented on a specific display device. See OCIODisplay in the Nuke Online Help for more information on the Properties panel for this effect. |
|
OCIO FileTransform (LUT) |
|
Loads a colorspace conversion from a file (usually a 1D or 3D LUT) and applies it. You can also load other file-based transformations, for example an ASC ColorCorrection XML. File transforms are applied without any input or output colorspace handling. If the file expects log-encoded pixels, but you apply the node to a linear image, you will get incorrect results. See OCIOFileTransform in the Nuke Online Help for more information on the Properties panel for this effect. |
|
OCIO LogConvert |
|
Converts from compositing_log to scene_linear, or the reverse. Sometimes log data is required for certain processing operations, like plate resizing or pulling keys. Usually a colorspace is provided specifically for these operations. |
|
OCIO LookTransform |
|
Applies a creative colorspace transform using a predefined look in the OCIO config file. A look is a named color transform intended to modify the 'look' of an image in a creative way, rather than a technically or mathematically defined colorspace conversion. See OCIOLookTransform in the Nuke Online Help for more information on the Properties panel for this effect. |
|
For more information on the OpenColorIO (OCIO) library, see https://opencolorio.org/ |
||
|
ColorCorrect |
|
Allows you to make quick adjustments to saturation, contrast, gamma, gain, and offset. You can apply these to a clip’s entire tonal range, shadows, midtones, or highlights. You can control the range of the image that is considered to be in the shadows, midtones, and highlights using the lookup curves on the Ranges tab. However, do not adjust the midtone curve - midtones are always equal to 1 minus the other two curves. Alt+C inserts a ColorCorrect soft effect on any shot selections or at the playhead |
|
ColorLookup |
|
Allows you to make color adjustments using lookup tables (LUTs). LUTs refer to line graphs of a given color channel’s brightness. The horizontal axis represents the original, or input, values and the vertical axis represents the new, or output values. |
|
Text |
|
Allows you to add text overlays on your images. You can simply type in the text you want to have displayed or use Tcl expressions (such as [metadata values]) or Tcl variables to create a text overlay. Text overlays can also be animated using animation layers in the Groups tab, so that their properties (such as position, size, and color) change over time. |
|
Burn-In |
|
Allows you to quickly add standard burn-in elements on the timeline. You can control the color, opacity, font, scale, and so on, as well as use the dropdowns to determine what element is added from the file or sequence metadata. You can also reference custom metadata from shots. For example: hiero/shot/tags/Approved Extracts the Approved tag from the shot. You can also append note to include any notes associated with the tag: hiero/shot/tags/Approved/note Note: You must precede spaces and slashes in the tag name with \\ (backslashes) to enable Hiero to process the tag name correctly. For example: You can also add burn-in through the Export dialog, see Adding Burn-in Text to Exports for more information. |
|
ModifyMetaData |
|
Allows you to inject metadata key pairs into the shot during export in a similar way to the ModifyMetaData node in Nuke. |
|
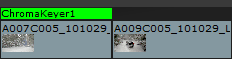
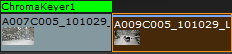
ChromaKeyer |
|
Allows you to pull a quick chroma key from green or bluescreen areas of your footage. Use the screen color selector to choose a color from the Source input to use as the blue/green screen color. To remove blue/green spill from the foreground object, use the despill controls to pick skin tones from the source. Use the matte parameters to improve the matte. |
|
BlinkScript |
|
Allows you to run Foundry's Blink framework on the timeline, enabling you to write code once and run it on any supported device. Warning: BlinkScript is very flexible, as there are no restrictions on the code you can write within a kernel. As a result, code complied from the Kernel Source can cause Nuke to crash, so please use caution! The BlinkScript soft effect supports a subset of the functionality available in the full BlinkScript node: • You can't publish your kernels to Groups or Gizmos. • Due to the way stacks of soft effects are processed in Hiero, the BlinkScript soft effect only contains one input source and produces only one output. • Currently, the BlinkScript soft effect only supports eAccessPoint data access, which means that only one point from the input can be accessed at a time, and only one point from the output can be written, for each iteration position. • The following functions are not supported by the BlinkScript effect: • log10 • round • rsqrt • abs for integer types • modf(a, *b) • sign • rcp • max, min, and clamp for integer types • median, atomicInc and atomicAdd. • The only data types supported by the BlinkScript effect are int, float, and bool. Note: The BlinkScript soft effect supports both pixel-wise and component-wise kernels, but the former is preferred for performance reasons. For more information about this and a more detailed description of the language, see https://learn.foundry.com/nuke/developers/13.2/BlinkKernels/ |


Adding Sequence-Level Soft Effects
Warning: Please keep in mind the following:
• Sequence-level soft effects are only permitted on the same track as clips if they're trimmed to exactly match the in and out points of individual clips. In this case, each effect is linked to a specific clip.
• Soft effects can be trimmed arbitrarily if they're on tracks with no clips.
As well as adding soft effects using the spreadsheet view (see next section), the timeline provides some additional ways to add soft effects. You can either:
• Right-click a shot on the timeline, select Soft Effects and then select the soft effect you want to apply, or
• Select a shot on the timeline, click the Add Effect button to the left of the timeline, and then select the soft effect you want to apply.
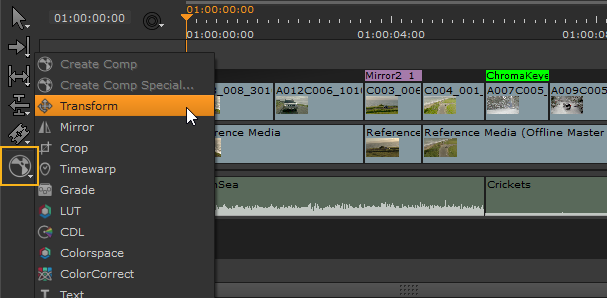
Note: You can add a soft effect to multiple shots by selecting the required shots first and then right-clicking on one of them and selecting the soft effect you want to add. A soft effect is added to each of the selected shots. You can also add a single soft effect for the whole track by right-clicking on the track header and then selecting the soft effect you want to add.
Note: TimeWarp effects are only allowed on tracks with clips (and therefore linked to clips).
Using the Spreadsheet View
You can add soft effects using the spreadsheet view in any workspace by doing the following:
| 1. | To open the spreadsheet view in any workspace, select Window > New Spreadsheet View. |
| 2. | Right-click a sequence in the bin view. |
This opens a context menu.
| 3. | If the spreadsheet view is not already populated in the context menu, select Open In > Spreadsheet View. |
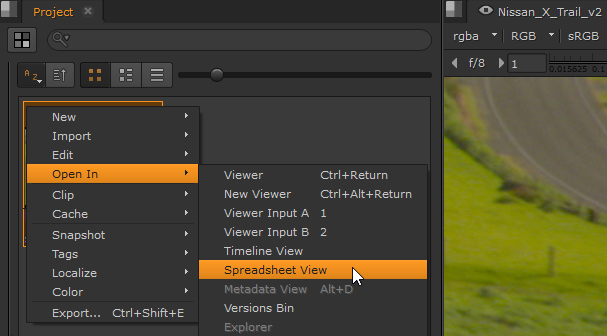
This loads the sequence in the spreadsheet view that you previously opened.
| 4. | Right-click an event from the list in the spreadsheet view and select Soft Effects to open a list of all available soft effects. |
| 5. | Select the required soft effect from the Soft Effects list. |
The sequence-level soft effect is then displayed above the shot and is color coordinated. For example, if the effect appears in green on the timeline, the corresponding effect properties are highlighted in the same color in the Properties pane.
When you insert a soft effect, its Properties open automatically. If you have it open, the effect properties panel displays in the Properties pane. If the Properties pane is not open, the effect's properties panel appears as a floating dialog.
Soft Effect Keyboard Shortcuts
You can add Transform, Grade, and ColorCorrect effects using the keyboard shortcuts Alt+T, Alt+G, and Alt+C, just like the Node Graph equivalents in the composting environment. You can add effects to multiple shot selections or at the playhead if no shots are selected.
Note: If no shots are selected, the effect is added to the top-most shot under the playhead.
|
|
|
|
Adding effects to multiple selections. |
Adding effects at the playhead. |
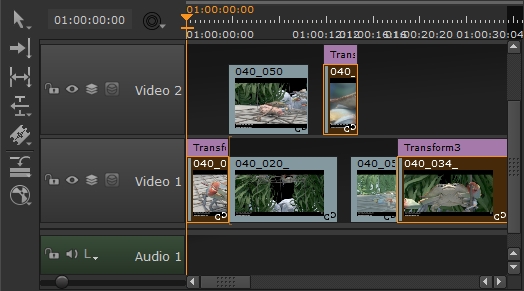
Adding Shot-Level Soft Effects
Warning: Soft effects added at shot-level, must match the length of the shot on the locked track. Any soft effect that is trimmed beyond the end of a shot, or a different length from the shot is marked with red hashing to show that it is invalid.
You can add shot-level soft effects on the timeline, by doing the following:
| 1. | Right-click the shot that you want to add a soft effect to. |
| 2. | Select Open In > Timeline View. |
| 3. | Click the Soft Effects menu icon and select the soft effect you want to apply. For example, you can select Grade. |
The soft effect is then displayed above the shot as a colored box.
When you close the timeline view of the shot – as it is a shot-level soft effect – the soft effect is displayed as a colored line within the top of the shot. The color of the line displayed reflects the highest soft effect added to the shot.
Soft Effect Controls
Adding an effect displays the associated controls in the Properties panel, similar to Nuke nodes. Adjusting the controls affects the shots underneath the effect in real-time. For example, adding a Grade effect at sequence level displays the Grade controls in the Properties panel.
See
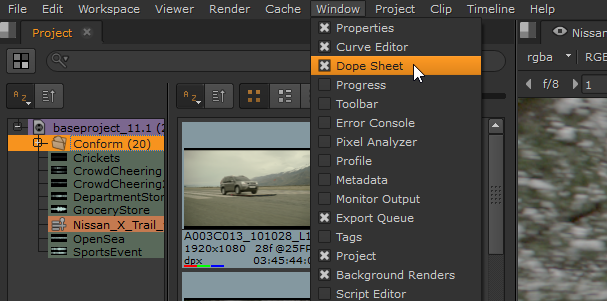
If you intend to animate soft effect controls using keyframes, you can use the Curve Editor and Dope Sheet to fine-tune the output. To add the Curve Editor or Dope Sheet to the interface, navigate to Window and select the required panel.
See
Editing Sequence-Level Soft Effects
You can copy, move, and cut soft effects just like you can with shots in the timeline. You can perform these actions by either accessing them from Edit in the right-click menu, or by using the keyboard shortcuts. You can copy soft effects to different tracks, different sequences, and different projects.
Moving
You can move a sequence-level soft effect by simply clicking and dragging the soft effect to a different shot, or even onto a different video track.
Copying
Nuke Studio and Hiero allow you to copy a sequence-level soft effect above the original to create a stack, to a different track, or to a different sequence. You can also copy a sequence-level soft effect to a shot open in the timeline view, therefore pasting it as a shot-level soft effect. There are several copy operations available for soft effects, standard copy/paste, replace paste, sequential paste, and sequential replace paste.
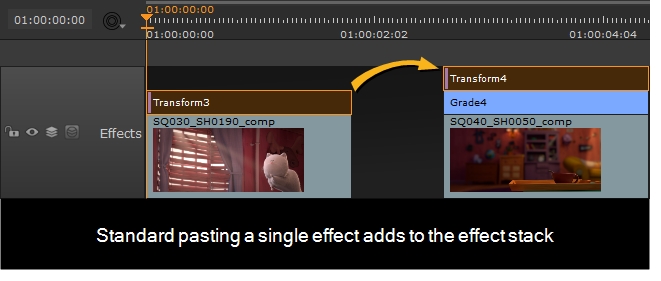
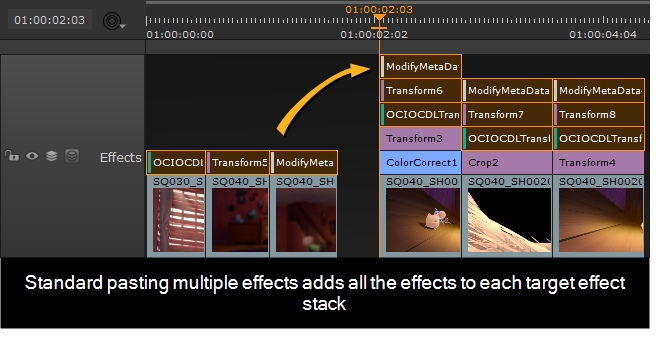
Standard Copy and Paste
Standard copy and paste adds the copied effect(s) to the stack on the target shot(s). Effects are read from the top down, so pay attention to the order of the stack.
-
Select the soft effect you want to copy by clicking it.
-
Press Ctrl/Cmd+C or right-click and select Edit > Copy.
-
Select the target shot or move the playhead to where you want to paste the copy.
-
Press Ctrl/Cmd+V or right-click and select Edit > Paste.
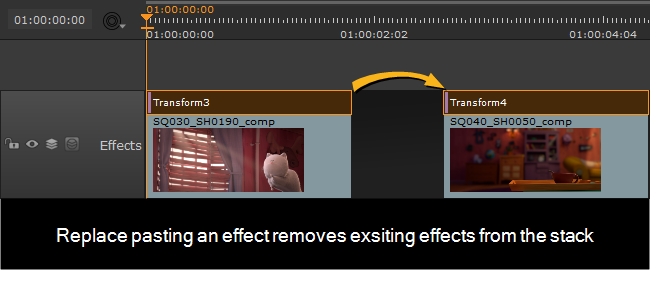
Replace Paste
Replace paste copies the source effect(s) to the target shot and removes any existing effects on the shot.
Press Shift+V or right-click and select Edit > Replace Paste.
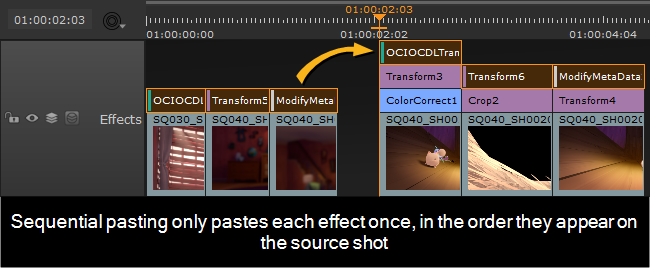
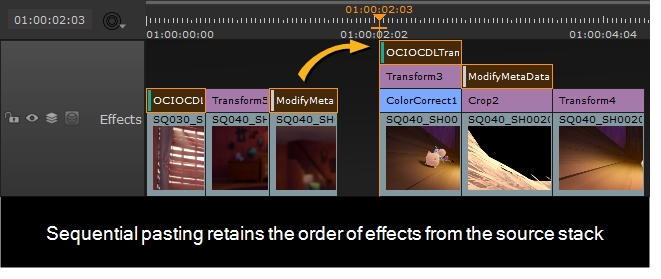
Sequential Paste
Unlike standard paste, sequential paste only pastes each effect once, in the order that they appear on the source shots.
Press Ctrl/Cmd+Alt+V or right-click and select Edit > Sequential Paste.
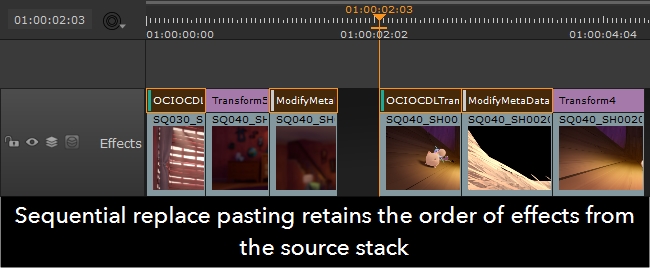
Sequential Replace Paste
Sequential replace paste only pastes each effect once, in the order that they appear on the source shots, removing any existing effects from the target shots.
Press Alt+Shift+V or right-click and select Edit > Sequential Replace Paste.

Cloning
You can clone a sequence-level soft effect. This copies the soft effect and links it to the original, which means when one of these is edited, the changes are reflected in the other one. You can clone a soft effect to a different track or even a different sequence. You cannot clone a soft effect in different projects.
To clone a soft effect:
| 1. | Select the soft effect you want to clone by clicking on it. |
| 2. | Select Edit > Copy (or press Ctrl/Cmd+C). |
| 3. | Move the playhead on the timeline to where you want to place the new clone. |
| 4. | Select Edit > Clone (or press Alt+K). |
The new clone is placed at the current playhead position on the timeline. You can repeat steps 3 and 4 to create multiple clones that are all linked, at different places on the timeline.
Clones are indicated by a C highlighted in red in the left of the soft effect.
Note: Cloning animation in soft effects is not supported.
Copying as Clone
You can also copy a sequence-level soft effect as a clone. This means, when you paste a new copy of the soft effect above a selected shot, it is automatically linked to the original soft effect as a clone. Therefore, any changes made to either of the cloned soft effects, are reflected in the other.
To copy a soft effect as a clone, do the following:
| 1. | Select the soft effect you want to copy as a clone by clicking on it. |
| 2. | Select Edit > Copy as Clones (or press Ctrl/Cmd+K). |
| 3. | Click on the shot that you want to clone the soft effect to. |
| 4. | Select Edit > Paste (or press Ctrl/Cmd+V). |
The soft effect is copied as a clone on your selected shot. You can repeat steps 3 and 4 to create multiple clones that are all linked above different selected shots.
Clones are indicated by a C highlighted in red in the left of the soft effect.
Note: Cloning animation in soft effects is not supported.
Decloning
To declone a soft effect, simply click on the clone you want to declone and select Edit > Declone (or press Alt+Shift+K).
Note: For more information about copying, moving, and cutting soft effects, see Timeline Editing Tools .
Deleting
To delete a soft effect, simply right-click on it and select Edit > Delete (or press Backspace).
Editing Shot-Level Soft Effects
To edit a shot-level soft effect, you first need to open the shot with the applied soft effect, in the timeline view. You can do this by right-clicking the shot and selecting Open In > Timeline View. You can then copy, delete or move the shot-level soft effect in exactly the same way as sequence-level soft effects.
You can copy and paste the shot-level soft effect on top of the original, creating a stack in the timeline view. When you close the timeline view, stacked shot-level soft effects are displayed as a single line within the top of the shot. Hiero allows you to copy a shot-level soft effect, return to the full sequence, and then paste it as a sequence-level soft effect. You can also paste a shot-level soft effect to another shot open in the timeline view.
Note: You cannot clone shot-level soft effects.
Enabling and Disabling Soft Effects
You can choose to disable and re-enable soft effects from the output. To enable or disable a sequence-level soft effect, select the soft effect by clicking on the colored box and then pressing D. To enable or disable a shot-level soft effect, you first need to open the shot – that includes the soft effect – in the timeline view. Then you can select the soft effect and press D.