Exporting USD LookFiles and Assemblies with Material Assignments
The USD Look Exporter allows you to export multiple materials, as well as their material assignments, from Mari in a USD LookFile or Assembly file. This allows you to get a quick first look at your asset in other Digital Content Creation(DCC) packages such as Katana, without the need to manually set up your shaders and assign materials their respective meshes.
Adding Materials to the USD Look Exporter
The USD Look Exporter is able to handle multiple materials, allowing you to export entire shader networks at once. In order to register your materials within the USD Look Exporter, your materials must be hooked up to a shader type that is supported by the USD Export Manager either through a Multi-Channel Bake Point node, or through a traditional channel-based workflow.
|
|
|
|
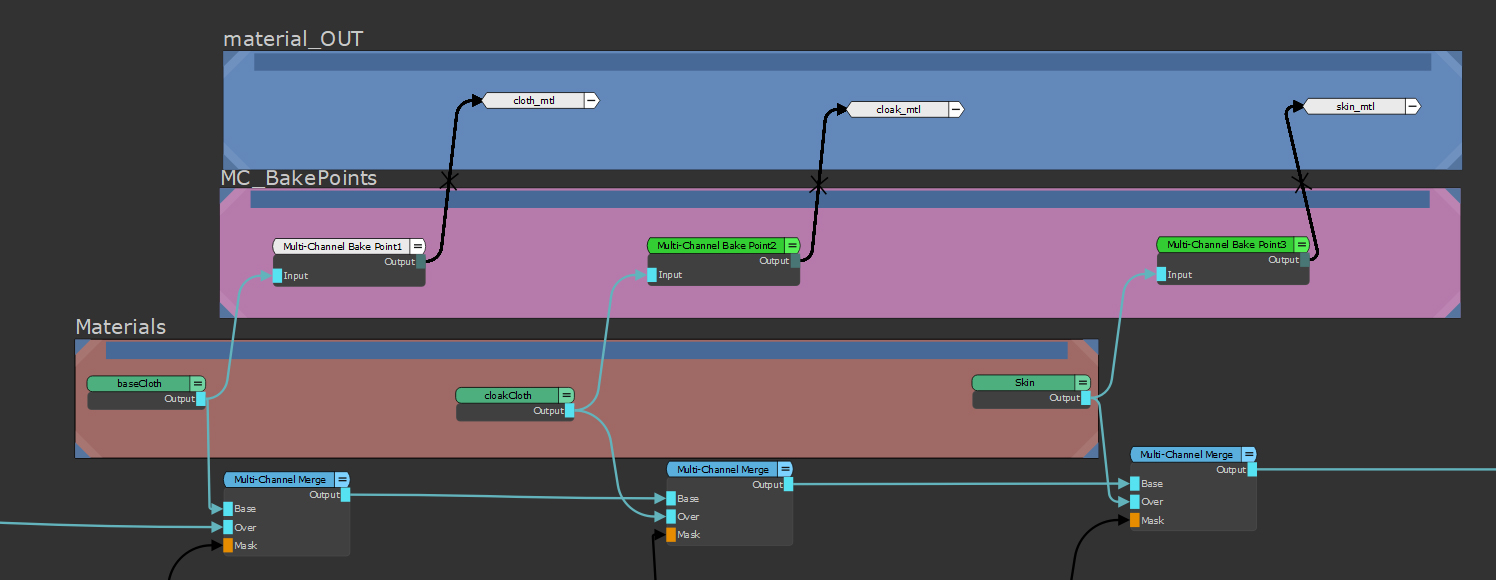
An example of a materials based workflow with Multi-Channel Bake Points and Shader nodes inserted after the material |
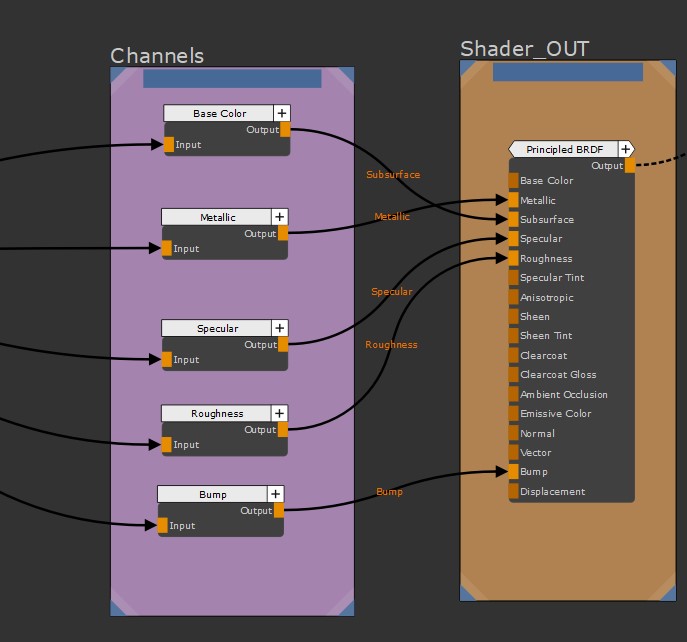
An example of a traditional Channels based workflow where all node streams are piped into Channels before being plugged into a single shader at the end of the node stream. |
Currently, the following vendor shaders are supported by the USD Look Exporter:
- Arnold Standard Surface
- Principled BRDF
- PxrSurface
- USD Preview Surface
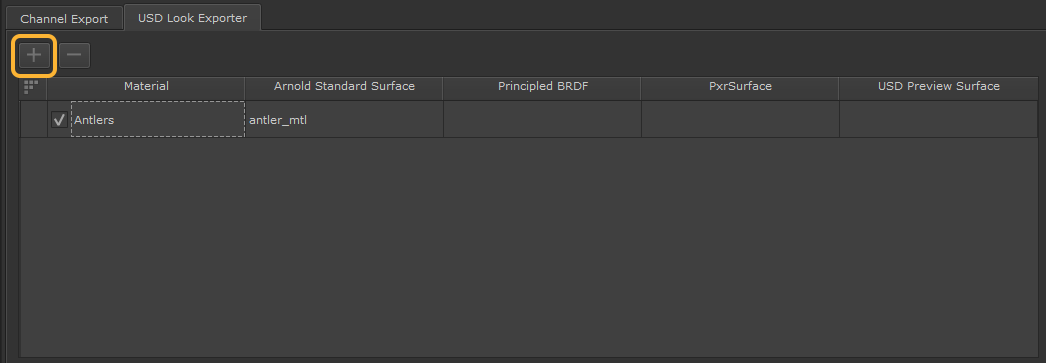
To add materials to the USD Look Exporter:
- Open the Export Manager through Channels > Export Manager or the
 icon in the project toolbar.
 - Open the USD Look Export tab.
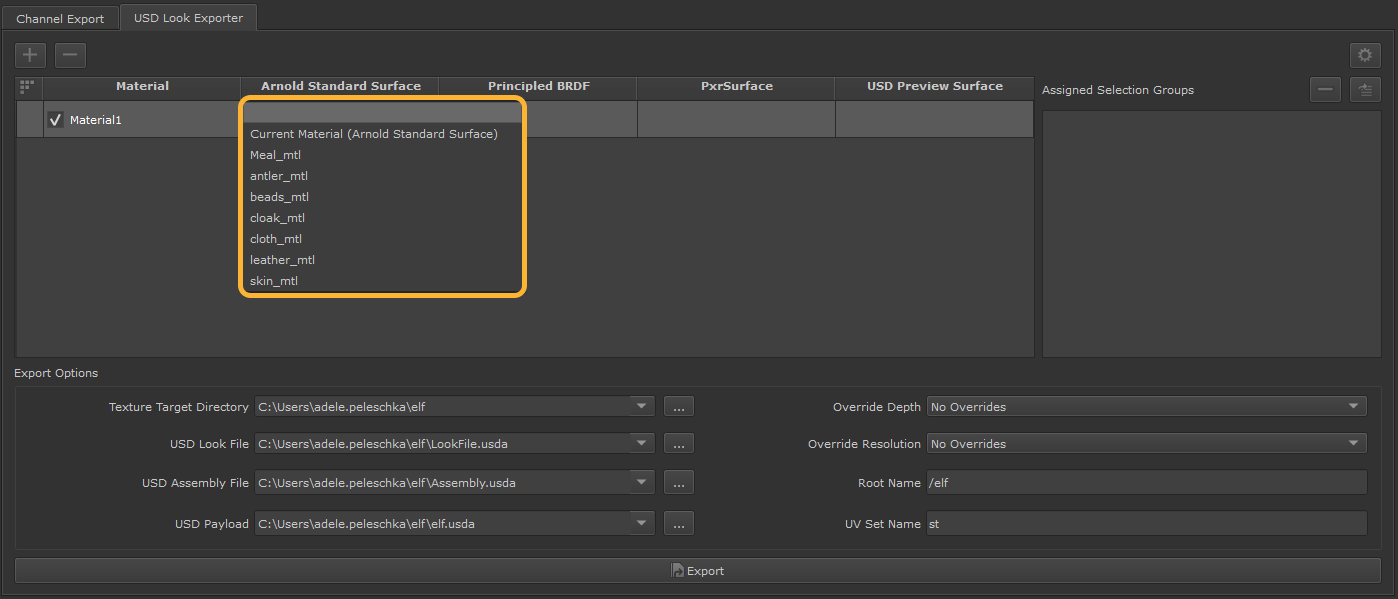
- Under the name of the shader type that you want to be exported, double click the box.
- In the dropdown that appears, select the material that you want to add.
- The material is now added to the USD Look Exporter window.
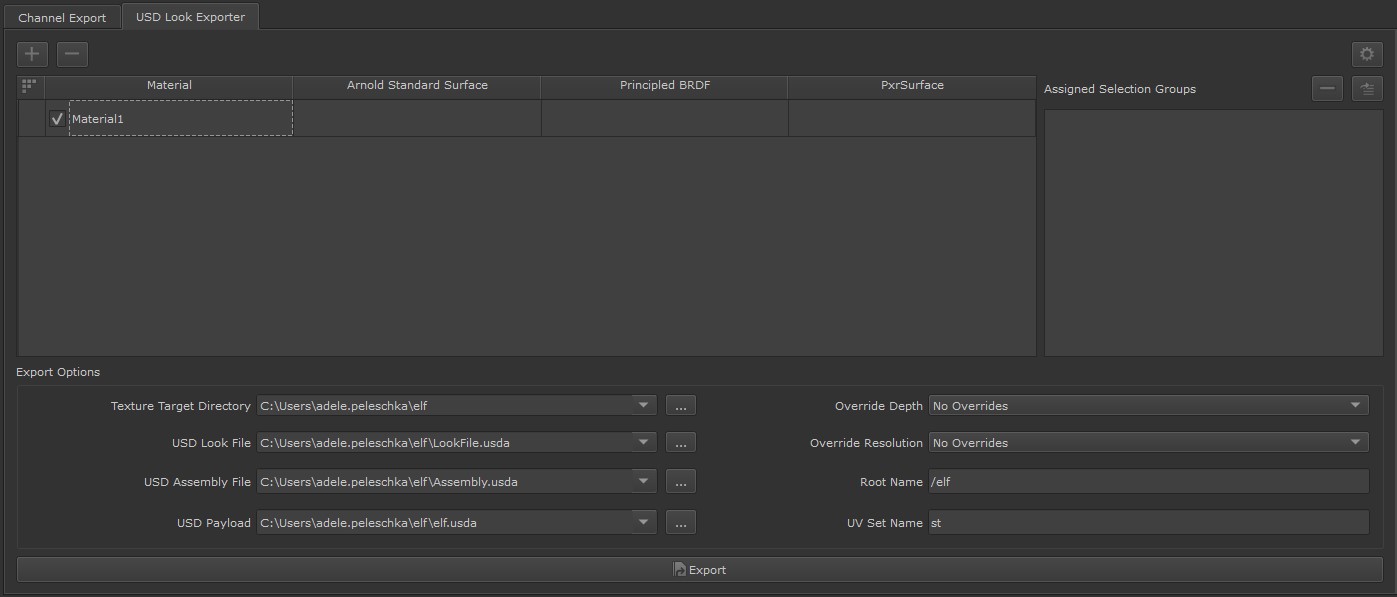
When opening the USD Look Exporter in a project for the first time, there is a single material available in the export list. If working with a traditional channels workflow, you can assign your shader in its respective column and then export as you would a LookFile or Assembly that has material assignments. For more information on exporting single materials in a USD format, see Exporting a Flattened USD Preview of Your Asset's Look.
Note: The shader types available for export in the USD Look Exporter are dependent on the shaders present in your node graph. For example, if your node graph only contains an Arnold Standard Surface shader, only that shader is present in the USD Look Exporter. If you have Arnold Standard Shader, USD Preview Surface and Principled BRDF in your node graph, all three are available in the USD Look Exporter.
Tip: You can double click the box under Material to change the name of the materials you have added in the USD Look Exporter for better organization and file management purposes.
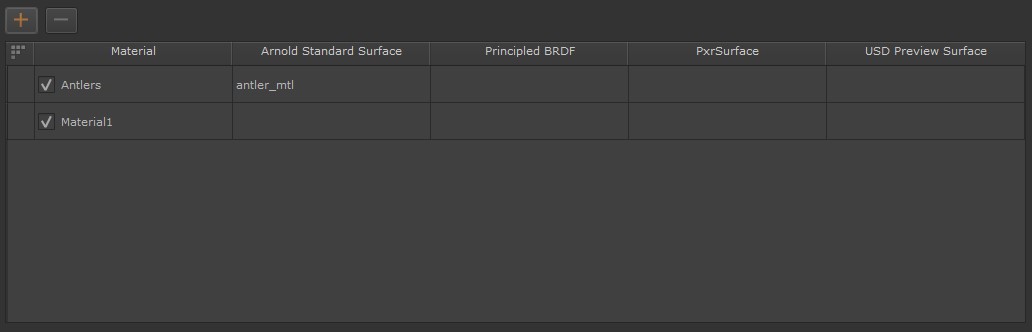
Multiple materials can be added to the USD Look Exporter, allowing you to export multiple materials into a single look file or assembly. To add additional materials:
- In the USD Look Exporter, click the plus
 button at the top of the window.
 - Double-click the box under the name of the shader type you are exporting.
- Select the material that you want to add from the dropdown that appears.
- Repeat steps 1-3 as many times as needed.
Tip: You can also add additional materials by right clicking in the materials list and selecting Add New Material.
A new material becomes available in the material list.
Once all your materials are added to the materials list, you can assign selection groups to them. Any selection groups that are assigned to materials in the USD Look exporter are saved in your USD LookFiles and Assemblies, meaning your asset is able to have multiple materials applied to it. Preserving your material assignments on export removes the need for additional setup when bringing your asset into another DCC, allowing you to get a first look at your LookDev quicker.
Assigning Your Materials to Selection Groups
Once your materials are present in the USD Look Exporter, you can assign your materials to Selection Groups. If a selection group is assigned to a material, the assignments are stored in your LookFile, allowing you to bypass the usual setup required when beginning the LookDev process in another DCC.
Note: For more information on Selection Groups in Mari, see Saving Selections on the Model
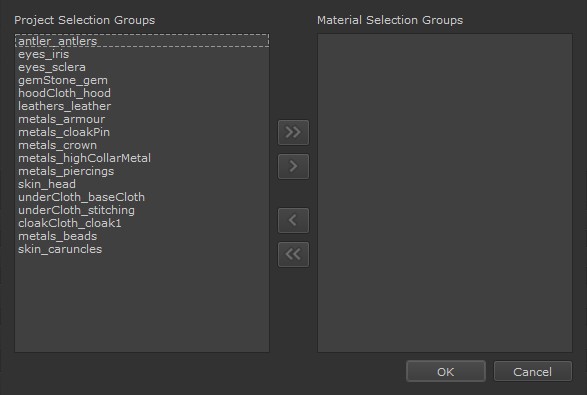
To assign your materials to Selection Groups:
- In the USD Look Manager, select the material that you want to create assignments for and click the Assign Selection Groups
 button.
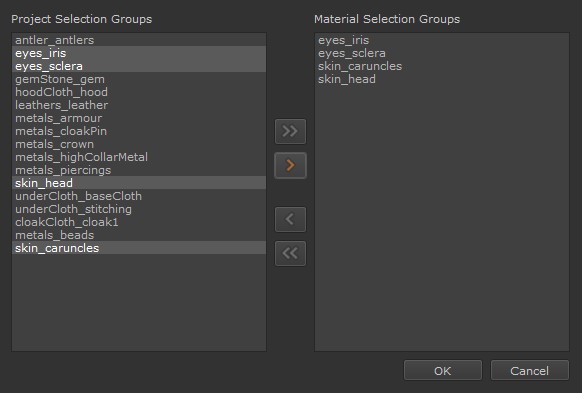
 - In the Material Selection Groups column, select the Selection Groups that you want the current material to be assigned to.
- Once selected, click the right-pointing single arrow button
 .
. - Once the Selection Groups have been moved into the Material Selection Groups column, click Ok.
- Repeat steps 1-4 as many times as needed.
The Edit Material Selection Assignments Window opens.
To select multiple groups at once, hold down CTRL or SHIFT and select any additional groups you want the material to be assigned to.
Once clicked, the selected groups are moved into the Material Selection Groups column.
Tip: You can move all selection groups at once by clicking the right-pointing double arrow button 
Materials that have had selection groups assigned to them are denoted by an orange icon ![]() .
.
Individual Selection Groups can be removed from their material assignments by clicking the left-pointing single arrow button . All selection groups present in the Material Selection Groups column can be moved back into the Project Selection Groups column by clicking the left-pointing double arrow button
  .
.
Exporting Your USD LookFiles and Assemblies
To export your USD LookFile and/or assembly:
- Open the Export Manager through Channels > Export Manager or the icon in the project toolbar.
- Open the USD Look Export tab.
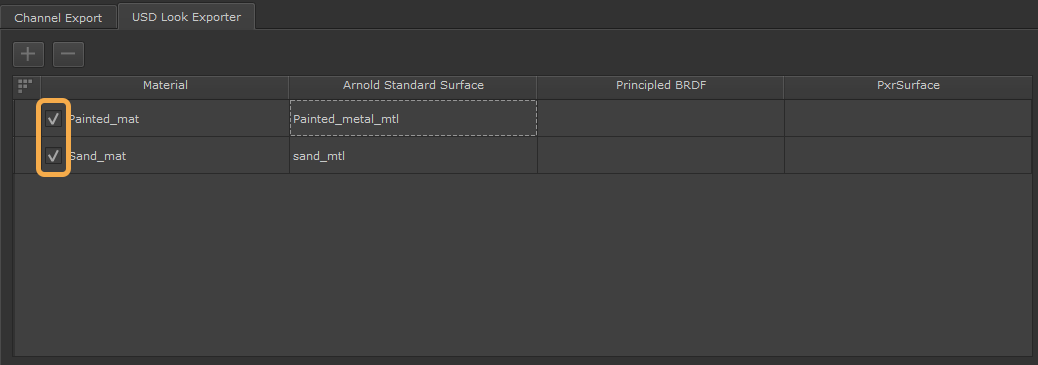
- Ensure that the checkbox next to any materials that you want to export is checked.
- Specify the target destination for your export and any variables for the file names of your textures. See Exporting Textures from Channels for more details.
- Once all the relevant target destinations have been set, click Export to USD.
• If the export is a flattened preview, the target destination can be specified in the Texture File Name field.
• To generate a USD ‘look’ file of your channels, specify a target destination in the USD Look File field.
• To export an assembly file containing any geometry used with the shaders in your scene, specify a target destination in the USD Assembly File field.
Note: When exporting USD files, a root name must be specified in the Root Name text field. Any root name specified to this parameter must include the / (forward slash) prefix.
Tip: The Shader Inputs of the materials you wish to export can be adjusted by right-clicking on the material, and selecting Edit Shader Inputs. In the window that opens, you are able to adjust the Size, Colorspace, Depth, File Name and File Options of your exported texture maps in the same way that you would the Channel Exporter. For more information on options available, see Exporting Textures from Channels.