Layers
Layers are the primary system for painting in Mari, they are the source of your paint textures in a project. Layers are created as part of a layer stack, which is in turn held within a specific channel. Each channel has a different layer stack that contains a new set of layers. You can create paint layers, layer masks, adjustments, procedurals, and layer groups within the Layers palette. The layer system combines effects in a non-destructive manner. The real strength of the layer system lies in the way layers integrate with shaders and channels.
Video: Watch this video to understand Mari's Layer System.
This video shows the workflow using Mari 3. Even though the Mari 4 workspace is different, the workflow remains the same. To have a look at the main UI differences, see Mari 3.3 vs 4.0.
Layer Integration
Mari’s layer system does not function in isolation; instead, it works together with shaders and channels to create a cohesive structure for painting. Layers are entirely dependent on channels and need to have diffuse, specular, or bump channels already set up in order to be created.
As in previous versions of Mari, channels are created with the choice of channel type, size, and depth; however, instead of painting directly into the channel as before, channels now allow the use of separate layers within them to create your texture. This gives you more control over how you paint, and gives you the option of creating non-destructive textures that can be integrated into the rest of your project. Channels are your foundation for working with layers, but what are these layers capable of, and what are your options?
Layers can be divided into a few categories: paint layers, layer masks, adjustments, and procedurals. In turn, these layers can be ordered into groups, as well as shared, merged, or exported, to name only a few features. Layers can even be converted into new channels with existing paint in the base layer. Experiment with them more to discover what you can do.
Note: For more information about channels, please see Channels.
Shader Dependence
Shaders are also important in the use of channels and layers, but they have received a makeover compared to their use in previous versions of Mari. Shaders now allow you to set up lighting and specify which channels should be used for each channel type in the shader system. Depending on the lighting system used, you can also control elements that affect your channels, such as bump weight, reflectiveness, and ambient occlusion.
Shaders also serve the vital purpose of giving you a quick way of comparing your texture under different conditions. Switching between the pre-existing shaders gives you a fast way of viewing your textures within the lighting shader you’ve set up, or simply viewing the current channel or layer stack.
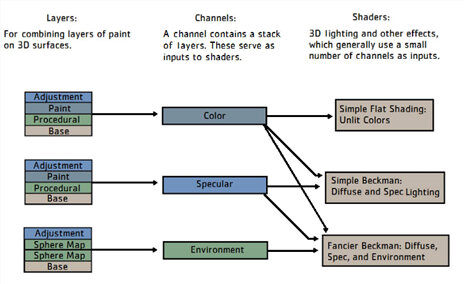
Co-dependence of channels, layers, and shaders.
Note: For more information about shaders, please see Shaders.
Getting Started with Layers
You can find most of the new features regarding layers and masks within the Layers palette or the Layers menu. The Layers palette is divided into two panes. The top pane displays all the layers for that channel, and the bottom pane provides information and controls to adjust the selected layer, when applicable.
All the controls for adding, editing, or deleting layers can be found on the right-click menu or the buttons on the palette. Adding layers and masks immediately adds the selected component, whereas adding adjustments and procedurals opens a dropdown menu for further selections.
Blend modes are also found on the Layers palette, as well as advanced blending options. Unlike the Paint Mode, found on the Paint Buffer toolbar, these blend options don’t affect the whole model, but only the selected layer(s).
Article: Read Q100502: Using Materials in the Layer Stack for more information on the unified stack rules when using Multi-Channel Layers.
Ordering Layers
Mari applies the layers in the order they appear in the palette, from the bottom of the list up (as in Photoshop®). You can drag and drop them around in the palette to change the order. Every channel that you’ve created automatically has a base layer in the layer stack. This is the foundation all other layers are built on. If the base layer is deleted, the object displays the transparency checkerboard wherever paint from the above layers doesn’t cover the model.
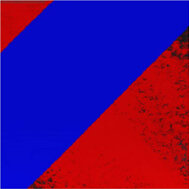
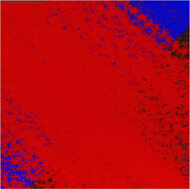
The following table illustrates a basic layer stack with two layers in a diffuse channel. One layer shows a red stripe, the other shows a blue stripe. The order of the two layers determines which texture appears on top. The table shows the results of swapping the order of the layers.
|
Layer Order |
Result |
|
|
The diffuse texture (Base) is on the bottom, then the Red, then the Blue. |
|
|
The diffuse texture is on the bottom, but this time the Red is on top of the Blue. |


If you like the look of a layer and want to replicate it elsewhere in your project, you can copy and paste the layer into the layer stack or another stack. In addition, layers can also be duplicated within the stack.
Note: For those unfamiliar with layers, the nearer the layer is to the bottom of the stack, the further down it sits in the paint order. Any overlapping paint on layers higher in the stack covers the original paint lower in the stack.
Filtering and Searching for Layers
In the Layers palette, there are four methods for quickly finding individual layers in a large layer stack: Name, Type, Attribute, and Color Tag. You can choose to filter by name, or to select a layer type or attribute, such as only procedurals, or layers that are visible. Alternatively, you can assign layers with one of eight color tags, and filter according to color.
Locked and Hidden Layers
Layers can be locked to protect them from being mistakenly deleted or edited. If the layer being locked is part of a group, only that layer is locked; however, if the layer being locked is the parent layer of the group, then all the child layers are locked too.
Hiding layers, on the other hand, allows you to examine your work in isolation. Hiding a layer non-destructively removes the texture from the object so that you can see the results of the rest of the stack without it.
Note: For more information about locking or hiding other selected items, see Hiding and Locking.
Dragging Layers for Moving, Copying, and Sharing
You can move, copy, and share layers between different layer stacks - even between layer stacks of different channels - by using modifier keys when dragging:
• Shift+drag to share layers.
• Alt+drag (or Ctrl/Cmd+Alt+drag) to copy layers.
• Drag (without any modifiers) to move layers.
Note that the modifier keys need to be held down until the layers are dropped, otherwise they have no effect.
To drag layers between the layer stacks of different channels, you need to open those stacks in their own layer stack palettes in advance. Remember to pin the layer stack palettes using the button in the top-left corner so that they do not automatically disappear. Alternatively, you can drag and hover over the relevant channel in the Channels palette to activate its layer stack in the Layers palette, and then continue dragging and drop the layers there.
Sub-stacks, such as adjustment stacks or mask stacks, automatically pop up additional dialogs if you drag your layers over their icons, so you don't need to open these pop-ups in advance.
Tip: Enabling Pin Palette  mode in the Palettes Toolbar makes sure layer stacks, adjustment stacks, and mask stacks always appear over the UI, even when your cursor is moved away from them.
Layer Properties
Any layer in the Layers palette can be inspected to view the layer properties, such as File Space, Colorspace, and information about the channel to which the layer belongs. To view the layer properties, right-click on a layer in the Layers palette and select Layer Properties from the dropdown menu. The Layer Properties dialog appears with the layer format and channel information for the selected layer.