Using Tint and Stencil Options
| 1. | On the Paint Through toolbar, there are additional buttons to the right of the main options. These give you Stamp, Repeat, and Tint options for the Paint Through functionality. |

| 2. | Stamp is a simple button that works the same as stamping down an image using a shortcut. You can drag your image around the canvas, resize it, and rotate as usual before using Stamp to apply the image directly to the model in full. |
| 3. | To repeat the image you wish to apply to the model, first press the Repeat button before painting on any part of the model. The image repeats across the painted parts of your model. To turn this off, simply press the button again. |
| 4. | To apply a Tint, press the Tint button and select your options from the following dropdown menu. |
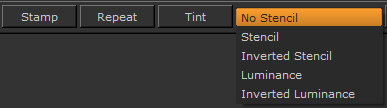
This allows you to combine a color with the image to apply a tinted version of the image.
• By default, No Stencil is the selected option, which simply tints the image color and does not change any other aspect.
• Selecting Stencil allows you to paint through an image to create a design on the model. Stencil ignores the color on the stencil and follows only the alpha value.
• Selecting Inverted Stencil allows you to color in all parts of the model where the stencil is transparent, leaving the stencil as the model’s original color.
• Selecting Luminance allows you to paint through an image in much the same way as you would with a stencil. However, by setting the option to Luminance, this allows you to use an image’s luminance as the alpha when painting. This works especially well for dirt, noise, blemishes, and other similar effects.
• Selecting Inverted Luminance allows you to create a similar effect as Luminance but uses the lighter parts of the image as alpha. This can be used to pick up scratches and fine lines.
Video: To learn how to use images as stencils, watch the Using Stencils in Mari video.
This video shows the workflow using Mari 3. Even though the Mari 4 workspace is different, the workflow remains the same. To have a look at the main UI differences, see Mari 3.3 vs 4.0.