Selecting Objects, Patches, or Faces
Mari has three selection modes. These control how you select things in your project, from whole objects to sections of surface.
|
Mode |
Description |
Example |
|
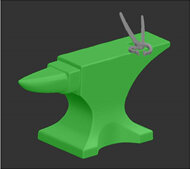
Object |
Lets you select whole objects at a time. Clicking on an object selects the whole of that object - every patch, every point on it. |
|
|
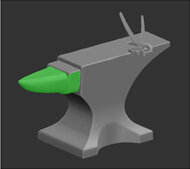
Patch |
Lets you select individual patches on an object. Clicking on a patch selects only that patch (and all points within the patch). |
|
|
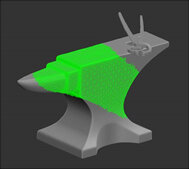
Face |
Lets you select object faces. You can use standard marquee and loop select tools to select parts of your objects. |
|
Video: Watch a quick demo on selection modes.
This video shows the workflow using Mari 3. Even though the Mari 4 workspace is different, the workflow remains the same. To have a look at the main UI differences, see Mari 3.3 vs 4.0.
In all three modes, you can add to, or remove from, the current selection. You also have the option of selecting all items or none, or invert the current selection.
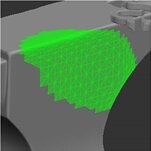
In Face selection mode, you can grow or shrink the current selection.
|
|
|
|
|
Initial selection |
Selection grown |
Selection shrunk |
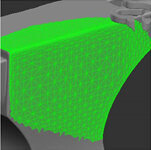
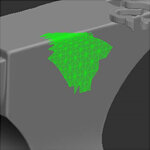
The smart selection mode of the Select tool (when in Face selection mode) lets you create selections based on the surface of the model. Similar to how Photoshop's magic wand tool lets you select areas of similar color, this lets you select areas that face in the same direction.
You can base your smart selection on:
• Connectedness Mesh
• Connectedness UV
• Edge Angles
• Orientation
• Selection Group
Tip: You can also make a smart selection by double-clicking a geometry while any selection tool shape is selected (square, lasso, or polygonal lasso). This way you can combine standard selection and smart selection together.
Video: Watch a quick demo on how to use the Face selection mode.
This video shows the workflow using Mari 3. Even though the Mari 4 workspace is different, the workflow remains the same. To have a look at the main UI differences, see Mari 3.3 vs 4.0.
You can use the selection to control where paint can bake onto the surface of your model. If Project On (on the Painting palette) is set to Selected, then Mari only bakes paint onto selected areas.
To use the Select tool:
| 1. | Start Mari and open your project. |
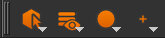
| 2. | From the Tools toolbar, choose the Select tool |
| 3. | You can use the Selection tool on the Project Controls toolbar to switch selection modes. |
If you can't see the Project Controls toolbar, right-click on the toolbar area and choose Project Controls from the dropdown menu.
| 4. | Set the selection mode. |
|
In this mode |
You can... |
|
|
click on an object to select it. |
|
|
click on a patch to select it, or click and drag a selection to select all the patches under that selection. |
|
|
click and drag to make the selection. |
| 5. | On the Tool Properties toolbar, set the selection details to Facing - selecting the (visible) front of the model, or to select “through” the model, including the back side - or the selection tool shape. |
The tool shape can be either:
•
![]() a square selection box,
a square selection box,
•
![]() a lasso selection (allowing you to draw any shape of selection),
a lasso selection (allowing you to draw any shape of selection),
•
![]() a polygonal lasso selection (allowing you to draw any shape in the form of a polygon), or
a polygonal lasso selection (allowing you to draw any shape in the form of a polygon), or
•
![]() smart selection (letting you select areas based on the shape of the model).
smart selection (letting you select areas based on the shape of the model).
Note: Smart selection only works in Face selection mode.
| 6. | Click and drag to make your selection. |
| 7. | You can use modifier keys to add to, remove from, or toggle the selection: |
|
Hold down... |
To... |
Effect |
|
Shift |
Add to the selection |
Areas that were unselected become selected, areas that were already selected stay selected. |
|
Ctrl/Cmd |
Remove from the selection |
Areas that were selected become unselected, areas that were already unselected stay unselected. |
|
Ctrl+Shift+click |
Toggle the selection |
At the cursor's location, areas that were selected become unselected and areas that were unselected become selected. Note: This only works with Patch and Face selection modes. |
| 8. | You can select all, none, or invert the current selection. Use the buttons on the Tool Properties toolbar, the options in the Selection menu, or the right-click menu on the canvas. |
| 9. | In the Face selection mode, use the Grow and Shrink buttons to change the size of the current selection. |
You can use the Grow/Shrink By field to set how these work. Edges grows along the edge of the current
selection, Vertices grows using the vertices as a guide.
Tip: You can only grow the selection up to the edge of the patch(es) that your face selections cover.
The Smart Selection mode works slightly differently from the other modes. To use it:
| 1. | In Face Selection mode |
| 2. | In the tool properties toolbar, set the Type. This sets how to create the selection area: |
• Connectedness Mesh - selects the areas on the model connected in 3D view.
• Connectedness UV- selects the areas on the model connected to the selected face. When you look at the area in the UV view, this selects the whole connected area within the current UV patch. If the UV patch holds several different areas, only those areas you click on are selected.
• Edge Angle - selects based on the degree of change between neighboring faces. The selection goes until it hits an angle higher than the Smart Angle.
• Orientation - selects the area that faces in the same direction as your initial selection.
• Selection Group - selects the whole selection group that the selected face belongs to. If the selected face does not belong to a selection group, nothing happens. If a face belongs to more than one selection group, clicking repeatedly cycles through the other selection groups to which it belongs.
| 3. | Set the Angle - this defines the maximum angle for the smart selection. |
• For Edge Angles, this sets the maximum angle between areas on the model surface. For example, if the angle is set to 30, this selects areas up to a 30 degree change of facing.
• For Orientation, this sets how far from the facing of your original selection the selection goes to. For example, if the angle is set to 30, this selects areas up to 30 degrees away from the facing of your original selection.
| 4. | Click and drag to make the selection. |
Mari creates a selection around the area you drag.
Alternatively, if you set Selection Group for the Type, click a face on the canvas repeatedly to cycle through the selection groups to which it belongs. The selections groups are selected in the Selection Groups palette and the selection group is highlighted on the model.
Alternatively, you can use the buttons on the Tool Properties toolbar to quickly select patches. To do this:
| 1. | In Patch Selection mode, click any of the selection modes in the Tool Properties toolbar (Rectangle, Lasso, Smart). |
| 2. | To quickly select all patches, click the  button on the Tool Properties toolbar. button on the Tool Properties toolbar. |
All patches on your current object are selected.
| 3. | To quickly clear your selection so that none of your patches are highlighted, click on the |
Any patches you have selected are unselected.