Search is based on keyword.
Ex: "Procedures"
Do not search with natural language
Ex: "How do I write a new procedure?"
Creating Actors, Actions, and Poses
The Actors, Actions, and Poses menus appear in a bar at the bottom of the Animate layout. This bar is under the keyframing and timeline transport controls. You use these menus to animate items. An actor is a special type of Groups Viewport that acts as a container for storing items or channels.
![]()
You can quickly assign keyframes for all associated channels, and then save the values as alternate layers with the Actions menu. Each action is an alternate of the entire timeline. You can set the current action as a driven action to re-time actions, create time warping affects, and also see multiple actions together in the timeline.
Additionally, the Poses menu stores specific keyframe values that you can then easily apply at any point along the timeline.
Creating an Actor
An actor is a container that groups related items together. This could be an entire hierarchy of joints for a character, or it could be all the parts to a dump truck (an actor doesn't need to be a character). By creating an actor you can apply keyframes to all associated items.
Note: Before you create an actor, select all the target items that you want to include in the Items list and then click the Actors menu.
| 1. | In the Animate layout, select the mesh item you wish to use as the target for your animation. |
| 2. | At the bottom of the interface, click the  Actors button. Actors button. |
| 3. | In the Actors menu, click Create a New Actor.... |
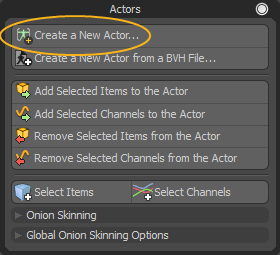
This opens the New Actor dialog where you create the actor group.

| 4. | Type a Name and ensure Type is set to Actor. |
This defines how Modo treats the group.
| 5. | In the Mode dropdown menu, select which items or channels should be added automatically to the new actor. The following options are available: |
• Empty - Creates an actor group with no automatically assigned items. This is useful when you are planning the different actors that are needed. You can assign items later by clicking Add Selected Items to the Actor in the Actions popup menu.
• From Selected Items- Automatically adds all the selected items in the scene.
• From Selected Channels - Automatically adds all the selected channels in the scene.
• From Item Edits - Adds any items from the current selection that have been changed from their rest state (modified from the Setup action state).
• From Channel Edits - Adds any channels from the current selection that have been changed from their rest state (modified from the Setup action state).
Tip: In most cases, use From Selected Items so that Modo adds all selected items automatically to the actor (group).
| 6. | Click OK to create the actor. |
Tip: If you need to add/remove more items or channels, use the Add Selected Items to the Actor and Remove Selected Items from the Actor commands in the Actors menu after selecting the target element.
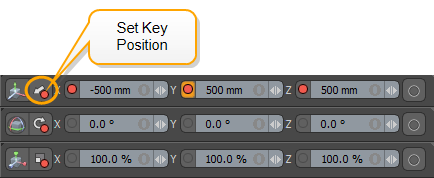
Setting Keyframes
When an actor is defined and the item is selected, you can click the Key button to define keyframes for every animated channel belonging to each item in the actor. Define at least one keyframe for each channel. (For characters, this would typically be a position or rotation channel.)
For information on creating keyframes, see Working with the Timeline.
Creating Actions
Actions store keyframes of the entire timeline for each actor. Each separate action can be a complete set of keyframes for the entire length of a given scene within a particular actor group. You can create each action either as a completely separate animation (such as a run cycle in one and a crouch action in another) or a subtle reworking of an existing animation (such as non-destructively modifying a character's motions). In movie terms, each action is its own take of the scene.
To create a new Action layer:
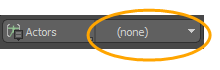
| 1. | Ensure an actor is selected in the Actors menu for the new animation. Click the dropdown menu and select an actor. |
Note: Each Action has to belong to a specific actor, so you need to have an actor chosen before you can create a new action.
| 2. | At the bottom of the Animate layout, click the  Actions button. Actions button. |
This opens the Actions dialog.
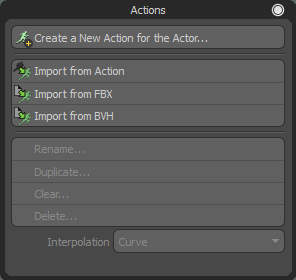
| 3. | Click Create a New Action for the Actor.... |

| 4. | Type a name and click OK. |
Now, when animating items belonging to the current actor, Modo stores the current action in defined keyframes. You can create any number of alternate animations for an actor by repeating the above steps. If you select Transfer in the New Action dialog, Modo copies any keyframes assigned to the item at the scene level into the new action. You can choose which action to view or edit by clicking it in the Actions menu. You can edit actions with the functions in the menu by specifying the action and clicking the appropriate command.
Note: When animating a scene with multiple actors, the current actor switches automatically when you select any item belonging to another actor. That actor's last active action becomes the current action.
Tip: You can set the current Timeline range to the range of the animation in the current Action. To do this, enable Auto Fit in the Animation toolbar: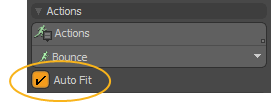
Creating Driven Actions
You can apply driven actions to key an action through a single channel. This allows you to re-time actions, create time warping affects, and also see multiple actions together in the timeline. Actions can be played multiple times and with different speeds or directions. This is useful when deciding how fast an animation is happening and where it is happening in a scene.
In this example, we are using a cube which has actions applied to animate it tipping forwards and backwards. Once done, we'll apply a driven action to change how fast that animation is happening and when it is happening in the scene. This driven action controls the entire animation. We'll set the driven action keys to control when the animation starts, ends, and the speed it is played.
To apply a driven action:
| 1. | Download our example scenes and open driven_action-roll_model.lxo in the Animate layout. |
| 2. | In the bottom panel of the Animate layout, select the actor from the Actors dropdown menu. In this example, ensure Cube is selected. |
The Cube actor is a Cube mesh item, which is used later in this procedure for the animation.

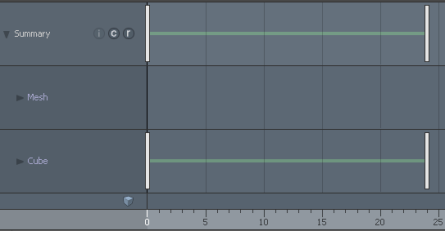
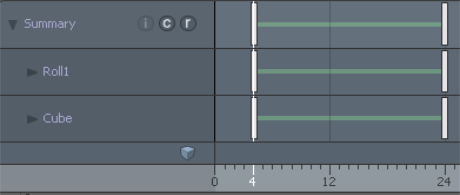
| 3. | Select the action you’d like to ‘drive’ from the Actions dropdown menu. In this example, select Roll1. |

The timeline updates and shows the summary of the overall animation and the cube animation; starting at 0 and ending at 24 seconds.
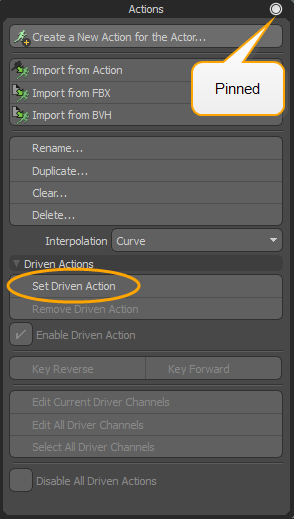
| 4. | At the bottom of the Animate layout, click Actions to display the Actions dialog, move it to pin it open, and click Set Driven Action. |
The current action is set as a driven action and added as an initial empty driver channel. There will be no visible change until this driver channel is keyed.
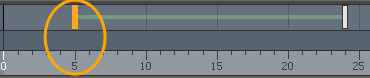
| 5. | In the timeline, click+drag the first key, and position it to 5 seconds. |
This key will be used as the starting point for the Key Forward animation in our next step.
| 6. | In the Actions dialog, click on Key Forward. |
This sets the initial key and the end key value for the action Roll1.
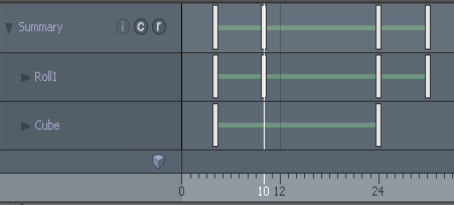
| 7. | Scrub in the timeline to 10 seconds and click Key Reverse in the Actions dialog. |
This creates a new percentage driver channel and adds a key at the current time for the start, and a key for the end.
When you scrub to 10 seconds in the timeline, notice the cube is animated. Once you have set Key Reverse at 10 seconds, the timeline displays new keys.
| 8. | Click+drag the first key for the Roll1 item and reposition it to 7 seconds. |
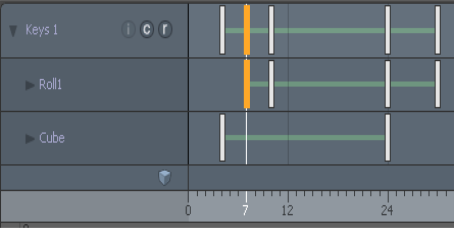
| 9. | Scrub in the timeline. |
The action starts playing from where you keyed it at 7 seconds and ends at 29 seconds.
| 10. | At the bottom of the Animate layout, set Actions to None. |
Only the driven action is displayed in the timeline. We'll change the location of when the animation starts and how fast it runs later in this procedure.

| 11. | Scrub in the timeline. |
The action starts playing from where you keyed the driven action at 10 seconds and ends at 29 seconds.
| 12. | Change the end key position to 56 and scrub in the timeline. |

Notice how this driven action controls the entire animation. Also, notice that the speed of the cube rotating at the end of the animation is much slower because we have increased the time.
Advanced Driven Actions
Driver channels are user channels on the Action Clip items, which can be found in the Groups Viewport under the actor they belong to. Percentage type user channels may be added manually and are treated by the modifier as driver channels. User channels of others types are ignored. For more information about channels types, see Add User Channels.
Actions can be prioritized when they overlap by changing their order in the Groups viewport. Actions higher up take priority over those below.
Driver channels can be driven by Channel Links, they affect the whole range of the scene unless there is another driven action with a higher priority that has a keyed Driver channel.
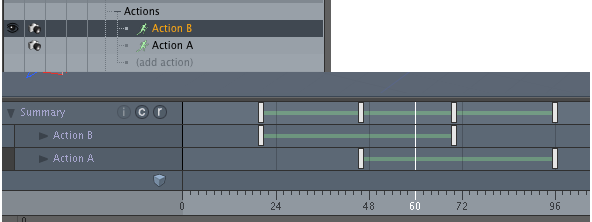
In the images below Action A takes priority over Action B at frame 60. Action B plays up until the start of Action A.
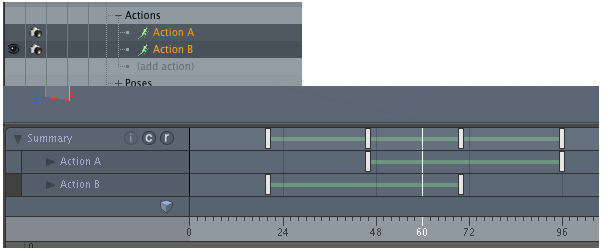
Dragging Action B above Action A in the Groups viewport gives it priority. Action B plays until it ends after which Action A plays.
The first and last keys on the driver channels define the range over which the channel affects the animation. Underlying actions are not considered inside this range, even if the driver channel has a zero percentage set.
Multiple Driver channels should be used to play an Action at multiple times in the scene and have any other Actions play in between.
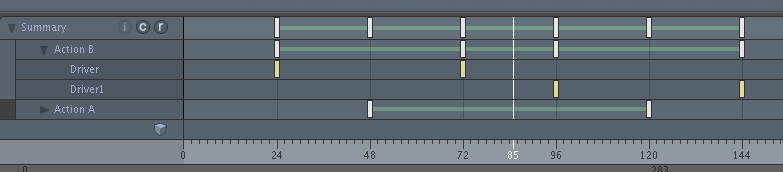
In the image above Action B plays between frames 24 and 72, Action A plays between frames 73 and 95, and the Action B plays again between frames 96 and 144.
Driven Actions Controls
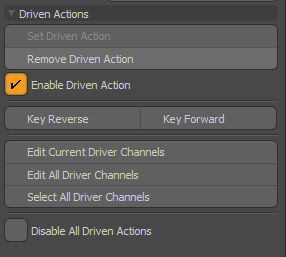
• Set Driven Action - Sets the current Action (as chosen in the Actions popup) as a driven action and adds an initial empty driver channel. There will be no visible change until this Driver channel is keyed.
• Remove Driven Action - Removes the driven state from the current action and deletes all the driver channels.
• Enable Driven Action - Used to enable or disable the driven state of the current action. The driver channels are preserved when disabled.
• Key Reverse - Creates a new percentage driver channel and adds a key at the current time with a value of 0% for the start, and a key at the current time plus the length of the animation in the Action with a value of 100% for the end. The channel has it’s limits set to clamp key values between zero and 100%.
The channel Curve Interpolation is set to Linear so the animation plays back at it’s correct rate. This can be changed if you’d like to vary the speed of the animation between the keys. Additional keys can be added for warping the playback speed.
• Key Forward - Sets the initial key values to 100% at the start and 0% at the end so the animation plays backwards.
• Edit Current Driver Channels - Selects the current driven action and opens the Graph Editor for editing the driver channels.
• Edit All Driver Channels - As above but selects all the driven actions belonging to the current actor.
• Select All Driver Channels - Selects all the driven actions belonging to the current actor. This is useful to load the driver channels into the Dope Sheet for example.
• Disable All Driver Channels - As the name suggests this will disable all the driven actions belonging to the current actor. This is useful if you need to edit or view the actions without the driven action modifier affecting them. This does not affect the individual enable state of driven actions.
Driven Actions in the Schematic View
Driven actions are regular channels found in the Items list Channels tab, which you can drag-and-drop into the Schematic Viewport to link to the actor in your rigging.
The following procedure assumes that you have created your rigging, which includes a locator. This example walks you through the process of dragging-and-dropping the driven action into the Schematic view and moving the Locator Item to update your animation.
To add and relocate a locator in the Schematic view:
| 1. | At the top of the left side of the Modo interface, click Open the Schematic Palette. |
| 2. | On the right panel of the Model layout, open the Items list, and then open the Channels tab. |
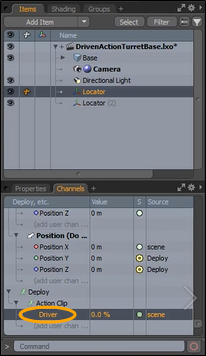
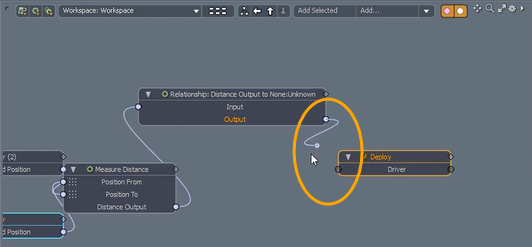
| 3. | Drag the Driver from the Items list onto the Schematic view and hook the driver to the actor. |
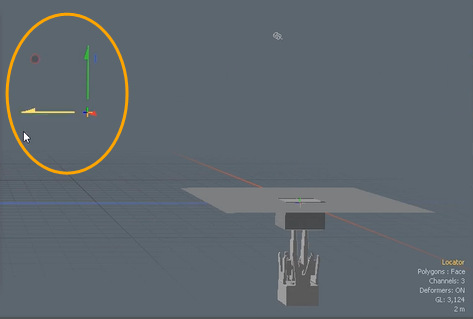
| 4. | In the 3D viewport, select the Locator and move it toward the mesh item. |
The animation plays forward.
| 5. | Move the Locator away from the mesh item to play the animation in reverse. |
Creating Poses
A pose stores a static snapshot of the values for the current keyframe of the active actor. You can then re-apply these values to the actor at another point in time. Poses don't need to be for the full character. They can be limited to just part of an actor or even a single joint. For example, you may want to create poses for a character's hand positions (such as a fist or a pointing finger). You can then apply these poses to the actor at any place in the timeline.
To create a pose:
| 1. | First position the target elements as desired. |
| 2. | Define keyframes for the target elements. For example, with a hand, this could be making a fist by bending the fingers appropriately. |
| 3. | Select all the target items. For example, double-clicking the wrist joint selects the item and all its children. |
| 4. | Next, click the Poses menu. |
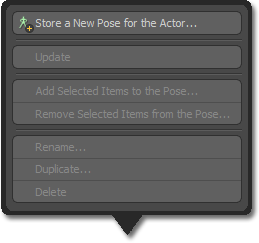
| 5. | In the Poses menu, click Store a New Pose for the Actor. |

| 6. | In the Store Pose dialog, type a Name for the pose. |
| 7. | Select Selected Actor Items in the Source Items list. |
| 8. | Click OK. |
Modo stores the pose for you to apply later. In the Store Pose dialog, you specify an item from the Source Items list to indicate which items belonging to the actor get stored in the pose: Actor Items stores values for all elements in the actor and disregards any current selection, and Selected Actor Items limits the values stored to the current item selection. The item that you select in the Source Channels list controls which channels from the source are stored: Edited stores channel values from the source elements only for channels that are different from their rest state (modified from the Setup action state), Animated stores only channels from the source elements that have keyframes applied to them, and All stores all related channels, animated or not, from the source elements in the pose. If you select the Transforms Only checkbox, Modo only stores transform-specific channels: Position, Rotation, and Scale.
Tip: When you create a pose, the items in the actor are not affected. Their channel values are copied (not cut). You can create more poses with the current values as a starting point.
Applying a Pose

To apply a stored pose:
| 1. | Go to the position on the timeline where you want the pose. |
| 2. | Specify one of the stored poses from the list next to the Poses menu. |
| 3. | With the pose now active, click the Set button next to the pose to assign it. |
Modo assigns all the stored channel values for the elements within the pose as keyframes. Once the values are set, they can be treated like any other keyframe value.
Pose Controls
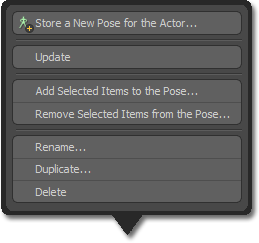
• Store a New Pose for the Actor - Opens the Store Pose dialog for saving collections of keyframe values to reuse.
• Update - Updates the keyframe values in an existing pose. Modo stores keyframe values when it creates a pose. With the target pose selected, make adjustments to the posed elements and then click this command to save the value in the current pose.
• Add Selected Items to the Pose - Opens the Edit Pose dialog for you to add additional items to those already included in a specific pose. The dialog also has options to control which channels from the added elements are stored in the pose when added. You can also limit the included channels to just the transform channels (Position, Scale, and Rotate).
• Remove Selected Items from the Pose - Opens the Edit Pose dialog, too, but defaults to Remove options, instead of Add options.
• Rename - Opens the Pose Name dialog where you can change the existing name.
• Duplicate - Opens the Pose Duplicate dialog where you can clone an existing pose to a new one with a different name.
• Delete - Removes the action from the scene entirely. Modo opens a confirmation dialog for you to verify the removal.
Actor Controls
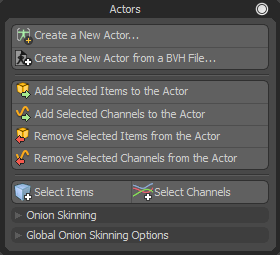
• Add Selected Items to the Actor - Adds additional items to the current actor. To use, first select the items to add and then click this button. Modo adds the items to the actor.
• Add Selected Channels to the Actor - Adds additional channels to the current actor. To use, first select the channels to add and then click this button. Modo adds the selected channels to the actor.
• Remove Selected Items from the Actor - Removes items associated with the current actor. To use, first select the items to remove and then click this button. Modo removes the element from the actor.
• Remove Selected Channels from the Actor - Removes items associated with the current actor. To use, first select the channels to remove and then click this button. Modo removes the element from the actor.
• Select Items - Selects all items related to the current actor.
• Select Channels - Selects all the animated channels related to all the items in the actor.
See below for information about Onion Skinning.
Action Controls
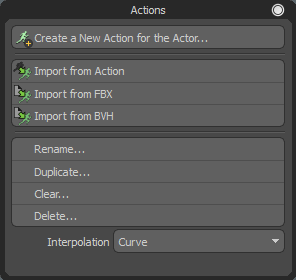
• Create a New Action for the Actor - Opens the New Action dialog for creating alternate versions of the entire timeline.
• Import from Action - Allows you to import an existing animation into the existing actor.
• Import from FBX - Allows you to import motion data from .fbx files. For more information on importing, see FBX Format Files.
• Import from BVH - Allows you to import motion data from .bvh files. For more information, see BVH Format Motions.
• Rename - Opens the Action Name dialog where you can edit the current name.
• Duplicate - Opens the Action Duplicate dialog where you can clone an existing action into a new one with a different name. You can make the new action the current, active action.
• Clear - Removes all keyframes from the current action, but retains the empty action itself. When used, Modo shows a confirmation dialog for you to verify that you want the keyframes removed.
• Delete - Removes the action from the scene entirely. Modo shows a confirmation dialog for you to verify the deletion.
• Interpolation - Defines the default method of interpolation between keyframes. You can select Curve, Linear, or Stepped to modify keyframes in the Graph Editor.
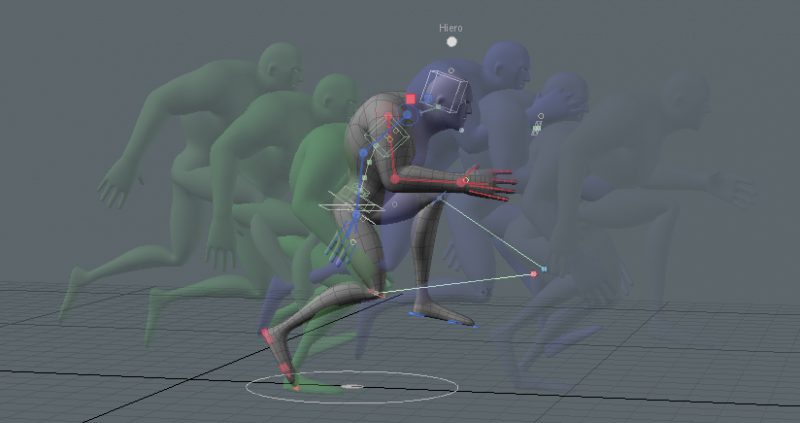
Onion Skinning
Onion skinning is a term related to traditional hand-drawn animation when the initial rough motion studies were drawn on thin, translucent paper for the artist to see the previous frames in a sequence through the paper. A drawing would seem more faded the lower it was in the stack. This way of working makes it easier for the artist to visualize the overall motion of an action and adjust the timing as necessary. The onion skinning feature in Modo mimics this same method of working, but offers additional controls not available to paper-based artists.
You find onion skinning options in the Actors menu. Actors determine the items that are drawn with onion skinning in the 3D viewport, and Modo takes the animated motion from the active action for the actor. When you set the active action to (none), Modo does not display onion skinning. Also, Modo does not display onion skinning during playback or while scrubbing the timeline.
You can use the onion skinning options to assign and modify common onion skinning settings for the current actor as well as general options for the onion skinning drawing.
Note: You must first create an actor to have something to assign the onion skinning options to. You must have some animation applied to the elements in the actor to give the onion skinning function something to display.
You'll also need an Action for the actor which has the Transfer option enabled for Modo to copy any keyframes assigned to the item at the scene level into the new Action.
Courtesy William Vaughan
To assign onion skinning:
| 1. | In the bottom panel of the Animate layout, click the dropdown menu beside the Actors button, and click + select the target actor. |

| 2. | Click to Actors button, expand Onion Skinning and click Assign Onion Skinning. |
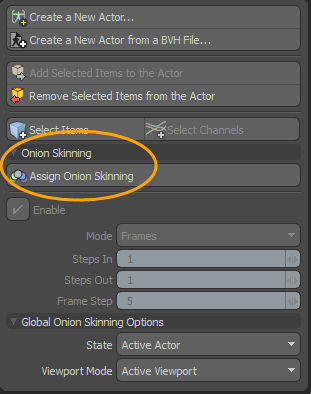
The preceding and following frames from the current point in time with the current time position is displayed most prominently.
Onion Skinning Controls
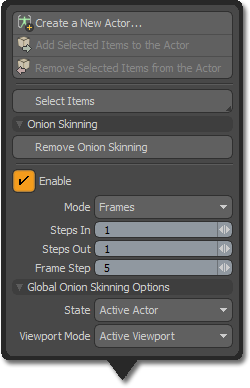
• Assign/Remove Onion Skinning - Turns onion skinning on or off for the currently selected actor.
• Enable - Use this to temporarily enable or disable onion skinning while retaining the existing settings.
• Mode - Determines the intervals used to display the onion skinning:
• Frames - Uses the whole frame values of the timeline.
• Keys - Takes the displayed intervals based on defined keyframes for the selected actor.
• Time Markers - Uses the time markers associated with the selected actor.
• Steps In - Controls the number of steps to show prior to the current time (maximum of 5).
• Steps Out - Controls the number of steps to show after the current time (maximum of 5).
• Frame Step - Controls the number of frames between each drawn step and only applies when the interval Mode is set to Frames
The following Global Onion Skinning Options are available:
• State - Provides choices to control globally how Modo displays the Onion Skinning function:
• Off - All settings remain intact for each actor. Modo only disables the display.
• Active Actor- Modo only draws onion skinning for the current actor. This is the default setting.
• All Actors- Modo draws onion skinning for all actors that have onion skinning assigned and enabled.
• Viewport Mode - Provides choices to control how Modo displays onion skinning:
• Active Viewport - Displays onion skinning only in the current active viewport.
• All Viewports - Displays onion skinning in all visible 3D Viewports.
Tip: You can also apply onion skinning to cameras and other locator-based items (such as lights) to include custom drawing features. To do this, create an actor that includes these types of items. (Locator items do not fade because of how Modo draws them in the viewport.)
Group Onion Skinning Properties
When you select an actor, you can also activate Onion Skinning options in the Properties viewport. The Properties panel also has some additional options for controlling how Modo displays onion skinning.
To view the Group Onion Skinning properties:
| 1. | Open your scene in the Model layout and then open the Groups tab on the right panel. |
| 2. | In the properties Groups tab, under Onion Skinning, click Assign Onion Skinning. |
The following properties display.
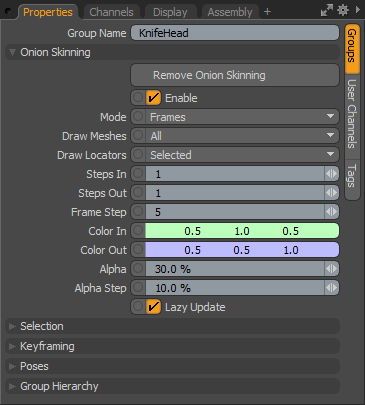
• Assign/Remove Onion Skinning - Enables or disables the Onion Skinning function for the currently selected actor.
• Enable - Use this to temporarily enable or disable onion skinning while retaining all the existing settings.
• Mode - Determines the intervals used to display the onion skinning: Frames uses the whole frame values of the timeline, Keys takes the displayed intervals based on defined keyframes for the selected actor, and Time Markers uses the time markers associated to the selected actor.
• Draw Meshes - Provides fine control over the elements of the actor group that are drawn as part of the onion skinning:
• None - Modo does not draw meshes that are members of the actor.
• Selected - Modo only draws selected meshes belonging to the actor.
• All - Modo draws all meshes belonging to the actor.
• Draw Locators - This option provides fine control over what locator-type elements (such as locators, cameras, and lights) of the actor group that Modo draws as part of the onion skinning:
• None - Modo does not draw any locator-type items belonging to the actor.
• Selected - Modo draws only selected locator-type items. (This is the default.)
• All - Modo draws all locator-type items belonging to the actor.
• Steps In - Controls the number of steps Modo draws prior to the current time (maximum of 5).
• Steps Out - Controls the number of steps Modo draws after the current time (maximum of 5).
• Frame Step - Controls the number of frames between each drawn step and only applies when the interval Mode is set to Frames.
• Color In - The display colors for steps prior to the current frame.
• Color Out - The display colors for steps following the current frame.
• Alpha - The transparency amount for the frames directly before and after the current frame.
• Alpha Steps - Defines the additional amount of transparency for subsequent steps.
• Lazy Update - Displays onion skinning only after you apply an edit. This is the default to increase the interactivity speed. For simple scenes, you can disable this option to preview all edits in real time.
Note: Sometimes it may not be desirable to have the mesh of a given character in the actor group along with rig control items. In this situation you can create a standard Groups Viewport with the character mesh and then parent it to the actor group (in the Groups viewport) to keep it separate. Modo applies the onion skinning settings to the actor as well as its child item.
Sorry you didn't find this helpful
Why wasn't this helpful? (check all that apply)
Thanks for your feedback.
If you can't find what you're looking for or you have a workflow question, please try Foundry Support.
If you have any thoughts on how we can improve our learning content, please email the Documentation team using the button below.
Thanks for taking time to give us feedback.