Search is based on keyword.
Ex: "Procedures"
Do not search with natural language
Ex: "How do I write a new procedure?"
Groups Viewport
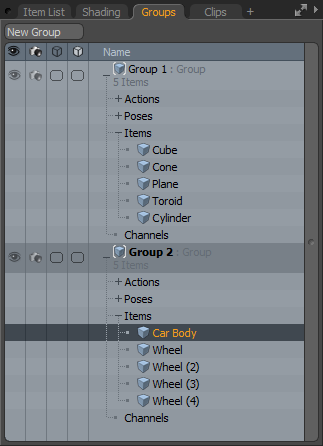
The Groups viewport is a great workflow streamlining tool, allowing you to easily control multiple items and/or channels within a scene. It also provides a number of functionalities to speed up common tasks, such as setting keyframes for complex hierarchies. In addition, many functions of Modo also use groups as specialized containers, assembling together items, channels, values, and settings for a variety of purposes.
Note: Groups used in this context should not be confused with the Group Locator Item, which is a purely organizational construct, and Material groups, which define masks for surface shading as well as to organize the many Shader Tree layers.
Working with Groups
To work with groups, you first need to create a new group using the New Group button at the top of the viewport. You can name the group, define the type of group desired, and set the mode for how items and/or channels are added automatically. Groups can be made up from any number of scene items, including Mesh Items, cameras, lights, and even locators. Channels can also be part of a group to speed up animation workflows.
For most of these specialized functions, you are using the specific interface options, rather than directly creating a group and populating it with the desired settings manually. Groups can be used to extend the functionality of the Light Linking and Replicators features.
For more information, see Creating a New Group
Opening the Groups Viewport
• On the bottom of the right panel, click Groups.
Tip: If the Groups tab is not visible on the right panel, click the More Tabs or New Tab icon and select Utility > Groups.

Groups Viewport Controls
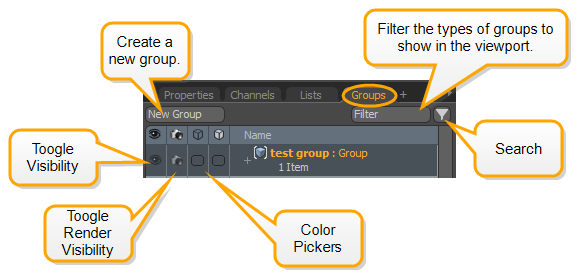
The Groups viewport itself has a number of controls.
|
New Group |
Allows you to define a new group. For more information, see Creating a New Group. |
|
|
Toggles the visibility for items within a group. Tip: This works the same way the eye column toggles visibility in the Items List. Note: The |
|
|
Toggles render visibility within a group. |
|
|
When clicked, presents a color picker that changes the wireframe color for all items within the group (only visible when the 3D viewport is set to Wireframe) and the fourth column changes the fill color for all items in the group (visible in the Solid, Shaded, Texture, and Texture Shaded display modes). Tip: Changing the display colors of items can be an easy way to visually tell which items are members of which group in scenes with many items. Individually, item settings can be adjusted within the Display Viewport when selected. |
|
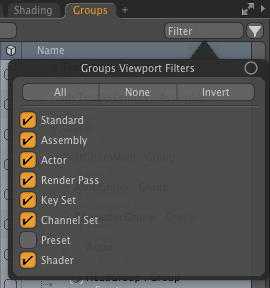
Filter |
Allows you to filter the types of groups to show in the Groups viewport.
|
|
Search |
When you click the Search |
Creating a New Group
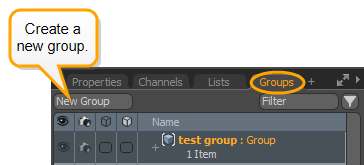
Pressing the New Group button near the top of the viewport opens the New Group dialog, which allows you to define the initial group. Though a variety of groups can be generated, you most likely want to use the specific UI controls located elsewhere in Modo for generating specialized groups.
When in Item mode, additional items can be added to a group by dragging and dropping them; simply select the item in the 3D viewport you wish to add then click-and-drag it to the group window before releasing it over the group to which you want to add the items. An orange highlight appears in the list to denote where the item lands when dropped. Channels can be added in the same fashion from the Channels Viewport.

• Name - this text input field allows you to define the desired name of the group when generated.
• Type - allows you to determine the type of group generated. Types available are described below:
• Standard - used for general groupings of items and for collecting together items for Replicators or light linking.
• Assembly - used for collections of nodes within the Schematic Viewport, used to organize and compartmentalize special functions.
• Actor - used generally for collections of the multiple elements that make up a single character in a scene, but they can be collections of any type of item and aid in animation keyframing. Additionally, they allow some specific functions related to the Timeline.
• Render Passes - used to collect channel settings together that allow you to vary the values in a single pass. The resulting passes are rendered in succession when using the Render Passes option.
• Key Sets - used to collect together various channels so keyframes can be assigned simultaneously.
• Channel Sets - used for collections of channels that can be viewed and modified directly in the 3D viewport as an overlay.
• Preset - created when working with presets - collecting the items into a container where their associated settings can be stored. You can define presets using the various Presets options found throughout Modo.
• Shader - when assigning Item Shaders to multiple items, a shader group is generated to store the associated values.
• Mode - determines how items or channels are initially added to the generated group. Additional selections can be added and removed at any time:
• Empty - generates a new group with no items or channels.
• From Selected Items - generates a group that includes any items that are currently selected in the scene.
• From Selected Channels - generates a group that includes any channels that are currently selected in the scene.
• From Item Edits - generates a group that includes any items that have been edited from their default scene action state.
• From Channel Edits -generates a group that includes any channels that have been edited from their default scene action state.
Channels in Groups
Groups can contain any number of individual channels from any combination of items in the scene. These individual channels can also be members of as many different groups as you want. If the visibility of a group containing channels is turned off, then those channels are hidden in the various channel lists, that is to say, the main Channels Viewport, Graph Editor and channel links viewports, though properties are not affected by this setting. If a group containing channels is locked, then the channels cannot be edited anywhere, including the channel list, Properties Panel, or interactively in a 3D viewport with the transform tools.
Group Parenting
Groups can be parented together, similar to 3D items; just drag a child group and drop it onto a parent item, working the same way parenting is performed in the Items list. Instead of inheriting transforms from their parents though, they inherit the group settings from their parent groups. Groups do not need to have any member items or channels either. They can be used as organizational tools. An example would be multiple groups, each containing many items. If parented to an empty group, and the visibility is switched off on that group, then all the child groups and, hence their member items, are hidden in the 3D views.
Group visibility and render channels can also override in the same way as their counterparts on Mesh Items. So in the above example, setting one of the child group's visibility channel to 'Yes' overrides the parent setting making all members of the group visible. Conversely if the parent group visibility is set to show member items, then setting a child's visibility channel to 'No' overrides that and hide its members. All other children of the parent group still get their settings from the parent group. This also applies to the group's 'Render', 'Selection' and 'Locking' settings available by the right-click context menu.
Group Drawing Settings
The Wireframe and Fill columns of the Groups viewport allow easy access to basic display settings. However, groups also support the full custom drawing settings available for 3D items. If you look in the Display Viewport with a group selected, you'll see an Add Group Draw Options button, which, when clicked, displays the custom drawing channels used for 3D items. (If you've already set a wire or fill color for the group the custom drawing channels are already available.) The difference with setting these channels on a group, as opposed to individual items, is that the group settings apply themselves to all items within the group.
Group custom drawing is layered from parent groups to child groups, so settings on parent groups override any settings on child groups. In order for settings on child groups to be visible, custom drawing on any parent groups needs to be disabled in the display properties viewport by switching off the Enable channel. It is not currently possible for child group custom drawing to override parent settings in the same way as the visibility settings for example.
For all settings, the order in which the group appears in the Groups viewport is also taken into account. Groups are searched from the top down. When an item is found in a group hierarchy Modo looks at the settings on the group containing the item. If that setting is Default it looks up the group hierarchy for a non-default setting. If one is found, then that setting is used, otherwise it continues to look through the groups in the viewport from the top down.
Since multiple groups can contain the same items, this can be used to very quickly change settings. For example, if two groups contain the same items, one is set to lock member items and make them un-selectable, and has it's custom drawing set to a dark color to indicate they can't be changed. The other group has the inverse settings applied. Just by dragging either group above the other in the viewport, it changes the settings applied to the items in the groups. For example, if the locked group is top-most, then all the items are drawn dark, and are un-editable and not selectable, otherwise the items are drawn in the other color, and can be edited and selected.
Contextual Menu
Right-clicking a group title presents you with a number of options.
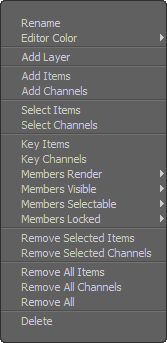
• Rename - allows you to rename the highlighted group.
• Editor Color - provides the means to colorize group layers, to help visually call out a specific group, mostly for organizational purposes.
• Add Layer - adds additional layers for the group, such as those used in Actions and Passes. The Transfer option copies any scene action state values for the related element when enabled.
• Add Items/Channels - adds all the currently-selected items from the item list or 3D viewport, or channels from the channels viewport, to the selected group.
• Select Items/Channels - selects (through Items Mode) all the associated items/channels within the group.
• Key Items/Channels - adds a keyframe at the current Timeline position for all associated items or channels within the group.
• Members Render - sets whether group members are visible in rendered images: Default respects item list visibility settings (or parent group settings if applicable), Yes enables member items' visibility in rendered images, and No disables member items' render visibility. When used in conjunction with group parenting, child group settings override parent settings.
• Members Visible - sets whether group members are visible in 3D Viewports: Default respects item list visibility settings (or parent group settings if applicable), Yes enables member items' visibility in 3D Viewports, and No disables member items' visibility in 3D Viewports. When used in conjunction with group parenting, child group settings override parent settings.
• Members Selectable - sets whether group members are selectable in 3D Viewports: Default respects item list settings (or parent group settings if applicable), Yes enables member items as selectable in 3D Viewports, and No disables selecting of member items in 3D Viewports. When used in conjunction with group parenting, child group settings override parent settings.
• Members Locked - sets whether group members are locked from property changes: Default respects item list settings (or parent group settings if applicable), Yes setting enables member property modifications, and No disables member property modifications. When used in conjunction with group parenting, child group settings override parent settings.
• Remove Selected Items - select an item in the 3D viewport or Ctrl+click to select multiple items and use the Remove Selected Items command to remove the selected items from the group.
• Remove Selected Channels - select a channel in the channel viewport or Ctrl+click to select multiple channels and use the Remove Selected Channels command to remove the selected channels from the group.
• Remove All Items - removes all items from the group.
• Remove All Channels - removes all channels from the group.
• Remove All - removes everything (all items and channels) from the group.
• Delete - deletes the group, removing it and its contents, from the Group viewport.
Items Contextual Menu
Right-clicking on any item within the group presents item-specific options:
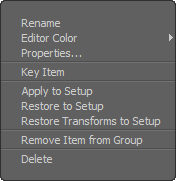
• Rename - allows you to rename the highlighted item.
• Editor Color - provides the means to colorize item layers, to help visually call out a specific layer (visible in the Items list as well), mostly for organizational purposes.
• Properties - opens a Properties dialog for quickly editing item attributes.
• Key Item - assigns a keyframe at the current time for all animated channels associated to the item.
• Apply to Setup - takes the current channel values, associated to the selected item, and moves them to the Setup action state.
• Restore to Setup - replaces the current channel values, associated to the selected item, with the setting from the Setup action state.
• Restore Transform to Setup - replaces the current channel values with the setting from the Setup action state for only the transform (position, rotation, and scale) values.
• Remove Item from Group - removes the item from the related group, but the item remains in the scene.
• Delete - removes the item from the scene entirely.
Channels Contextual Menu
Right-clicking on any channel within the group presents you with some channel-specific options:
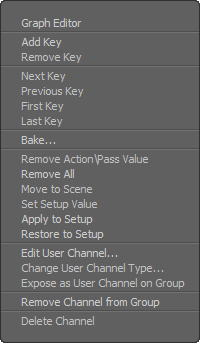
• Graph Editor - opens the selected channel in the Graph Editor for further refinement.
• Add Key - sets a keyframe at the current time with the current value.
• Remove Key - removes the keyframe at the current time.
• Next/Previous/First/Last Key - moves the Timeline position to the selected location.
• Bake - for a modifier-driven channel, this option opens a dialog allowing you to convert the procedural values to actual keyframes at every frame and disconnect the modifier(s). This is useful when exporting animation or network rendering.
• Remove Action/Pass Value - removes the current value from the current action/pass.
• Remove All - removes all keyframes and returns to the default (unmodified) value.
• Move to Scene - assigns the current channel value(s) to the scene. This is used to move a value inadvertently assigned while in a Render Pass or Actor/Action/Pose.
• Set Setup Value -
• Apply to Setup - takes the current channel values associated to the selected item and moves them to the Setup action state.
• Restore to Setup - replaces the current value of the selected channel(s) and replaces it with the Setup action state value.
• Edit User Channel - opens a dialog that allows you to modify the settings of the Users Channel, such as Name, Default Value, and the Minimum and Maximum values.
• Change User Channel Type - opens a dialog to change the user channel Type. The Type determines the formatting of the resulting value, such as a Scalar, Float, or Boolean.
• Expose as User Channel on Group - when making presets for surfacing, often times the author only wants to show certain channels for you to edit, instead of giving them everything. This command allows preset creators to control which channels are exposed. By selecting specific Shader Tree item channels, the Expose as User Channel on Group command links the channels to properly-defined user channels on the Material Group Item, where they can be edited directly (under the User Channels sub-tab). The context menu for the Material Group Item allows authors to also Lock the preset, making it easier to direct the preset end-user to the appropriate controls.
• Remove Channel From Group - removes the selected channel from the group.
Keyframing and Selecting Group Members
Groups can also be used to help with keyframing workflows, as well as with item selections. On the Groups Properties viewport there are buttons to select, and key items and channels within the group (also available from the right-click context menu).
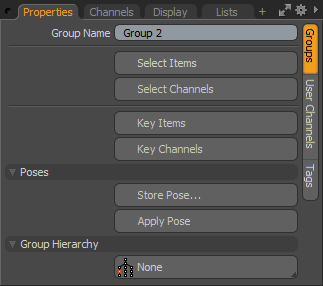
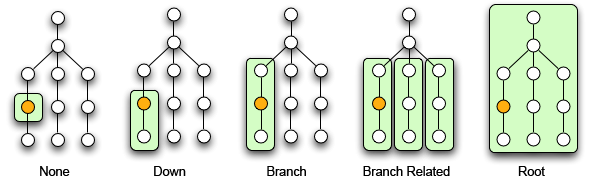
When keying Group Items, only channels belonging to the items that are already keyed are affected. Keying channels within a group adds a key at the current time to each member channel, regardless of whether they have been keyed already or not. This becomes more powerful with parented groups and the use of the Group Hierarchy buttons, also displayed on the Groups Properties form. By default, only the contents of the currently-selected groups are keyed (or selected), but this behavior can be changed with the Hierarchy-type buttons:
• None - the default; this option only keys the contents of the current group(s).
• Down - keys the contents of the current group(s) and all child groups.
• Branch - keys the contents of the hierarchy branch that the current group resides in.
• Branch Related - as above, but also keys the branches related to the current one, that is to say, branches that share a common parent. (An example might be fingers on a hand.)
• Root - keys the contents of the entire hierarchy that the group belongs to.
Light Linking
When a group contains one or more light items (directional, spot, point, or any of the other light types), they can also be used to control the lights overall affect on shading on a surface-by-surface basis, using a shader in the Shader Tree with the light linking function.
Replicators
Multiple items can act as base prototypes for Replicators when set into a group, allowing for greater variety in replicated objects. To use multiple Mesh Items as prototypes for a single Replicator, first create a group that contains all the different mesh layers. Once a Replicator has been created, the group name appears in the Replicator's Prototype dropdown list. When specified, the Replicator randomly grabs objects from the group for each Replica.
Sorry you didn't find this helpful
Why wasn't this helpful? (check all that apply)
Thanks for your feedback.
If you can't find what you're looking for or you have a workflow question, please try Foundry Support.
If you have any thoughts on how we can improve our learning content, please email the Documentation team using the button below.
Thanks for taking time to give us feedback.