Search is based on keyword.
Ex: "Procedures"
Do not search with natural language
Ex: "How do I write a new procedure?"
Spline Falloff
Like with modeling, you use a falloff to attenuate the effect any deformer has on a target item and to provide additional control about how deformers influence a mesh.
For more information, see Applying Deformers.
Using the Spline Falloff
To add a Spline Falloff to a scene, you must first add a Spline Deformer. The falloff item uses this deformer and its resulting curve to produce the falloff. The deformer, itself does not have to be active for the falloff to function but the falloff needs the deformer to be present as a container for the locators. Then, you can use both the Spline Deformer and Spline Falloff together without duplicating the spline.
Once you define a Spline Deformer, you add the Spline Falloff to it.
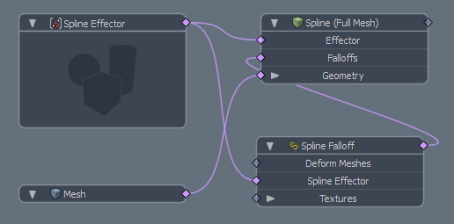
| 1. | Right-click the Spline (Full Mesh) layer within the Deformers viewport or the Items List and choose Add Override > Falloffs > Spline Falloff. |
| 2. | Once you create the Spline Falloff, in the Schematic, connect the resulting Spline Effector to the Spline Falloff's Spline Effector connector. |
Note: If you're not familiar with the Schematic viewport, see Schematic viewport for more information.
| 3. | Create a link by dragging a connector between the Spline Effector's relationship output to the Spline Falloff's Spline Effector input. |
Note: For the falloff to adjust the range of the deformation rather than shift along the length of the spline, set the Spline (Full Mesh) item Interpolation mode to Linear.
Once defined, the falloff properly attenuates the effects of the Spline Deformer.
| 4. | At this point, select the Spline Effector item and disable it. |
| 5. | Add an additional Deformer to the item and link the Spline Falloff output to the resulting item's Falloffs input to have the falloff attenuate the influence of the new Deformer. |
The falloff's position relative to the undeformed item determines which parts of the target item Modo affects.
Note: See the Schematic viewport topic for more information about adding items to the viewport and linking them together.
Spline Falloff in the Procedural
Note: For details on how to add falloffs to the Mesh Operations list, see Adding Falloffs in Procedural Modeling.
In the Mesh Operations list, the Spline Falloff has the following inputs:
• Deform Meshes - This allows you to use the falloff as a deformer on a mesh. You can connect a mesh to the falloff to transform the vertices, modulated by the falloff.
• Textures - You can specify a texture to be used by the falloff to attenuate its effect.
• Spline Effector - The Spline Falloff operation requires a Spline Effector's curve to produce the falloff. For more information on the Spline Effector, see Spline Effector.
Transform Properties
![]()
|
Name |
This displays the current item's name. You may change it by clicking the current name and typing a new name. |
|
Position XYZ |
Specify to position the item numerically in XYZ space. Position transforms originate from the Center position. |
|
Rotation XYZ |
Specify to set the rotation of the item numerically. Rotation transforms originate from the Center position. |
|
Order |
Sets the order that Modo applies rotations to the falloff item. By changing the order that Modo applies rotations you can sometimes reduce or eliminate gimbal lock. |
|
Scale XYZ |
Sets the size of the item numerically. Scale transforms originate from the Center position. |
|
Reset |
Resets the selected transform values to (0,0,0) and returns the items back to their default state. |
|
Zero |
Resets the selected transform property value to 0 and leaves the Center position and Item position intact. |
|
Add |
Use to add the selected set of transforms to the Channel list while keeping the default 0,0,0 values. (Keeping the default values is necessary for Referencing. To be able to override a channel, it must first exist.) Note: Transform items are the channel groups associated with an item that store its transform values. These transform values control an item's position, rotation, or scale. By default, new items do not have any transform items associated with them (although they are visible within the Properties panel). Add only the necessary transforms on an as-needed basis to reduce scene overhead. If you don't use the Add function (as given here), you can transform the target item with one of the various transform tools (or by editing the values). When you do so, Modo automatically adds the transform item to the Channels viewport list. |
Spline Falloff Properties
|
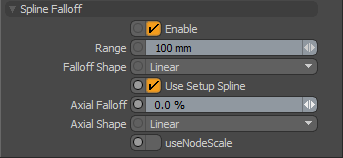
Enable |
Toggles the falloff on or off. When clear, the falloff has no influence on the scene. However, Modo saves disabled layers with the scene and their values are persistent across Modo sessions. |
|
Range |
Defines the distance away from the Spline that the falloff influences its target. |
|
Falloff Shape |
Controls the rate of attenuation across the falloff with four options. • Linear - Provides a straight attenuation of the falloff's influence across its total range. • Ease In - Gives a smooth attenuation with greater influence toward the start of the falloff's range. • Ease Out - Gives a smooth attenuation with greater influence toward the end of the falloff's range. • Smooth - Provides a smooth attenuation with a slightly stronger influence in the middle of the falloff's range. |
|
Use Setup Spline |
Select when the Spline is both a deformer and a falloff. When selected, Modo uses the Setup Spline shape to compute distances between the vertices and the spline. (The Setup Spline is how it looks in its Setup state.) When you use the Spline as both a deformer and a falloff, Modo determines the falloff on the undeformed vertex positions. Then, the deformer can pull the mesh out the reach of the falloff and cause deformation artifacts. With Use Setup Spline selected, Modo produces a more desirable result. |
|
Axial Falloff |
Controls the strength of the falloff along the length of the curve. A value of 0% generates no axial falloff. A value of 100% attenuates the falloff's strength along the curve with the maximum influence at the base of the curve and no influence at its termination point; a value of -100% produces the inverse: no influence at the base and the maximum strength at the terminator. (You can use values of greater than 100% to achieve unusual results.) |
|
Axial Shape |
Controls the attenuation amount along the length of the curve when you set Axial Falloff to a value greater than 0%. This duplicates the functionality of the Falloff Shape option, but Modo applies it along the length instead of outward from the Spline Falloff's core. |
|
Use Node Scale |
When selected, you can scale the Locator(s) that make up the Spline Falloff's curve that then scales the Range value. This acts as a multiplier on a per node basis. In the unselected, default state, node scaling has no effect on the falloff's Range. |
Easing Properties
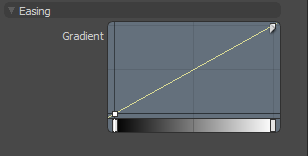
| Gradient |
Allows you to re-map the weight of a falloff by creating a new custom falloff shape. In the Graph Editor, press Ctrl/Cmd + Alt and click on the graph line to add a new key point. Move the key points to create custom falloff shape. For more information, see Key Creation. |
Related Videos
Watch this video for an overview of the Gradient Editor.
Sorry you didn't find this helpful
Why wasn't this helpful? (check all that apply)
Thanks for your feedback.
If you can't find what you're looking for or you have a workflow question, please try Foundry Support.
If you have any thoughts on how we can improve our learning content, please email the Documentation team using the button below.
Thanks for taking time to give us feedback.