Search is based on keyword.
Ex: "Procedures"
Do not search with natural language
Ex: "How do I write a new procedure?"
Using Deformer Falloffs
Falloffs have a multitude of uses, mainly:
• As Deformers, where their area of influence can be assigned to deform the target mesh (similar to having a magnet that pushes and pulls a surface).
• To attenuate the effects of other Influences upon an item or mesh. For example, a modeling falloff can control the amount of influence a tool has on a surface.
• To control the degree to which a Force influences a Dynamic item (such as a Rigid or Soft Body). How the falloff affects other items depends on how you add it to the scene. The influence shape is related to its type.
Adding a Falloff as a Deformer
You can add a falloff item to a scene by using the Add Item function of the Items list, but the falloff has no direct effect upon any items in the scene until you link it to the target item. You can do this manually by using the Schematic view.
Modo offers a few ways to create these links automatically. For example:
| 1. | In Items mode, select the target mesh item. |
| 2. | In the Setup interface tab in the Deformers sub-tab of the toolbox, select the target falloff type in the Add Falloff Deformer list. |
This adds the falloff and links it to the selected mesh using the falloff's Deform Meshes input.
If you move the falloff now, Modo also moves any points within the influence of the falloff.
|
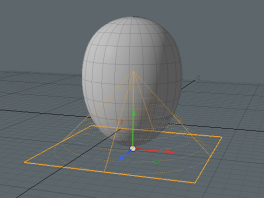
|
A sphere primitive deformed by a linear falloff. |
You can adjust the initial Rest (undeformed) state by clicking the Setup button. (In Setup mode, the viewport frame has a yellow outline.) Position the falloff to where it should be in its undeformed state. After exiting Setup, you can animate or adjust the position of the falloff and deform the target mesh.
![]()
Adding a Falloff to an Influence
To have a falloff attenuate an Influence, you use the Deformers viewport where you can automatically create and link a falloff to the Influence in a single step. Within the viewport, select the target Influence item, right-click the item, and in the shortcut menu click Add Override > Falloff > Falloff Type to add it to the scene. Once added, you can animate the Position's Size and Range. The Influence only affects the target mesh within the bounds of the falloff. (You can invert this behavior, if desired.)
![]()
Adding a Falloff to a Force
You can also automatically link a falloff to a Dynamics Forces item to attenuate the effects of the force on dynamic items. To do this, in Items mode select the Force Item and use the Add Falloff option found in the Dynamics sub-tab of the same toolbox. With the falloff active, dynamic items within the bounds of the falloff are not affected to the full degree of the Force and attenuate to the core of the falloff where Items aren't affected at all.
![]()
Adding Falloffs in Procedural Modeling
You can add the procedural versions of falloffs in the Mesh Operations list. In the Model layout, you can find this in the lower half of the Mesh Ops tab, on the right side of the interface.
Note: For more information on the Mesh Ops tab, see Using the Mesh Ops Tab.
Most of the time, you add a falloff to the Tool Pipe of a mesh operation to modulate the effect of the operation.
You can add falloffs to procedural mesh operations the following way:
| 1. | In the Mesh Operations list, expose the tool's Tool Pipe input and click (Add Tool Pipe). |
This opens the Preset Browser, where you can select the falloff you need.
| 2. | Double-click a falloff to add it to the list. |
The image below shows a Bezier Falloff added to the Tool Pipe of a Polygon Bevel operation in the Mesh Operations list:
Blending Falloffs
When using multiple falloffs to attenuate the effect of a tool, falloffs behave additively and are applied one after the other in the order you add them. However, to achieve a different effect, you can also combine multiple falloffs into one by using a Blend Falloff. A Blend Falloff is a falloff that takes other falloffs as inputs and combines them based on the math operation you select in its properties.
You can work with Blend Falloffs in the Schematic Viewport or the Mesh Operations List.
Blending Falloffs in the Mesh Operations List
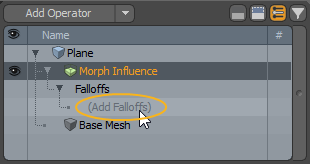
Make sure you have a mesh and an operation affecting it, that you can add falloffs to. Here the Morph Influence is used as an example.
| 1. | On the right panel, open the Mesh Ops tab. |
Note: If you're working in a layout where the Mesh Ops tab is not visible by default, click the + button on the right of the tab names, and select Data Lists > Mesh Ops.
For more information about the Mesh Ops tab and how mesh operations work, see Procedural Modeling.
| 2. | In the Mesh Operations list, expand the operation to which you want to add the falloff. |
| 3. | Expand the operation's Falloff input and click (Add Falloff). |
| 4. | In the Add Operator window, navigate to New > Falloffs, then double-click Blend Falloff. |
The Blend Falloff is added to the selected operation in the Mesh Operations list.
| 5. | To add the falloffs to blend, expand the Blend Falloff item in the list. |
This reveals its Falloff input.
| 6. | Expand the operation's Falloff input and click (Add Falloff). |
| 7. | In the Add Operator window, navigate to New > Falloffs, then double-click the falloff you want to add. Repeat this to add the required falloffs. |
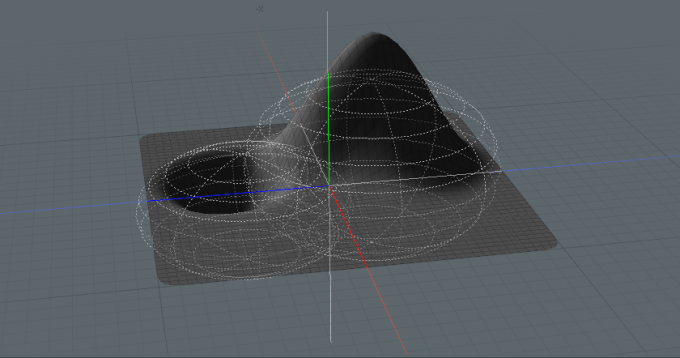
The example below uses a Radial Falloffs.

| 8. | Adjust each falloff by selecting it in the list, and editing its properties in the Properties tab in the lower right panel. |
| 9. | Select the Blend Falloff in the Mesh Operations list to open its properties in the lower right panel. Edit the properties to achieve different effects. For more information, see Blend Falloff Properties. |
Blending Falloffs in the Schematic
Make sure you have a mesh and an operation affecting it, that you can add falloffs to. Here the Morph Influence is used as an example.
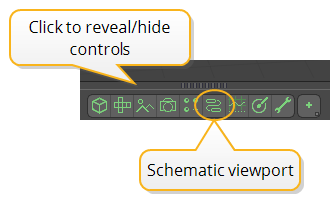
To open the Schematic viewport:
• In the Modo layout, click the thin gray line below the 3D viewport, and click the Schematic viewport ![]() button.
button.
OR
• Switch to the Setup layout from the menu bar by clicking Layout > Layouts > Setup.
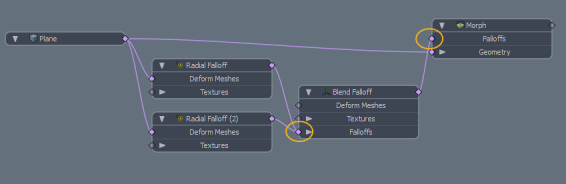
| 1. | Click Add..., navigate to Mesh Operations > Tool Pipe > Falloffs, and double-click Blend Falloff. |
| 2. | Add the other required falloffs the same way. |
| 3. | Connect the Blend Falloff node to the required operation's Falloff input, and the falloffs to the Blend Falloff node's Falloff input. |
In the example below, the Blend Falloff is connected to the Morph Influence node (Morph in this case) and combines the two Radial Falloffs.
| 4. | Adjust each falloff by selecting it and editing its properties in the Properties tab in the lower right panel. |
| 5. | Select the Blend Falloff node in the Schematic to open its properties in the lower right panel. Edit the properties to achieve different effects. For more information, see Blend Falloff Properties. |
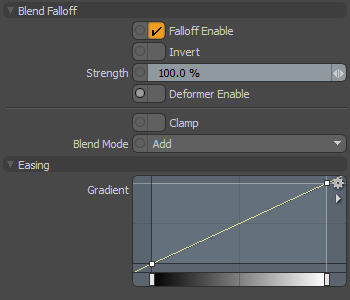
Blend Falloff Properties
|
Falloff Enable |
Toggles the influence of the falloff on or off. When disabled, the falloff has no effect on its target. However, Modo saves disabled layers with the scene, and the values persist across Modo sessions. |
|
Invert |
When enabled, reverses the influence area of the falloff. |
|
Strength |
Controls the maximum amount of influence the falloff has on its target. At a value of 50%, even areas that are affected fully by the falloff are only influenced half as much. |
|
Deformer Enable |
When enabled, you can connect the falloff to a mesh and use it as a mesh deformer. For more information, see Applying Deformers. |
|
Clamp |
When disabled, the falloffs are applied additively, one after the other. When enabled, they are clamped. |
|
Blend Mode |
Determines the math operation used to combine the falloffs. You can choose between Add, Subtract, and Multiply. |
|
Gradient |
Allows you to re-map the weight of a falloff by creating a new custom falloff shape. In the Graph Editor, press Ctrl/Cmd + Alt and click on the graph line to add a new key point. Move the key points to create a custom falloff shape. For more information, see Key Creation. |
Related Videos
Watch this video for an overview of the Gradient Editor.
Falloffs
Click any link below to view the topic for a specific falloff.
![]() Curve Falloff
Curve Falloff
Sorry you didn't find this helpful
Why wasn't this helpful? (check all that apply)
Thanks for your feedback.
If you can't find what you're looking for or you have a workflow question, please try Foundry Support.
If you have any thoughts on how we can improve our learning content, please email the Documentation team using the button below.
Thanks for taking time to give us feedback.