Search is based on keyword.
Ex: "Procedures"
Do not search with natural language
Ex: "How do I write a new procedure?"
Weight Map Falloff
The Weight Map Falloff evaluates a weight map applied to a Mesh Operation. You can choose which weight map to evaluate. Weight maps define the area of influence upon a mesh. A Mesh Operation, such as Polygon Bevel, drives the Weight Map Falloff. The Easing Properties allows you to quickly create a new falloff shape.
For more information about Weight Maps, see Working with Weight Maps.
|

|
|
Before |
After |
Adding a Weight Map Falloff
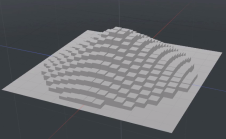
In this example, create a subdivided plane with a weight map, and apply a mesh operation to drive the Weight Map Falloff.
To create a plane with a weight map:
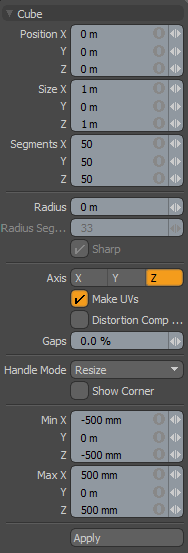
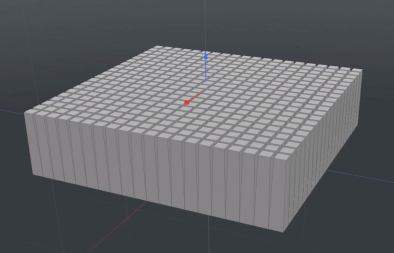
| 1. | In Model layout, on the left panel, click Cube. |
| 2. | Set the cube properties to the following and click Apply. |
| 3. | On the right panel, open the Shading tab. |
Tip: If the Shading tab is not visible, below the menu bar double-click Model to reset the layout.
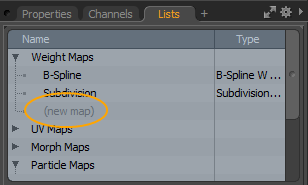
| 4. | On the bottom of the panel, open the Lists tab, expand Weight Maps, and click (new map). |
| 5. | Ensure that the following weight map properties are set and click OK. |

| 6. | Below the menu bar, click Paint, and set the viewport display property to Vertex Map. |

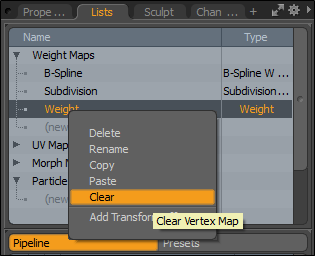
| 7. | On the right panel, under Lists, right-click on Weight, and click Clear. |
| 8. | On the left panel, open the Vertex Map Tools tab, and click Paint. |

| 9. | Left-click on the center of the cube and drag to paint a circle. |
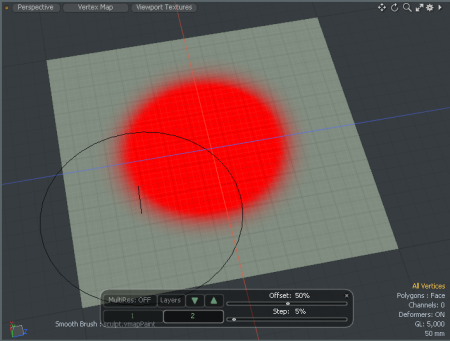
Tip: You can scale the paint brush size by right-clicking and dragging in the 3D viewport.
| 10. | Press the Esc key to drop the tool. |
| 11. | In the viewport, set the viewport display property to Default. |

To add a Mesh Operation and Weight Map Falloff:
| 1. | On the right panel, open the Mesh Ops tab. |
Tip: If the Mesh Ops tab is not visible, click the More Tabs and select New Tab > Data Lists > Mesh Ops.

| 2. | Click Add Operator, expand Mesh Operations > Polygon, and double-click Polygon Bevel. |
| 3. | In the Polygon Bevel Properties, on the bottom of the right panel, disable Group Polygons. |
| 4. | Click and drag both the red and blue handles to bevel the plane. |
| 5. | On the Mesh Ops tab, expand Polygon Bevel > Tool Pipe, and click (Add Tool Pipe). |
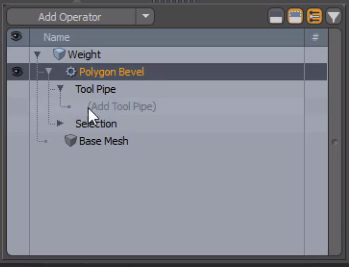
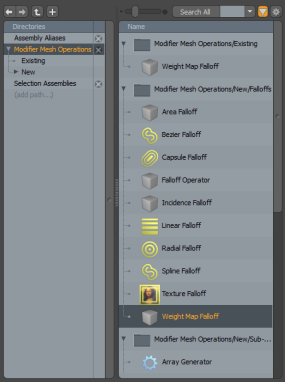
| 6. | In the Add Operation dialog, select Modifier Mesh Operations > New > Falloffs and double-click Weight Map Falloff. |
| 7. | In the Properties tab, set Weight Map to use the plane's weight map. In this example, select Weight. |

| 8. | In the Easing Properties, press Ctrl/Cmd + Alt and click on the graph line to add keys. |
For more information, see Key Creation.
| 9. | Click and drag the key points into a new position to create a new falloff shape. |

Weight Map Falloff Properties
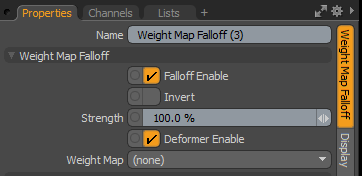
| Name | Displays the Weight Map Falloff item name. |
|
Falloff Enable |
Toggles the influence of the falloff on or off. When disabled, the falloff has no effect on its target. However, Modo saves disabled layers with the scene, and the values persist across Modo sessions. |
|
Invert |
When enabled, reverses the influence area of the falloff. |
|
Strength |
Controls the maximum amount of influence the falloff has on its target. At a value of 50%, even areas that are affected fully by the falloff are only influenced half as much. |
|
Deformer Enable |
When enabled, you can connect the falloff to a mesh and use it as a mesh deformer. You can specify the initial rest state for the deformer if you select Setup Range as well and position the falloff appropriately. |
| Weight Map | Evaluates the selected weight map. |
Easing Properties
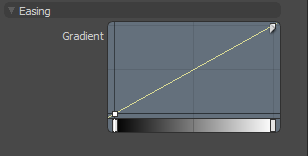
| Gradient |
Allows you to re-map the weight of a falloff by creating a new custom falloff shape. In the Graph Editor, press Ctrl/Cmd + Alt and click on the graph line to add a new key point. Move the key points to create custom falloff shape. For more information, see Key Creation. |
Related Videos
Watch this video for an overview of the Gradient Editor.
Sorry you didn't find this helpful
Why wasn't this helpful? (check all that apply)
Thanks for your feedback.
If you can't find what you're looking for or you have a workflow question, please try Foundry Support.
If you have any thoughts on how we can improve our learning content, please email the Documentation team using the button below.
Thanks for taking time to give us feedback.