Search is based on keyword.
Ex: "Procedures"
Do not search with natural language
Ex: "How do I write a new procedure?"
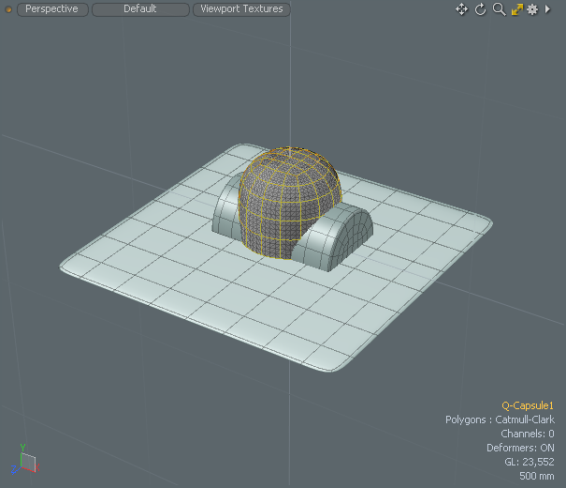
Fusion Surface Strips

Strips are a primary geometric element of a Fusion model. They are the surfaces around the intersecting edges of the source mesh. You can edit strip properties to determine the smoothness, size, or flatness of the strip.
Surface Strip Types
A number of surface strip types are found in the Fusion tab under Apply Surface Strip.
![]()
|
|
Creates a two-sided surface strip on the primary Fusion Item. A 90 degree grid is created between the corners of the intersection. The Fusion Item remains unchanged. Moving the mesh item moves the strip on the Fusion Item's surface. Tip: You can apply this to one or more primary Fusion Items with the mesh item used to create the surface strip. Selecting one or more primary items and clicking UnTrim removes the surface strip. Clicking Trim adds the surface strip back. |
|
|
Creates a two sided surface strip on the primary Fusion Item. 45 degree miter angles are created at the corners of the intersections. The Fusion Item remains unchanged. Moving the mesh item moves the strip on the Fusion Item's surface. |
|
|
Subtracts the mesh item from the Fusion Item at the trim line and creates a single-sided surface strip. It performs the trim and leaves one half of the surface strip on the trimmed primary Fusion Item. No new surfaces are added by the trimming mesh item. |
|
|
Intersects the mesh item with the Fusion Item and creates single-sided surface strips along the cut edges. This function performs the trim and leaves one half of the surface strip on the trimmed primary Fusion Item. No new surfaces are added by the trimming mesh item. |
Holding the Alt key and clicking these controls allows you to change the mesh's role, but maintain its relationship to Primaries.
Creating Surface Strips
In this example, first create your Fusion Item, specify which items are used to generate surface strips, and then apply one of the Surface Strip Types.
Watch the following videos for an overview.
Note: The first time you create surface strips, we recommend setting the following Fusion Item properties used in this procedure. For a full list, see Fusion Item Properties.
The surface strip property options can be changed later, if needed.
| 1. | Load three Fusion Qbic Presets into your scene. |
| 2. | On the right panel, under the Items tab, select an item to set as the Fusion Item. |
| 3. | Click New Fusion on the left panel, set Strip Profile to 100%, and click New Fusion with Selected Meshes. |
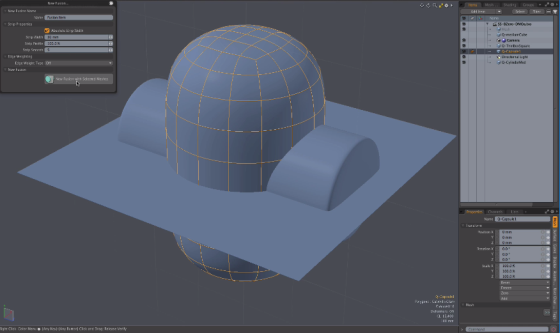
Note: Setting the Strip Profile value to 100% ensures your surface strips are calculated correctly for your initial design. This is not a requirement and can be changed at a later time.
Tip: You can set the New Fusion... Strip Width to 30 mm to see the topology of the surface strips created.
| 4. | With the Fusion Item selected, on the right panel, select one or two other fusion Qbic meshes from the Items tab. |
The selected Qbic preset meshes are used to create the surface strips onto the Fusion Item.
| 5. | On the left panel, under Apply Surface Strip, click |
| 6. | In the Items tab, select only the Fusion Item, hide the other mesh items, and set the following properties: |
• Deferred Update - Disable.
• Optimization Performance - Set to Boolean. This is a temporary setting to ensure all of the optimization continues to work with the surface strips.
• Draft Unions - Set to Off.
• Global Strip Settings > Strip Rows - Set the value to 4 to add an additional strip row to use as a buffer strip. This ensures the edge to your surface strip is maintained.
• Default Corner Settings > Corner Rounding - This is an optional choice but by adding rounding, such as 8.0, the corners of the surface strips are no longer square.
• Fusion Mesh > Mesh Mode - Set to Airtight Final w/Parts to automatically create selection sets used to alter the surface strips.
• Mesh Details > Relax Mesh Topo - Enable. Set the Relax Iterations and Relax Range to 4. With Relax Mesh Topo enabled, tools that reply on poly-derived normals, such as Push or Polygon Bevel, produce better results.
Modifying Surface Strips
Before modifying surface strips, duplicate and convert your Fusion Item into a mesh. Once done, your Fusion Item is hidden in the Items list. You can then modify surface strip properties for the duplicated mesh item and apply deform and scale tools to reshape the selected strips. The following steps demonstrates how to do this.
To modify surface strips:
| 1. | Output the Fusion Item into a regular mesh. On the right panel, under Output Mesh, click Dup and Convert to Mesh. Use the default settings and click Create Mesh. |
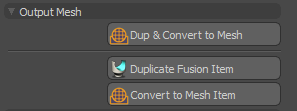
For more information, see Fusion Mesh Conversion
| 2. | Change to Polygon mode, and click Select Through in the menu bar. |
| 3. | Click Quick Select and select the fusion strip item. |
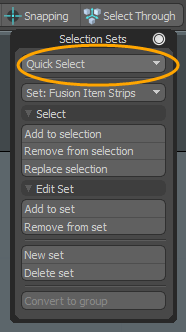
Note: By default, the surface strips selection set is called Fusion Item Strips. If your Fusion Item is renamed Fred, this item is named Fred Strips.
| 4. | On the right panel, open this Lists tab, expand Other Maps, right-click normals, and select Clear. |
| 5. | Press Shift+down-arrow to reduce the surface strip selection by one row. |
This places one row between the polygons you are going to modify and the rest of the model, to give you clean topology to work with.
| 6. | Select a deform tool, such as Push, and modify the surface strip. |
Tip: Strips are dynamically added and removed as you edit the Fusion model. However, strip items are not automatically updated except for the addition of new items. You must therefore manually update strip items following dynamic edits, to access the latest strip geometry.
In addition, you can refresh updates made to strips at any time using one the following options: In the Model layout, select the Fusion tab, and click Fusion Strips > Update Strip Items. In the Schematic Fusion layout, click Strip Options... and select Update Strips.
Curves as Surface Strips
You can use Curves, Beziers, or B-Splines to create surface strips on Fusion models.
Sorry you didn't find this helpful
Why wasn't this helpful? (check all that apply)
Thanks for your feedback.
If you can't find what you're looking for or you have a workflow question, please try Foundry Support.
If you have any thoughts on how we can improve our learning content, please email the Documentation team using the button below.
Thanks for taking time to give us feedback.