Search is based on keyword.
Ex: "Procedures"
Do not search with natural language
Ex: "How do I write a new procedure?"
Curve Fill
This is a procedural tool for filling closed, non-intersecting curves with quadrangles.
|
|
|
|
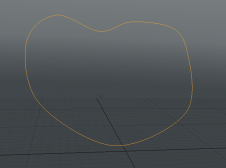
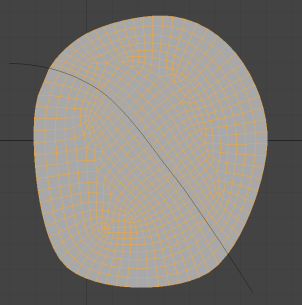
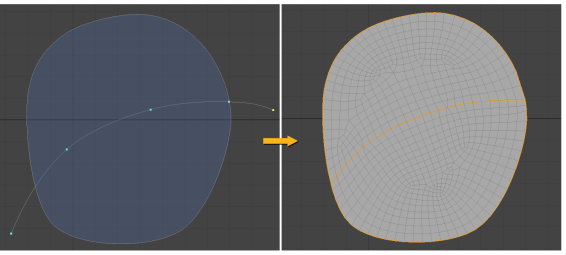
A sample curve. |
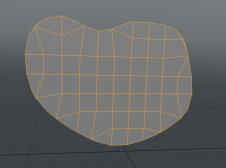
The curve filled using the Grid setting. |
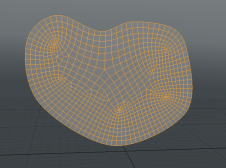
The curve filled using the Paving setting. |
The tool supports two fill methods:
• Grid - This forms a grid aligned to Cartesian coordinates. This is a fast method with fewer polygons but the results are not as reliable as Paving.
• Paving - This method repeatedly creates an inner ring of polygons, starting from the inside of the curve and finishing at the center. As the fill area gets smaller, multiple polygons may be merged or split to add or remove polygons as required. This method is slightly slower than the Grid method, but produces a better topology.
Note: Elaborate curve profiles may not result in a successful fill.
Tip: To improve your modeling workflow, use the procedural modeling Delete operation. For more information, see Edit Commands - Delete/Remove. You can also use the Select by Previous Operation mesh operation. For more information, see Procedural Selection.
Using Curve Fill
The following example stacks a Curve Fill tool on top of a mesh containing a curve. You can also add a curve to the tool using the Curve setting in the procedural stack.
| 1. | Draw a curve using the Adding Curves tool, or add a procedural curve to the Mesh Operations List. |
If you have multiple curves and want to target a certain one, select the curve in the Item List or the Mesh Operations List.
| 2. | Click Add Operator in the Mesh Operations List. |
Note: You can also right-click on the mesh in the 3D viewport and select Item Operations > Add Mesh Operation.
| 3. | Double-click Curves > Curve Fill to add it to the stack and fill the curve. |
| 4. | Adjust the Curve Fill Properties as required. |
Using Guide Curves
The Curve Fill mesh operation can use open curves as guide curves for the topology. For example, if you need an edge in a certain place on your filled curve, you can specify a guide curve, and Modo will place an edge along the length of the guide curve. You can also use guide curves to separate your filled curve into individually editable islands.
You can add guide curves within the same mesh layer as the closed curve used for the fill, or in a separate one.
In a Separate Mesh
| 1. | Add a new mesh layer and draw a curve. |
| 2. | Select the mesh where your Curve Fill mesh operation is and expand the operation it in the Mesh Operations list by clicking the arrow in front of it. |
This reveals the inputs the operation uses.
| 3. | Expand the Guide input and click (Add Guide). |
This opens the Add Operation dialog.
| 4. | Under Existing, double-click the mesh where your open curve is. |
The curve fill topology now follows the new guide.
|
|
|
|
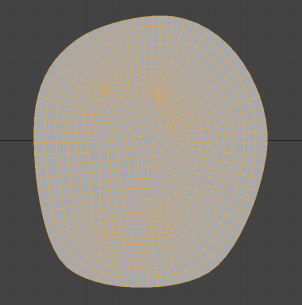
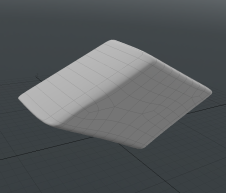
Curve Fill without Guide Curves |
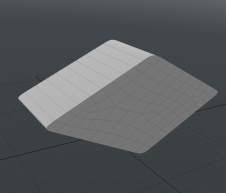
Curve Fill with Guide Curve |
In the Same Mesh
To add the closed curve and the guide curves in a single mesh layer:
| 1. | Add the Curve Fill mesh operation as described in Using Curve Fill. |
| 2. | In the Mesh Operations list, select the Base Mesh. |
| 3. | Draw your curve. |
The generated topology automatically follows the open curve.
Curve Fill Properties
|
Curve Fill |
|||||
|
Enable |
Toggles the fill on and off. |
||||
|
Curve |
Selects the curve to fill. |
||||
| Guide | Selects the guide curve. | ||||
| Delete Source Curve | When enabled, the original curve is deleted after it's filled with polygons. When disabled, the curve is preserved after the Curve Fill operation. | ||||
| Merge Patch | When enabled, Modo treats the Curve Fill topology as one item, regardless of the existence of guide curves. When disabled, the guide curves separate the topology into distinct islands. | ||||
|
Method |
Selects the fill method. Choose from: • Grid - Create fill quads as a grid, aligned with Cartesian coordinates. • Paving - Create fill quads in progressive rings from the outer edge to the center. |
||||
|
Fill Steps |
Determines the quad density in the fill surface. |
||||
|
Curve Selection |
Select one or more curves from the input mesh. The number counts up from zero, and can be a single value or a range. To specify a range separate values with a hypen, for example: 1-3. |
||||
|
Polygon Type |
Selects the polygon type for the quads: • Face - Standard face with no subdivision. • Subdivision - Smooth subdivision using Modo's standard algorithm. • Catmull-Clark - Smooth subdivision using the Catmull-Clark algorithm. |
||||
|
Edge Weight |
When Polygon Type is set to Subdivision or Catmull-Clark, determines the edge weight to modify the amount of sharpness at the edges in a subdivided fill.
|
||||
|
Make UVs |
Check this to create a UV map for the filled curve. |
||||
|
UV Map Name |
If you have checked Make UVs, you can edit the name of the UV map. |
||||
|
Pack UVs |
Only active when Make UVs is enabled. When enabled, packs the UV map to the 0.0 - 1.0 space. |
||||
Curve Fill Procedural
The Curve Fill has the following procedural sub-tool:
• Curve - The curve(s) to fill. This allows you to fill a curve (or curves) on another mesh layer (or from third-party tools that generate curves).
• Guide - The guide curve(s) used to generate the fill topology.
Curve Fill Schematic
The Curve Fill node has the same inputs as the procedural version.
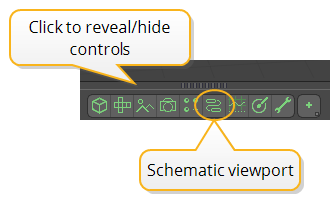
To open the Schematic viewport:
• In the Modo layout, click the thin gray line below the 3D viewport, and click the Schematic viewport ![]() button.
button.
OR
• Switch to the Setup layout from the menu bar by clicking Layout > Layouts > Setup.
To add the Curve Fill node, click Add..., then under Mesh Operations > Curves, double-click Curve Fill.
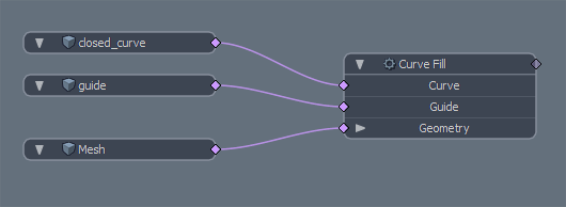
In the following example, the Curve Fill node takes a curve to fill from the mesh layer called closed_curve. The guide curve is attached to its Guide input, and it generates the geometry in a separate layer called Mesh, attached to its Geometry input.
Note: For more information on working in the Schematic, see Schematic Viewport.
Sorry you didn't find this helpful
Why wasn't this helpful? (check all that apply)
Thanks for your feedback.
If you can't find what you're looking for or you have a workflow question, please try Foundry Support.
If you have any thoughts on how we can improve our learning content, please email the Documentation team using the button below.
Thanks for taking time to give us feedback.