Search is based on keyword.
Ex: "Procedures"
Do not search with natural language
Ex: "How do I write a new procedure?"
Set Vertex Normals
Vertex normals provide an efficient way to smooth shade a polygon mesh, giving it the appearance of a much higher poly mesh. Vertex normal smoothing provides much more control over edges hardness than material smoothing.
Smoothing and Vertex Normals
Smoothing graduates the shading across polygons to produce a surface that appears smooth, without adding any additional geometry.
|
|
|
|
No Smoothing - the surface is faceted. |
Smoothing. |

Modo provides a number of ways to smooth an object so that the surface does not appear faceted. For example:
• The mesh can be smoothed in the 3D viewport through SDS Subdivide (press Tab or Shift+Tab).
• The surface's material item has a Smoothing setting.
Once smoothed, you can freeze the smoothing by baking out the current values into a Vertex Normal Map (see Vertex Normal Maps). This captures the smoothing that is displayed in the 3D viewport. The map then preserves the shading when used with a lower poly mesh.
Note: Unlike displacement maps, vertex normal maps do not modify the geometry, and the contours of the mesh are unaffected. The map gives the impression that the surface is smooth, but the silhouette is shaped according to the underlying geometry.
Note: A vertex normal map overrides any smoothness settings of the material.
Hard and Soft Edges
A vertex normal is calculated by averaging the surface normals of the faces that surround the vertex. The orientation of the vertex normals provides a means to determine the properties of reflected light (and therefore the shading) at each vertex. By interpolating between the vertex normals, Modo can smooth shade across the surface.
A smooth interpolation across polygon edges creates the appearance of soft edges, with no sharp distinction between adjacent polygons. Alternatively, the vertex normals can be adjusted to create hard edges, with contrasting shading across edge boundaries.
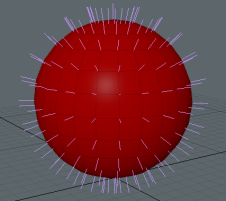
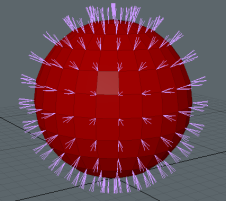
The images below show the same mesh with soft edges and hard edges,
Tip: In Modo, you can display the normals at each vertex by selecting View > Show Vertex Normals.
|
|
| A smooth shaded sphere showing vertex normals. A single normal at each vertex indicates smooth shading between the edges. | A sphere with hard edges, resulting in a faceted surface. Multiple vertex normals are drawn at each vertex to indicate the difference in shading angles between adjacent polygons. |
Creating a Vertex Normal Map
In Modo, there are a few ways to create a Vertex Normal Map:
• Create a new, empty Vertex Normal Map using (new map) in the Vertex Maps viewport. You can add to this map later.
• Bake the current shading to a Vertex Normal Map using Vertex Map > Set Vertex Normals. See Setting Vertex Normals
• Use the Vertex Normal Tools to create or edit a Vertex Normal Map with hard or soft edges as required.
You can edit the values in the fixed Vertex Normal Map to vary the shading settings. If you generate a vertex normal map, it saves the map with the model, and you can export it in various formats.
Setting Vertex Normals
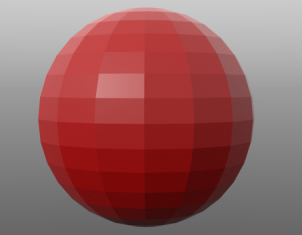
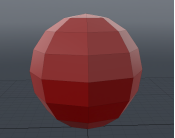
You can generate a Vertex Normal Map based on the current selection. The smoothing is then baked into a Vertex Normal Map and is automatically applied when you reduce the smoothing. The images below demonstrate this process using subdivision.
|

|
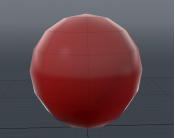
|
| A low poly sphere with no smoothing. | The same sphere subdivided by pressing Tab. Set Vertex Normals is then selected to to bake the shading into a Vertex Normal Map. | The low poly version, viewed by pressing Tab. Notice how the Vertex Normal Map is now smooth shading the surface. |
Tip: You can apply Vertex Normal Maps to sections of a mesh by selecting the required polygons before generating vertex normals.
To Set Vertex Normals
| 1. | Open your geometry in the 3D viewport, with the preferred smoothing method applied. |
| 2. | Select Vertex Map > Set Vertex Normals. |
This opens the Normals Vertex Map dialog.
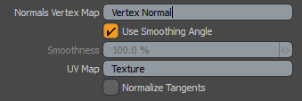
Adjust the parameters:
• Normals Vertex Map - Enter a name for the Vertex Map. This is the name used in the Lists viewport.
• Use Smoothing Angle - Enable this to use the smoothing values from the Material item's Smoothing and Smoothing Angle settings.
If disabled, you can specify a Smoothness value that Modo assigns to all vertices in the target geometry.
• Smoothness - Specifies a percentage for smoothing the Vertex Map. This option is available if you clear the Use Smoothing Angle checkbox. At 100%, Modo fully smooths all vertices.
Once applied, you can then select specific edges and apply the Split Normals command to add creases to specific areas of a surface.
• UV Map - Modo stores its own tangent basis in a vertex map that it uses behind the scenes. This tangent basis is derived from the normals of the mesh and the UV coordinates. This option lets you choose the UV Map that is used to derive the tangent basis.
• Normalize Tangents - Check this to normalize the tangent vectors. For normal maps, normalized vectors are usually preferred. For displacement maps, the vectors are not required to be of unit length.
| 3. | Click OK. |
You can see the new Vertex Normal Map in the Other Maps section of the Lists viewport.

| 4. | You can now switch to a low poly version or reduce the material smoothing. The Vertex Normal Map is used to shade the selection. |
Warning: When Modo associates a vertex normal map with a Mesh Item, modifying the smoothing value for that surface no longer affects the actual smoothing of the surface in the viewports because vertex normal maps supersede any other settings. To modify the values, remove the map and generate a new one with the new values or apply the Split Vertex Normals command with an appropriate edge selection.
Sorry you didn't find this helpful
Why wasn't this helpful? (check all that apply)
Thanks for your feedback.
If you can't find what you're looking for or you have a workflow question, please try Foundry Support.
If you have any thoughts on how we can improve our learning content, please email the Documentation team using the button below.
Thanks for taking time to give us feedback.