Search is based on keyword.
Ex: "Procedures"
Do not search with natural language
Ex: "How do I write a new procedure?"
Array
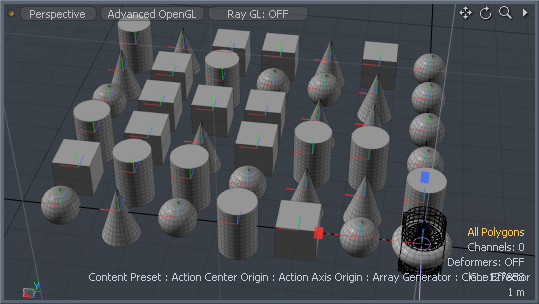
The Array tool produces ordered duplicates of a mesh (or multiple meshes) by cloning a source element into a grid-like pattern. By specifying the Source, you can define whether to clone individual items, random items, or a specific, defined item layer.
Usage
You first determine what to clone — either by selecting the target element(s) when cloning into the current foreground layer or by setting the visibility of item layers in the Items List when you want to clone background items. Modo generates cloned items in the topmost foreground layer. Next, activate the Array tool by clicking the Array icon in the Duplicate sub-tab of the modeling toolbox or by choosing Geometry > Duplicate > Array. Alternatively, to add a procedural Array, in the Mesh Operations list, click the Add Operator button, and navigate to Mesh Operations > Duplicate > Array, or enter its name in the search bar. For more information, see Array in the Procedural.
Once you have activated the tool, click in any 3D viewport to enable the interactive tool mode and adjust its attributes by dragging in the viewport. You can also click and adjust offset values for the tool handles. Each handle's color corresponds to its axis. Dragging interactively adjusts the spacing of the array. (Horizontal dragging adjusts one axis and vertical dragging adjusts another. The two adjusted axes are entirely dependent on the current position of the Work Plane.) If working in the Perspective view, rotate the viewport's orientation to change the axes being targeted. You can also right-click and drag in the 3D viewport to add or subtract additional clones (interactively adjusting the Count value). As before, the adjusted axes are dependent on the direction of dragging and the current Work Plane position. You can constrain any hauling action to the initial dragging direction by pressing Ctrl before clicking in the viewport. Alternatively, you can type values in the tool's Properties panel to make adjustments while in interactive mode or prior to entering interactive mode and then click Apply to invoke the cloning. By right-clicking the Array icon in the toolbox, you can choose other related Array tools.
Array Properties
|
Array Generator |
|
|---|---|
|
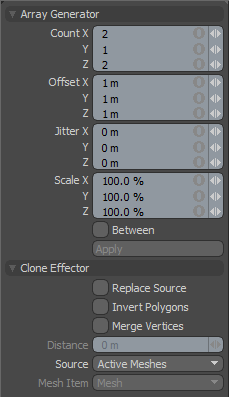
Count X/Y/Z |
Determines the number of clones in each axial direction. The array produces a volume of cloned elements that can increase polygon counts very quickly — even with small numbers. (For example, a 4x4x4 array produces 64 cloned elements.) The use of Instances (Instance Array tool) or Replicators (Replica Array tool) can limit the amount of geometry generated by the Array tool. |
|
Offset X/Y/Z |
Determines the distance away from the source element to produce the cloned elements, which Modo calculates as the distance between the source and the first order of clones. Subsequent clones are offset the same amount again. If you enable Between, this value determines the distance between the first and last clones with all others evenly spaced between those two. |
|
Jitter X/Y/Z |
Provides random variation to be added to any of the three axes (X, Y, or Z). Modo positions each copied mesh with the Offset and a random variation using the Jitter distance as the maximum possible offset variation (offset from the new position within the array). |
|
Scale X/Y/Z |
Scales the cloned elements to resize them based on the specified values. All cloned elements in the array receive the same amount of scaling. |
|
Between |
When enabled, uses the Offset value to generate the clones between the calculated first position and the last position. |
|
Clone Effector |
|
|
Replace Source |
When enabled, removes the source geometry (the initial geometry being cloned) and replaces it with a cloned element. By enabling this Modo can apply Jitter and Scale values to the source, which would otherwise remain unmodified. |
|
Invert Polygons |
When enabled, reverses the normal direction on the cloned geometry. This can be useful in instances where negatively cloned elements flip their normals inward, producing an inside-out geometry. |
|
Merge Vertices |
When enabled, automatically joins vertices into a single vertex based on the Distance setting. |
|
Distance |
Determines the maximum distance between neighboring vertices for Modo to join them into a single vertex. This only applies when you enable Merge Vertices. A setting of 0 m only joins vertices that are collocated. |
|
Source |
Determines the source mesh that is cloned into the array.
• Active Meshes - Uses the currently selected geometry as the clone source.
• Specific Mesh - Specifies a mesh item as the clone source based on the Mesh Item information.
• All BG - Combines all the currently visible background items and clones them as a single mesh.
• Random BG - Selects a random background item from all the currently visible background items at each clone position.
• Preset Shape - Clones a profile shape selected in the Preset Browser. Open the Preset Browser (by pressing F6) and select a profile before activating the tool. |
|
Mesh Item |
Specifies the mesh to be cloned. This is only relevant if you set Source to Specific mesh. |
Tip: When the you click in the 3D viewport to activate the interactive mode for the tool, Modo defines an initial offset value that is automatically set to the bounding box size of the selected element. This makes it possible to clone an array of elements that are side by side with no space between them.
Instance Array
The Instance Array tool is similar to the standard Array tool, but produces instances instead of Mesh Items or geometry. Instances are useful in that they don't contain any physical geometry, but reference a source item to keep scene files small. Additionally, Modo propagates any edits made to the source geometry to all the instanced clones to make it easy to update the geometry if necessary. There is no visual difference between an instance or the actual geometry. To activate the Instance Array tool, right-click the Array icon in the Model layout, Toolbox Duplicate sub-tab and choose Instance Array.
Instance Array Properties
|
Array Generator |
|
|---|---|
|
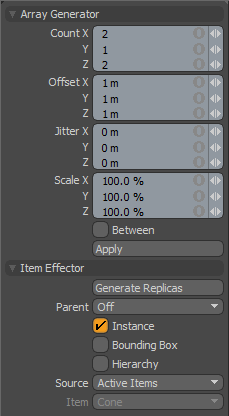
Count X/Y/Z |
Determines the number of clones in each axial direction. Each clone is an instance of the original mesh and contains no geometry, itself, but references the source mesh. If you make any edits or modifications to the source, Modo propagates those changes to each instance. |
|
Offset X/Y/Z |
Determines the distance away from the source element to produce the cloned elements, which Modo calculates as the distance between the source and the first order of clones. Subsequent clones are offset the same amount again. If you enable Between, this value determines the distance between the first and last clones with all others evenly spaced between those two. |
|
Jitter X/Y/Z |
Provides some random variation to be added to any of the three axes (X, Y, or Z). Modo positions each copied mesh with the Offset and a random variation using the Jitter distance as the maximum possible offset variation. |
|
Between |
When enabled, uses the Offset value to generate the clones between the calculated first position and the last position. |
|
Item Effector |
|
|
Parent |
Determines how Modo treats instanced items in the Item List.
• Off - Clones source item as additional instanced layers in the Item List.
• Hierarchy - Creates a cascading array where each subsequent clone is a child of the previous clone.
• Root - Creates instances as child items of the source mesh.
• Primary - Creates Instances as children of a group locator that is parented to the source mesh. |
|
Instance |
When enabled, each cloned item is an instance of the source mesh. Instances contain no physical geometry, but they reference a source layer and are represented in 3D Viewports by pink wireframes. (This is enabled by default.) |
|
Bounding Box |
When enabled, the resulting instances display as bounding boxes rather than wireframe meshes. This may provide a 3D viewport performance increase when Modo generates many instances. |
|
Hierarchy |
When enabled, clones any child items of the source geometry and retains their hierarchy through each subsequent clone. |
|
Source |
Determines the source mesh that Modo clones into the array. • Active Items - Uses the currently selected item(s) as a clone source.
• Specific Item - Specifies a Mesh Item as the clone source based on the Mesh Item information.
• All BG - Combines all the currently visible background items and clones them as a single mesh.
• Random BG - Selects a random background item from all the currently visible background items at each clone position.
• Mesh Layer Preset - Clones a mesh preset selected in the Preset Browser. Open the Preset Browser (by pressing F6) and select a mesh preset before activating the tool. |
|
Item |
Specifies the mesh to be cloned. This is only relevant if you set Source to Specific Item. |
Replica Array
The Replica Array tool produces an array of cloned items (similar to the Array tool), but this tool generates the cloned items by using a Replicator. Much like instances, replicas don't add additional geometry to the scene. Modo creates a point source Mesh Item layer with vertices representing the item positions and a Replicator Item properly defined with a source and prototype. To activate the Replica Array tool, right-click the Array icon and choose Replica Array.
Replica Array Properties
|
Array Generator |
|
|---|---|
|
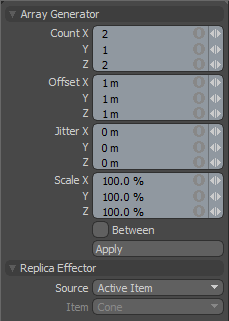
Count X/Y/Z |
Determines the number of clones in each axial direction. Each clone is an instance of the original mesh and contains no geometry, itself, but references the source mesh. If you make any edits or modifications to the source, Modo propagates those changes to each instance. |
|
Offset X/Y/Z |
Determines the distance away from the source element to produce the cloned elements, which Modo calculates as the distance between the source and the first order of clones. Subsequent clones are offset the same amount again. If you enable Between, this value determines the distance between the first and last clones with all others evenly spaced between those two. |
|
Jitter X/Y/Z |
Provides some random variation to be added to any of the three axes (X, Y, or Z). Modo positions each copied mesh with the Offset and a random variation using the Jitter distance as the maximum possible offset variation. |
|
Between |
When enabled, uses the Offset value to generate the clones between the calculated first position and the last position. |
|
Replica Effector |
|
|
Source |
Determines the source mesh that Modo clones into the array. • Active Item - Use the currently selected geometry as the clone source.
• Specific Item - Specifies a Mesh Item as the clone source based on the Mesh Item information.
• All BG - Combines all the currently visible background items and clones them as a single mesh.
• Preset Shape - Clones a profile shape selected in the Preset Browser. Open the Preset Browser (by pressing F6) and select a profile before activating the tool. |
|
Item |
Specifies the mesh to be cloned. This is only relevant if you set Source to Specific Item. |
Transform Array
The Transform Array tool creates ordered arrays of existing items. To use the Transform Array tool, you need to select the target items prior to activating the tool. Regardless of the target items' current positions, Modo moves the items to the new array positions based on their center points. To activate the Transform Array tool, right-click the Array icon and choose Transform Array.
Transform Array Properties
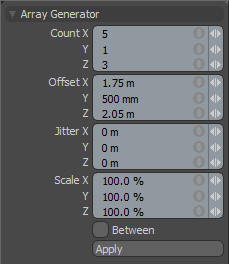
|
Array Generator |
|
|---|---|
|
Count X/Y/Z |
Determines the number of clones in each axial direction. Each clone is an instance of the original mesh and contains no geometry, itself, but references the source mesh. If you make any edits or modifications to the source, Modo propagates those changes to each instance. |
|
Offset X/Y/Z |
Determines the distance away from the source element to produce the cloned elements, which Modo calculates as the distance between the source and the first order of clones. Subsequent clones are offset the same amount again. If you enable Between, this value determines the distance between the first and last clones with all others evenly spaced between those two. |
|
Jitter X/Y/Z |
Provides some random variation to be added to any of the three axes (X, Y, or Z). Modo positions each copied mesh with the Offset and a random variation using the Jitter distance as the maximum possible offset variation. |
|
Between |
When enabled, uses the Offset value to generate the clones between the calculated first position and the last position. |
Array in the Procedural
Array is also available as a procedural mesh operation. It is a combination of the Clone Effector and Array Generator sub-tools. You can find the tool in the Mesh Ops tab, on the right-side of the Model layout.
To add the Array mesh operation:
| 1. | Click the Add Operator button, and navigate to Mesh Operations > Duplicate > Array, or enter its name in the search bar. |
| 2. | Double-click it to add it to the Mesh Operations list. |
The Array mesh operation duplicates the geometry below it in the list. You can adjust the operation using its Properties panel in the lower-right.
You can expand the Array item in the list by clicking the small arrow in front of it. This reveals the inputs the operation uses:
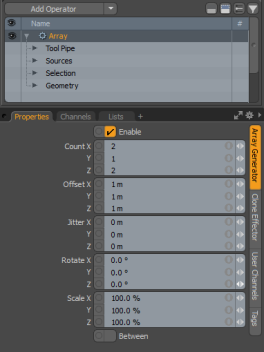
• Tool Pipe - Allows you to add sub-tools to the operation. For the Array tool, Array Generator is added by default and the options are displayed in the Properties tab.
• Sources - Allows you to specify the geometry you want to duplicate.
• Geometry - This lists any geometry that is affected by the tool. Meshes are connected automatically if they are below the tool in the Mesh Operations list. You can connect additional meshes by clicking (Add Geometry) to open the Preset Browser. From there you can select an existing mesh or add a new, empty mesh.
• Selection - Allows you to select the elements to which you want to apply the tool.
Note: The Geometry input is only visible when the list is not in Solo mode. For more information, see Solo Mode.
The Array mesh operation has the same properties as the traditional Array tool. See Array Properties.
Sorry you didn't find this helpful
Why wasn't this helpful? (check all that apply)
Thanks for your feedback.
If you can't find what you're looking for or you have a workflow question, please try Foundry Support.
If you have any thoughts on how we can improve our learning content, please email the Documentation team using the button below.
Thanks for taking time to give us feedback.