Search is based on keyword.
Ex: "Procedures"
Do not search with natural language
Ex: "How do I write a new procedure?"
Curve Rebuild
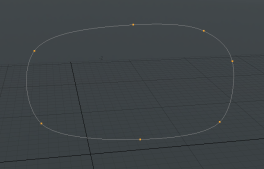
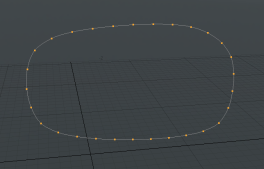
This is a procedural tool that uses a curve to build a new, similar curve but with a different amount of points.
|
|
| Before | After |
Activating the Curve Rebuild Tool
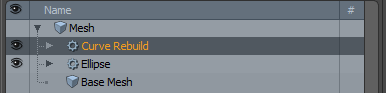
• On the left panel, open the Mesh Ops tab, click Add Operator, and double-click Mesh Operations > Curves > Curve Rebuild.
• Using the Schematic viewport, click Add Operator, and double-click Mesh Operations > Curves > Curve Rebuild.
Applying the Curve Rebuild Tool
The following example stacks a Curve Rebuild tool on top of a mesh containing a curve. You can also add a curve to the tool using the Curve setting in the procedural stack.
| 1. | Draw a curve using the Adding Curves tool, or add a procedural Curve. |
If you have multiple curve meshes and want to target a certain one, select the curve in the Item List or the Mesh Operations List.
| 2. | Click Add Operator in the Mesh Operations List. |
Note: You can also right-click on the mesh in the 3D viewport and select Item Operations > Add Mesh Operation.
| 3. | Double-click Curves > Curve Rebuild to add it to the operations stack and rebuild the curve. |
| 4. | Adjust the Mode and Point Count as required. |
Applying the Curve Rebuild Tool in the Schematic Viewport
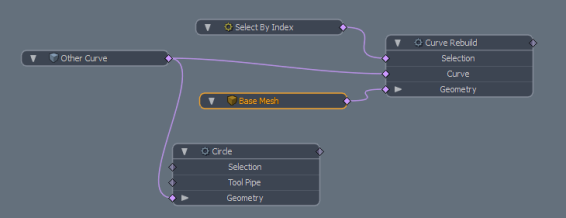
The schematic node has the same three inputs as the procedural version. The image below shows an example.
| 1. | In Model layout, draw a curve using the Adding Curves tool, or add a procedural Curve. |
If you have multiple curve meshes and want to target a certain one, select the curve in the Item List or the Mesh Operations List.
| 2. | On the top left corner of the interface, click the Schematic palette |
![]()
| 3. | In the Schematic viewport, click Add... and double-click Mesh Operations > Curves > Curve Rebuild. |
| 4. | Drag-and-drop your curve mesh item from the Mesh Ops tab onto the Schematic viewport. |
The mesh item is automatically connected to the Curve Rebuild node.
| 5. | On the right panel, select the Curve Rebuild layer in the Mesh Ops tab, and adjust the properties. |
For more information, see Curve Rebuild Properties.
Schematic sub-tools
The Curve Rebuild tool has the following procedural sub-tools in the Schematic viewport:
• Selection - Allows you to select one or more curves from the input mesh. The selection can be a single figure, or a range such as 0-4.
• Curve - The input mesh to rebuild. This allows you to rebuild a curve on another mesh layer (or from third-party tools that generate curves) to fill.
• Geometry - This lists any geometry that is affected by the tool. Meshes are connected automatically if they are below the tool in the Mesh Operations list. You can connect additional meshes by clicking (Add Geometry) to open the Preset Browser. From there you can select an existing mesh or add a new, empty mesh.
Curve Rebuild Properties
|
Source Curve |
The mesh containing the curve(s) to rebuild. |
|
Mode |
Sets the point generation method: • Point Count - Specifies a discrete number of particles to create along the curve. • Minimum Distance - Specifies a minimum distance between particles along the curve. • Exact Distance - Specifies an exact distance between particles along the curve. The resulting curve may not be full length. |
|
Point Spacing |
Specifies the distance between each particle on the curve. This option is available when Mode is set to Minimum Distance or Exact Distance. |
Sorry you didn't find this helpful
Why wasn't this helpful? (check all that apply)
Thanks for your feedback.
If you can't find what you're looking for or you have a workflow question, please try Foundry Support.
If you have any thoughts on how we can improve our learning content, please email the Documentation team using the button below.
Thanks for taking time to give us feedback.