Search is based on keyword.
Ex: "Procedures"
Do not search with natural language
Ex: "How do I write a new procedure?"
Shatter
The Shatter command breaks a model into a specified number of individual pieces, which can then be used with Modo dynamics to produce animated mayhem. The Shatter command performs a Veronoi-type of fragmentation within the bounding box of the target selection to generate cutting shards that are necessary for the Boolean operations that form the actual pieces. You can use any arbitrary shape for the target geometry, but it must be completely water-tight (with no open faces, floating vertices, or floating curves). The geometry generated by the Shatter command is not specifically SubD-compatible geometry, so these meshes should be frozen to an appropriate level prior to running the command. For information on freezing meshes, see Freezing Geometry.
Each individual shard becomes its own item layer (with an option for grouping pieces) with an independent center point. Once generated, you can apply dynamics at once to all selected elements. You can also glue them together to create groupings that must reach a certain force threshold before breaking apart. There are several different types of shattering that you can apply. Each has its own options that influence the look of the resulting shards. The Shatter commands are in the Geometry > Mesh Shatter submenu. You must select the target geometry to break apart prior to invoking the command.
Uniform
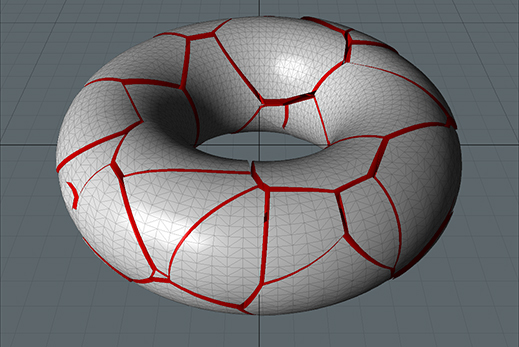
By choosing Geometry > Mesh Shatter > Uniform, you have Modo generate pieces that are roughly uniform in size for the Veronoi shards that make up the Boolean operation. The resulting Boolean shards may not be strictly uniform depending on how the pieces intersect with the target geometry during the Boolean stage.
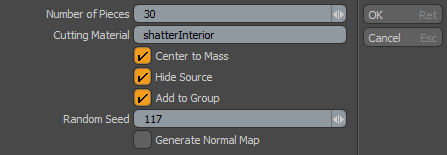
The following Shatter Uniform options are available:
|
Shatter Uniform |
|
|---|---|
|
Number of Pieces |
Determines the number of Veronoi shards generated for the Boolean cutting operations. Depending on the shape of the target geometry, this value roughly determines the final number of separate items generated. |
|
Cutting Material |
Defines an interior surface for the resulting shards (colored red by default). If you leave this blank, Modo tags the interior surfaces with the Default material tag. |
|
Center to Mass |
When enabled, places the center position of each resulting shard item on its overall mass. This is a requirement for using the shards with dynamics and produces the most realistic results for its movements. |
|
Hide Source |
When enabled, disables the original Mesh Item layer in the Items list to make it invisible (unless its Render Control option is On). Modo always preserves the original Mesh Item from which the shards originate. |
|
Add to Group |
When enabled, parents all the resulting shard items under a single group locator (folder) item. When disabled, the items are added as new Mesh Item layers to the Items list. |
|
Random Seed |
Specifies the initial value Modo uses when generating the random Veronoi values. Each seed produces different, random results. |
|
Generate Normal Map |
When enabled, creates a vertex normal map prior to cutting the shards to freeze their shading normals. When disabled, shading normals are influenced by the shard edges and the material's Smoothing Angle. |
Cluster
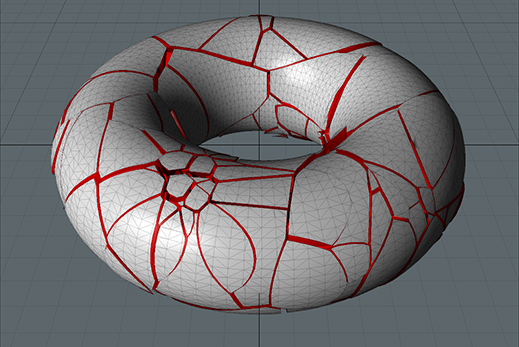
The Cluster command is similar to the Uniform command. By choosing Geometry > Mesh Shatter > Cluster, you have Modo generate additional, smaller shards around the initial pieces to create a more randomized look to the final shards.
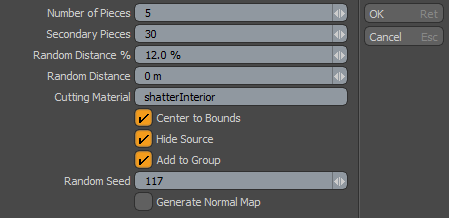
The following Shatter Cluster options are available:
|
Shatter Uniform |
|
|---|---|
|
Number of Pieces |
Determines the number of Veronoi shards generated. This is similar to the option with the Uniform command. |
|
Secondary Pieces |
Determines the number of secondary shards generated around the initial shards. |
|
Random Distance % |
Specifies the distance offset that Modo uses to create the secondary shards from the initial shards. This value is a percentage relative to the size of the original piece. |
|
Random Distance |
Specifies the distance form the initial pieces for the secondary pieces as an absolute World value. |
|
Cutting Material |
Defines an interior surface for the resulting shards (colored red by default). If you leave this blank, Modo tags the interior surfaces with the Default material tag. |
|
Center to Bounds |
When enabled, places the center position of each resulting shard item on the bounding box volume's center. You must enable this to use the shards with dynamics. |
|
Hide Source |
When enabled, disables the original Mesh Item layer in the Items list to make it invisible (unless its Render Control option is On). Modo always preserves the original Mesh Item from which the shards originate. |
|
Add to Group |
When enabled, parents all the resulting shard items under a single group locator (folder) item. When disabled, the items are added as new Mesh Item layers to the Items list. |
|
Random Seed |
Specifies the initial value Modo uses when generating the random Veronoi values. Each seed produces different, random results. |
|
Generate Normal Map |
When enabled, creates a vertex normal map prior to cutting the shards to freeze their shading normals. When disabled, shading normals are influenced by the shard edges and the material's Smoothing Angle. |
Radial
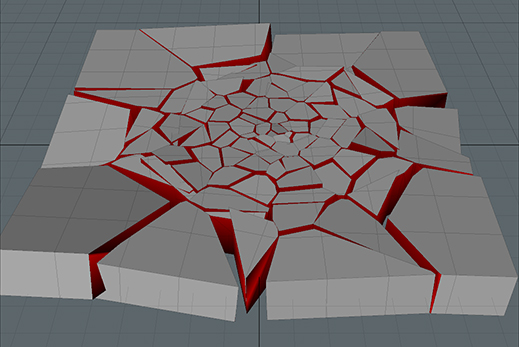
Choose Geometry > Mesh Shatter > Radial to have Modo generate a radial graph-type of look to the resulting shards similar to a spider's web. Randomized shard values look like broken glass from a central strike point with smaller pieces in the center and the size increasing as the pieces move outward.
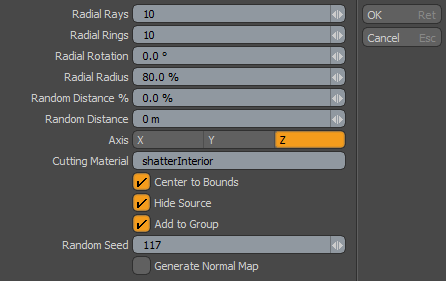
The following Shatter Radial options are available:
|
Shatter Radial |
|
|---|---|
|
Radial Rays |
Determines the number of radial divisions. Modo calculates the total ray length value by the selected form's overall bounding box size. |
|
Radial Rings |
Determines the number of divisions along the rays length – similar to rings on a tree. |
|
Radial Rotation |
Spins the radial rays to control where they land on the target geometry. |
|
Radial Radius |
Determines size of radial rings along the length of the radial rays. For example, with a setting of 50%, Modo positions the final radial ring at 50% of the total radial ray length to concentrate the shards toward the center of the form. |
|
Random Distance % |
Specifies an offset of the initial cut location based on a percentage of the final shard's size. |
|
Random Distance |
Specifies an amount of random offset from the initial shard position as an absolute World value. |
|
Axis |
Specifies the axis plane that the radial cuts align along. |
|
Cutting Material |
Defines an interior surface for the resulting shards (colored red by default). If you leave this blank, Modo tags the interior surfaces with the Default material tag. |
|
Center to Bounds |
When enabled, places the center position of each resulting shard item on the bounding box volume's center. You must enable this to use the shards with dynamics. |
|
Hide Source |
When enabled, disables the original Mesh Item layer in the Items list to make it invisible (unless its Render Control option is On). Modo always preserves the original Mesh Item from which the shards originate. |
|
Add to Group |
When enabled, parents all the resulting shard items under a single group locator (folder) item. When disabled, the items are added as new Mesh Item layers to the Items list. |
|
Random Seed |
Specifies the initial value Modo uses when generating the random Veronoi values. Each seed produces different, random results. |
|
Generate Normal Map |
When enabled, creates a vertex normal map prior to cutting the shards to freeze their shading normals. When disabled, shading normals are influenced by the shard edges and the material's Smoothing Angle. |
Splinter
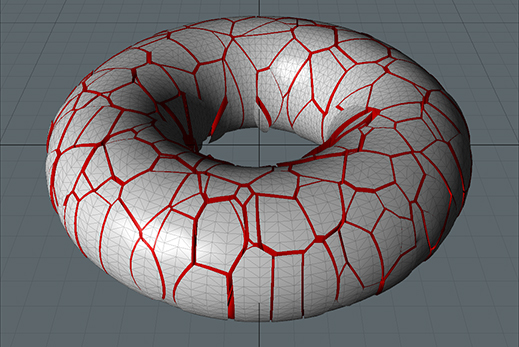
Choose Geometry > Mesh Shatter > Splinter to have Modo generate long shards that have jagged interiors, which is similar to how wood breaks. The Splinter command is similar to the Uniform command, but it generates longer shards.
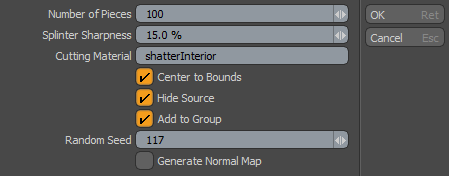
The following Splinter Uniform options are available:
|
Splinter Uniform |
|
|---|---|
|
Number of Pieces |
Determines the number of Veronoi shards generated for the Boolean cutting operations. Depending on the shape of the target geometry, this value roughly determine the final number of separate items that Modo generates. |
|
Splinter Sharpness |
Determines the amount of jaggedness at the center cut line. |
|
Cutting Material |
Defines an interior surface for the resulting shards (colored red by default). If you leave this blank, Modo tags the interior surfaces with the Default material tag. |
|
Center to Bounds |
When enabled, places the center position of each resulting shard item on the bounding box volume's center. You must enable this to use the shards with dynamics. |
|
Hide Source |
When enabled, disables the original Mesh Item layer in the Items list to make it invisible (unless its Render Control option is On). Modo always preserves the original Mesh Item from which the shards originate. |
|
Add to Group |
When enabled, parents all the resulting shard items under a single group locator (folder) item. When disabled, the items are added as new Mesh Item layers to the Items list. |
|
Random Seed |
Specifies the initial value Modo uses when generating the random Veronoi values. Each seed produces different, random results. |
|
Generate Normal Map |
When enabled, creates a vertex normal map prior to cutting the shards to freeze their shading normals. When disabled, shading normals are influenced by the shard edges and the material's Smoothing Angle. |
Source
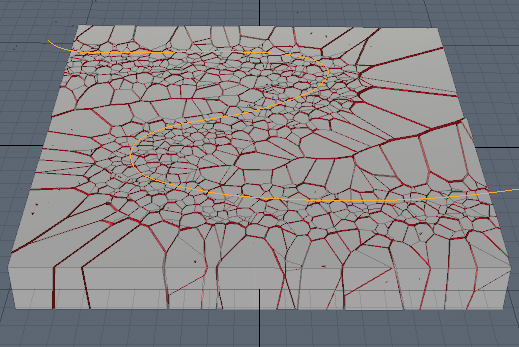
The Source shatter option allows you to use Mesh Items to drive the cutting of the target mesh. Curves or point sources can be used as well, with the positions of the resulting shards placed relative to the vertices of the driving geometry. To add it, choose Geometry > Mesh Shatter > Source.
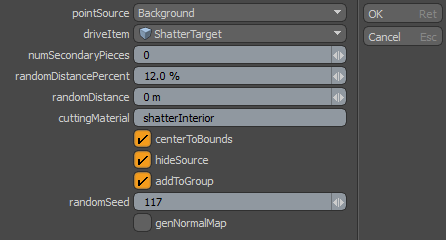
The following Source Shatter options are available:
|
Source Shatter |
|
|---|---|
|
Point Source |
The Point Source option defines what particular mesh is used as the point source; where the vertex positions within the layer defines the relative locations of the generated shards. Background uses any visible, but inactive mesh layers as the driving item(s), Last Selected uses any geometry that was actively selected in the current layer when the command was invoked as the driving item, and Specific Item uses the mesh layer defined in the Drive Item input field. |
|
Drive Item |
When the Specific Item option is selected in the Point Source field, this input defines the item that is used as the driver for the resulting shards. |
|
Secondary Pieces |
This value determines the number of secondary shards generated around the initial shards. |
|
Random Distance % |
This value is an offset of the initial cut location based on a percentage of the final shards size. |
|
Random Distance |
This value is an absolute World value that specifies an amount of random offset from the initial shard position. |
|
Cutting Material |
Defines an interior surface for the resulting shards (colored red by default). If you leave this blank, Modo tags the interior surfaces with the Default material tag. |
|
Center to Bounds |
When enabled, places the center position of each resulting shard item on the bounding box volume's center. You must enable this to use the shards with dynamics. |
|
Hide Source |
When enabled, disables the original Mesh Item layer in the Items list to make it invisible (unless its Render Control option is On). Modo always preserves the original Mesh Item from which the shards originate. |
|
Add to Group |
When enabled, parents all the resulting shard items under a single group locator (folder) item. When disabled, the items are added as new Mesh Item layers to the Items list. |
|
Random Seed |
Specifies the initial value Modo uses when generating the random Veronoi values. Each seed produces different, random results. |
|
Generate Normal Map |
When enabled, creates a vertex normal map prior to cutting the shards to freeze their shading normals. When disabled, shading normals are influenced by the shard edges and the material's Smoothing Angle. |
Sorry you didn't find this helpful
Why wasn't this helpful? (check all that apply)
Thanks for your feedback.
If you can't find what you're looking for or you have a workflow question, please try Foundry Support.
If you have any thoughts on how we can improve our learning content, please email the Documentation team using the button below.
Thanks for taking time to give us feedback.