Search is based on keyword.
Ex: "Procedures"
Do not search with natural language
Ex: "How do I write a new procedure?"
Halftone Material
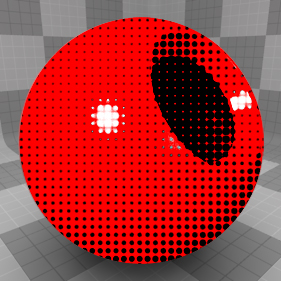
The Halftone Material stylizes the target surface replacing the smooth shading with a black user-defined pattern laid over its diffuse color, simulating the look of a low-fidelity image printed in a newspaper or magazine.
You can add the material to any surface using the Add Layer function of the Shader Tree, found in the menu under Custom Materials > Halftone Material. The direction and contouring of the lines can be dependent on the surface's UV map, defined in the Texture Locator item, or by enabling the Screen Coordinates option, the lines simply follow along the user-defined Angle value relative to the frame.
Note: For information regarding adding and working with Shader Tree item layers, please see Shader Tree.
Layer Properties

|
Enable |
Toggles the effect of the layer on and off. This duplicates the functionality of toggling visibility in the Shader Tree. When disabled, the layer has no effect on the shading of the scene. However, Modo saves disabled layers with the scene, and they are persistent across Modo sessions. |
|
Invert |
Inverts the colors (RGB values) for the layer to produce a negative effect. |
|
Blend Mode |
Affects the blending between different layers of the same effect type. With this, you can stack several layers for different effects. For more about blending, see Layer Blend Modes. |
|
Opacity |
Changes the transparency of the current layer. If there are layers below this layer in the Shader Tree, reducing this value increasingly reveals the lower layers. Reducing the value always dims the effect of the layer. |
|
Locator |
Sets the association for the Texture Locator. Most texture layers have a Texture Locator that Modo automatically creates in the Item List. This defines the mapping of the texture (how Modo applies the texture) to the surface. You can specify alternate locators, but this is normally not required. Although you may want multiple texture items to share a single locator. |
|
Projection Type |
Defines how a texture/material is applied to a 3D surface. Types vary significantly in their effects. For a guide to each Projection Type see Projection Type Samples. |
|
Projection Axis |
The texture/material is projected down this axis. This applies to Planar, Cylindrical, Spherical, Cubic, Box, and, Light Probe projection types. |
Halftone Material Properties
|
Halftone Material |
|
|
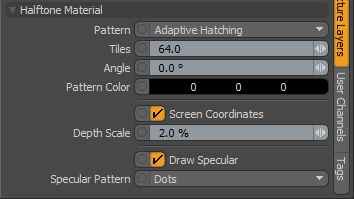
Pattern |
Determines the design motif used to create the halftone pattern across the surface: • Dots - applies a series of variable sized circles that simulating surface shading. • Lines - applies a series of lines of variable width simulating surface shading. • Crosshatch - applies a series of perpendicular lines of variable width simulating surface shading. • Adaptive Hatching - simulates the technique of woodcut shading where the lines can't get very thin. At the lightest shading, it draws a dashed line which becomes more solid and thicker as it gets darker. A perpendicular cross hatch is added for the darkest tones. |
|
Tiles |
Determines the size or spacing of the halftone Pattern. Larger values result in finer pattern spacing, while smaller values produce a larger more apparent pattern. |
|
Angle |
Determines the angle of the effect, relative to the final rendered frame. An Angle of 0 degrees produces an ordered grid or horizontal flow to the pattern, and a 45 degree angle produces an effect similar to a traditional black and white newsprint. 90 degrees produces a vertical flow to the pattern. |
|
Pattern Color |
Determines the color of the halftone pattern added to the surfaces diffuse color. |
|
Screen Coordinates |
When enabled, the Pattern is drawn relative the frame itself, based on a user defined Angle value. When disabled, the UV map defined in the associated Texture Locator determines the direction and angle of the halftone pattern, giving you ultimate control of halftone pattern results. |
|
Depth Scale |
When Screen Coordinates is enabled, the Depth Scale value can be applied to simulate the Pattern UV map contouring without actually using a UV map. This is done by scaling the Tiles values as the surface recedes into the distance. The Depth Scale amount controls how much the depth affects the Tiles scaling. |
|
Draw Specular |
When enabled, any specular highlights created by direct light sources in the scene are added as an additional white pattern overlaid on the surface. |
|
Specular Pattern |
Determines the design motif used to create the specular overlay halftone pattern: • Dots - applies a series of variable sized circles simulating surface shading. • Lines - applies a series of lines of variable width simulating surface shading. • Crosshatch - applies a series of perpendicular lines of variable width simulating surface shading. • Adaptive Hatching - simulates the technique of woodcut shading where the lines can't get very thin. At the lightest shading, it draws a dashed line which becomes more solid and thicker as it gets darker. A perpendicular cross hatch is added for the darkest tones. |
Sorry you didn't find this helpful
Why wasn't this helpful? (check all that apply)
Thanks for your feedback.
If you can't find what you're looking for or you have a workflow question, please try Foundry Support.
If you have any thoughts on how we can improve our learning content, please email the Documentation team using the button below.
Thanks for taking time to give us feedback.