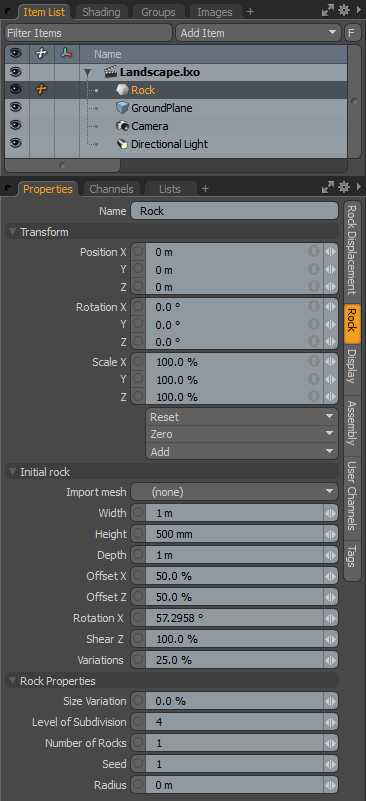
The Rock Item automatically generates geometry that can be made to look like a variety of stone elements, such as pebbles, rocks and boulders. The initial mesh is based on a subdivided cube that can be deformed and displaced into the final rendered shape. Multiples can be generated within a specified area defined by the Radius value (relative to the position of the Rock item). The Rock item also allows a unique displacement to be applied to existing Subdivisions surface geometry using the Import Mesh option.
|
Option |
Description |
|---|---|
|
Name |
This data field displays the current item name. Change it by clicking on the field and typing the new name. |
|
Transform |
|
|
Position |
An item transform that allows you to numerically position the item in XYZ space. |
|
Rotation |
An item transform that allows you to numerically set the rotation of the item. |
|
Scale |
An item transform that allows you to numerically set the size of the item. |
|
Reset |
Resets the selected transform values to (0,0,0) returning the items to their default state. |
|
Freeze |
Returns the item's center position to the world space center (0,0,0) without changing the position of the Mesh Item itself. |
|
Zero |
Resets the chosen transform property values to 0, leaving the center position and mesh position intact. This is done by adding an additional transform item to the Mesh Item's channels with an inverted version of the current values. This is useful to allow, say a joint, to have a base value of 0,0,0, but still be located away from the World Origin. |
|
Add |
Adds additional transform items to the associated item, or if they do not yet exist, it simply adds them. Transform items are the channel groups that store the actual transform values controlling any item's position, rotation and/or scale. You can add as many transform items as desired for any transform property desired. Adding additional transform items produces an additive effect where each transform group is evaluated before the next and so on. Additional item transforms are evaluated in their order in the Channels list, from the bottom upwards. By default, new items do not have any transform items associated with them (even though they are visible in the Properties panel). This is useful as an optimization as only the necessary transforms are created on an as-needed basis, reducing scene overhead. There are several actions that add these base transform items. One is by simply transforming the target item with one of the various transform tools or by editing the values' input fields. This action causes the particular transform item to be added automatically to the Channels viewport list. Because of this fact, you may need to specifically create item transforms when referencing, because in order to override the channels in the master scene, they must first exist. |
|
Initial Rock - The initial mesh that is modified is based on a cube, defined by the size values. The cube is then further modified by the offset and shear values to produce the basic shape. |
|
|
Import Mesh |
This option can be used to specify an existing Mesh Item layer that stands in as the base geometry for the resulting rock item(s). It can also be used as a way to apply the unique displacement properties of the Rock generator to any geometry in the scene. For best results the specified mesh should be a subdivision surfaces model, consisting of mostly quad geometry. When specified, the resulting mesh is a duplicate of the source (the original mesh is not modified). |
|
Width/Height/Depth |
These options determine the physical size of the overall bounding box of the generated rock mesh(es). |
|
OffsetX/Z |
These values control the offsetting of the opposing horizontal and/or vertical edges of the bounding box, generating a tapering effect. An Offset of 0% retains the rectangular shape of the initial box and a value of 100% creates a pyramid shape. Negative values increase the size of the rock's top plane. |
|
Shear Z |
This value laterally shifts the opposing edges of the base plane of the initial rock form. |
|
Variations |
Determines the amount of randomness in the various settings that determine the shape. Especially useful when more than one Rock is defined, as it adds randomness to the shape of subsequent rock forms. |
|
Rock Properties |
|
|
Size Variations |
Defines the amount of overall scale variations when more than one rock is defined. |
|
Level of Subdivision |
The level of subdivision determines the roundness and overall mesh density of the resulting rock forms. |
|
Number of Rocks |
Defines the number of Rock forms generated. |
|
Seed |
This value is the initial value used when generating random values. Each Seed produces different random results when the Variations values are above 0%. |
|
Radius |
The Radius value defines a circular domain where rock is generated within (when multiples are generated using the Number of Rocks value). |
|
Random Offset |
When set to any number above 0 for X, Y or Z, it provides a range from where random values can be generated. For example, with an offset value of 1m, the replicated item is randomly offset up to 1 meter from its initial position. Values of 0 disable this functionality. |
|
Random Twist |
When set to any number above 0 degrees for X, Y or Z, it provides a range from where random values can be generated. For example, with an twist value of 90 degrees, the replicated items are randomly rotated 90 degrees in either direction from initial position. Values of 0 disable this functionality. |
|
Random Scale |
When set to any amount above 0%, produces a random scaling amount anywhere within the range for the value specified. For example, with a setting of 50%, replicated items vary anywhere between 50% to 150% of the item's original size. Values of 0 disable this functionality. |
|
Uniform Scale |
When using Random Scale values, all three axes are generated independently. When Uniform Scale is enabled, random scaling of generated replicas would be uniform across all axes eliminating squashing or stretching. |
|
Time Offset |
Offsets the playback of an animation applied to replicated objects. It can also be used to move the random span of time when combined with Random Time Variation. For example, if this is set to 5 seconds and the variation is set to 1 second, then the replicas get their motion from the animation of the prototype between 5 and 6 seconds into the future. |
|
Random Time Variation |
Selects a span of time for replicas to vary their animation within from their current time. So, if this is set to 1 (second), then the replicas play their animations on a random start frame between the current time and one second in the future. |
|
Option |
Description |
|---|---|
|
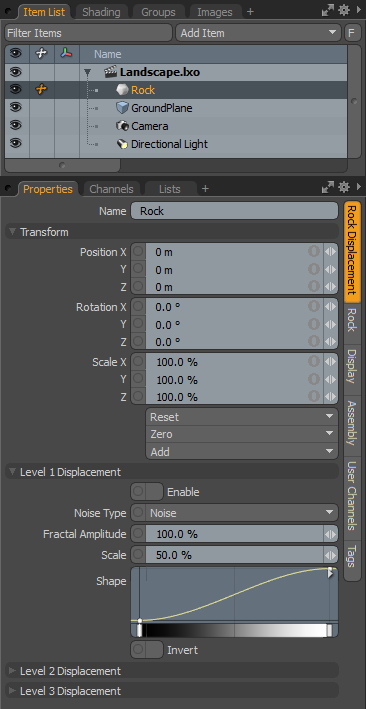
Level 1 Displacement |
The three Displacement controls work together to create realistic variations in the resulting rocks. All the Displacement options work basically the same way as it would if a texture layer was added to the Shader Tree and set to the Displacement effect. The one main difference in the approach used by the Rock item is that the displacements are applied sequentially, meaning that each subsequent layer that is enabled displaces the geometry using the normals from the prior layer. There are three separate Displacement layers that all have identical functionality. |
|
Enable |
Turns displacement on or off for that layer. Any layer can be enabled or disabled, although their order does have an effect of the final result, as each layer displaces on top of the previous layer. General rule of thumb is that large form-defining displacements can be done first, then the second layer for the major details, and finally the last layer produces the smallest detail. The amplitude should be reduced in each subsequent layer for best results. |
|
Noise Type |
Defines a procedural noise layer that displaces the rock's surface. There are two choices, the Noise option and the Cellular option. Both are identical with their Shader Tree counterparts. Noise produces a somewhat cloud-like puffy distortion to the surface, and Cellular produces a bubbly bumpy look, or when inverted, a chipped sort of look. |
|
Fractal Amplitude |
Represents the strength of the displacement. For best results, subsequent layers should have their amplitude reduced for each layer level the proper proportional amount. |
|
Scale |
Defines the average size of the fractal features. |
|
Shape |
The Shape Gradient modifies the contour profile of the generated Noise. If it is thought of as a basic linear displacement, the curve values can be used to modify that gradient producing subtle or dramatic changes in the shape profile. The middle mouse button is used to insert keys into the mini gradient and the left mouse button can be used to select key positions and change their value, moving up or down. Upwards displaces outward and down displaces less at that position. The small widget in the upper right corner offers some options to open a full size gradient editor of modify the view style of the in-line gradient editor. |
|
Invert |
Reverses the values for the nose layer producing a negative effect. |