There are probably a number of items you create for every scene: a ground plane, a certain environment gradient, or maybe a specific material. Creating your own presets is a great way to streamline a workflow and speed up scene creation, eliminating repetitive tasks so you can concentrate on the important stuff.
• Materials - any layer or collection of layers in the Shader Tree can act as a preset. If you right-click on a layer, and select Save Preset from the dropdown menu, you are presented with an OS-specific File Save dialog asking where you'd like to save your preset. If you want the preset to show up automatically in the existing browser, you'll need to navigate to the directory where your presets are stored and save within that directory. You can also create a new directory for saving presets, but make sure to use the (add path) command so you can see them within the browser viewport. Quite often you may have a surface made up of multiple texture layers. In that case, you might want to create the preset from the material group (![]() ) , as that includes all associated texture layers within the preset. Don't forget that fur is made up of texture layers, so making hair presets is just as easy as making surface presets.
) , as that includes all associated texture layers within the preset. Don't forget that fur is made up of texture layers, so making hair presets is just as easy as making surface presets.
• Environments - environment materials can also be saved as presets by right-clicking the environment material layer and selecting Save Preset. Just as with materials, you are presented with a File Save dialog, asking where you want to save your preset. If you want the preset to show up automatically in the existing set, you'll need to navigate to the directory where your presets are stored, and save within that directory. You can also create a new directory for saving presets, but make sure to use the (add path) command so you can see them within the Preset Browser viewport.
• Meshes - mesh presets require a small amount of setup for them to work properly. Mesh presets align themselves based on their relationship to Modo's origin when they are created; therefore, it is recommended that you create mesh presets at Modo's origin point. You'll also want them resting on the ground, so they are facing the Y up (positive) direction. That way, when you create a light fixture that you are applying to a series of walls, for instance, each one is properly aligned to the wall in the proper orientation when placed.
NOTE: Item transforms are not considered in presets, so make sure you make your alignment changes at the component level, otherwise use the Freeze command in the item's Properties tab.
Once your model is properly positioned, you only need to right-click on the Mesh Item layer in the Item List viewport, and select Save Preset..., where you are presented with a File Save dialog, asking where you'd like to save your preset. If you want the preset to show up automatically in the existing set, you'll need to navigate to the directory where your presets are stored, and save within that directory. You can also create a new directory for saving presets, but make sure to use the (add path) command so you can see them within the Preset Browser viewport.
• Render Presets - save the settings of the render items, which contain core rendering attributes such as Frame, AA and ray trace Settings, and Global Illumination settings, by simply clicking on Render Item, the top-most item of the Shader Tree, to select it. Right-click on the item to open the context menu and then select the Save Preset option. Additionally, you may select the Render Item and invoke the menu bar command File > Save Item Preset. Either way opens an OS-specific File Save dialog. If you want the preset to show up automatically in the existing set, you'll need to navigate to the directory where your presets are stored, and save within that directory structure. You can also create a new directory for saving presets, but make sure to use the (add path) command so you can see them within the Preset Browser viewport.
If a Camera item is also selected when the preset is saved, then that camera and its associated settings become part of preset and, when applied, is added to the scene in addition to any existing cameras. This is useful for setting up automatic DOF and motion-blur cameras.
• Profiles - this is based on a curve drawn in Modo. You can create them in a number of ways, including the curve, Bezier curve, or sketch tools. Once you have your profile curve defined, select it and, in the menu bar, select the command Geometry > Profile > Save..., where you are presented with a "file save" dialog asking where you'd like to save your preset. If you want the preset to show up automatically in the existing set, you'll need to navigate to the directory where your presets are stored, and save within that directory. You can also create a new directory for saving presets, but make sure to use the (add path) command so you can see them within the Preset Browser viewport. Once you click Save you see this dialog box.
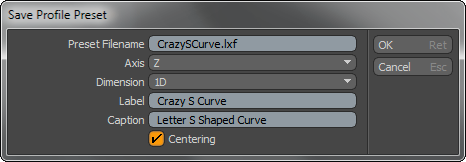
The Preset Filename contains the name you specified in the previous File Save dialog, so it shouldn't be necessary to edit it here. Axis specifies the plane that the profile was created on: either X, Y or Z. Dimension specifies to Modo whether the drawn profile is 1D or 2D. Label and Caption serve to do just that - label and provide a caption for the preset - and appear above and below the profile, respectively, in the preset library window. The Centering toggle automatically centers the curve when enabled (if it was created away from the origin). Click OK to finalize saving of the profile.
• Assemblies - these are presets that contain collections of multiple items, even including full hierarchies of rigged elements, if desired. To save a regular Assembly preset (a collection of multiple items), select the root item of the setup in the Item List, or all the individual items you wish to save (from the various viewports, such as related materials, if applicable), and in the menu bar go to File > Save Assembly.... Alternatively, right-click on the root element in the Item List and use the Save Assembly command from the context menu. Saving the Assembly opens an OS-specific dialog, where you can specify the file name and save location. When saved to the existing presets folder structure, under the Assemblies section, the resulting Assembly preset is available immediately in the Preset Browser.
To save a rigged Assembly preset, with channel connections, modifiers, and/or constraints, it's necessary to save the Assembly preset from the Schematic Viewport. In order to retain the schematic layout of nodes and their connections, it is required to first create an Assembly node of all the desired elements in the Schematic viewport and, from the resulting Assembly item, right-click on the header/title area of the node and select the Save Assembly option from the context menu.
NOTE: Any scripts used by the preset needs to be saved into the root script location so they can be found automatically.
In the viewport options, there's a simple multi-line edit field labeled Filter String. This allows advanced users to limit what is displayed in the Preview Browser, by testing the markup and metadata. This filter affects the currently-visible files in the thumbnail browser or flat list, and can be set to filter only files, or both files and directories.
The basic input format for the filter is:
(NOT class:attribute(options)={value}..{value}) COMBINER
You can have as many of these as you like, space-delimited.
• Parentheses - you can optionally wrap multiple tests in parentheses for grouping purposes. The COMBINER determines how this test is handled relative against the next test.
• NOT - the optional NOT prefix inverts the following test.
• class - the class is one of "intrinsic" metadata, user or shared, and determines where the attribute is pulled from.
• attribute - the internal name of the attribute to test. Attributes are case-sensitive, and are fairly arbitrary (beyond the fact that they obey internal string naming rules).
The intrinsic class supports the following special properties:
• path: (filepath) The full local path to the file.
• name: (string) The name portion of the path, including the extension.
• ext: (string) The extension of the file, if any.
• size: (memory) The file size on disk. Directories currently return a size of 0.
• isFile: (boolean) True if this is a file; false if this is a directory.
• numFiles: (integer) The total number of recognized files in a directory.
• numDirs: (integer) The total number of sub-directories in a directory.
• numChildren: (integer) The total number of recognized files and sub-directories in a directory.
• modTime: (string) When this file or directory was last modified or created (whichever is more recent).
Some examples of common user and shared markup include:
• isFavorite: (boolean) True if this entry is flagged as a favorite.
• starRating: (integer) 0-5 indicating the star rating assigned by the user.
• tags: (string) Arbitrary strings provided by the user for tagging purposes.
• author: (string) Author of the file.
• copyright: (string) Copyright information.
• desc: (string) Description of the file.
The markup is extensible by the user, and can contain arbitrary attributes.
These are optional but, if present, must be in parentheses and follow the attribute name. The available options depend on the datatype. The list of options are space-delimited. For strings:
• substring: Search the attribute for the test value as a substring. This is the default.
• pattern: Do pattern matching.
• case: Make the comparison case-sensitive. The default is case-insensitive.
• exact: The string must exactly match the test value. This can be used with case to enforce a case-sensitive compare.
The operator is a standard mathematical test, although the behavior is a bit different depending on the datatype.
• = (Equal); the value must match exactly. When used with strings, this does pattern matching, a substring search, or an exact match depending on which options are set.
• < (Less Than), > (Greater Than), <= (Less Than or Equal), >= (Greater Than or Equal); basic logic tests.
• On numeric types, this works as you would expect.
• On float numbers, this compares against a very small threshold (epsilon), since you can't directly compare floats for technical reasons.
• On strings, this does the C function strcmp (or the case in-sensitive version, depending on if the case option is set) and tests the result. This is most useful when comparing the modTime attribute against another time to find files newer or older than that time.
If no operator is provided, then the filter matches as long as class:attribute exists on the file or directory.
If the attribute does not exist on the file or directory, and an operator is present (meaning, you're not just doing an existence test), the test is considered a failure, irrespective of the value being tested against.
The value to test against. It must be wrapped in one of the following ways:
• Curly braces {...}: The value string is parsed as a "raw" format value.
• Square braces [...]: The value string is parsed as a "nice" format value.
• Less than/greater than bracing <...>: The string is in the form class:attribute path and represents another attribute to be tested against. The path is optional. If present, it is the full local path to another file or directory in the dir cache; if omitted, then the attribute is pulled from the current entry.
These braces are allowed to nest, in case you need braces inside the search string. If there is an unbalanced curly brace inside of that string, it must be escaped with ` (backtick). If you have to search for a ` (backtick), it needs to be escaped with another ` (backtick). For example, ``(two backticks side-by-side).
It is also important to note that a value test only happens if the attribute actually exists on the item. This means that if you wanted to check for everything that has the isFavorite attribute set to false and you did this:
user:isFavorite={false}
It would only match entries that have been previously flagged as favorites and then turned off again (since turning it off just reset the attribute to false; it didn't remove it from the markup). Thus, you would need to do this for your filter:
user:isFavorite={false} OR NOT user:isFavorite
Which would match if the isFavorite attribute is false, or if the isFavorite attribute does not exist.
The .. (two periods) syntax can be used to do a range test between the value described above and a second value. The second value after the .. follows the same formatting rules as the first value. This is only valid with the = (equal) operator, since it doesn't make sense with any of the others.
When comparing numbers, values from class:attribute must by greater than or equal to the first value and less than or equal to the second value.
When comparing strings, they are both tested against class:attribute's value with strcmp( ). (For a case-insensitive version, if the case is set, other string options are ignored.)
For those who don't know, strcmp() returns if a string is "less than" (which can generally be thought of as meaning "comes before in sort order") or "greater than" another string. The class:attribute value string must test greater than or equal to the first value string, and less than or equal to the second test string. This is primarily useful when testing file times with the intrinsic:modTime attribute, allowing you to see if a file was created in between two time ranges.
When performing multiple tests, the AND and OR combiners can be used to decide if they all must match or only some must match. AND is optional and is inferred, if not provided. This is most useful when combined with parentheses.
For example, this matches if a Favorite flag is set in the user markup, or if the user markup Star Rating does not exist, or it does exist and is less than 1.
user:isFavorite={true} AND (NOT user:starRating OR user:starRating<{1})