Array Modifiers
Arrays are a multi-dimensional value type that can store multiple values in a single value. They can take any value type supported by Modo, such as integer, float, and matrix. However, all values within the array should be of the same type.
You can create a complex hierarchy of arrays, each of which can store a different value type. For example you can have an array that stores three other arrays: one that contains integers, another that contains floats, and a third one that contains strings.
When arrays are evaluated, they behave like any other channel type. They are constructed by sampling a data set, manipulated using modifiers, and used by various operations, such as the procedural modeling system.
You can use array modifiers to to generate, merge, blend, sort arrays, and so on. When you add a modifier to the Schematic, some of its channels are exposed on the node. You can open the Channels viewport on the right panel and drag additional channels onto the node, if you need them. Most of them also have properties that you can edit in the Properties panel on the right.
Note: For more information on using the Channels viewport, see Channels Viewport.
Array Blend
The Array Blend modifier interpolates between two input values and generates an output array containing values blending from the first value to the last value, over a specified number of steps. For example, if the input values are 0.0 and 1.0, and the step count is 5, the output array contains 0.0, 0.25, 0.5, 0.75, 1.0.
Note: Only value types supporting Value Math are correctly interpolated, any other value type is stepped from the first value to the second.
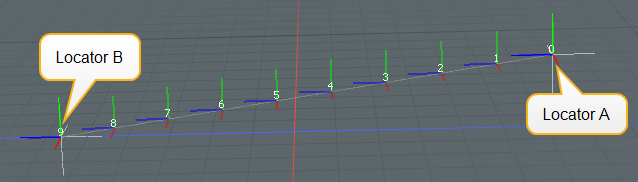
The example below takes the world positions of two locators (Locator A and Locator B) to create an output array. The Count property is set to 10, so the modifier creates eight additional points between the locators.
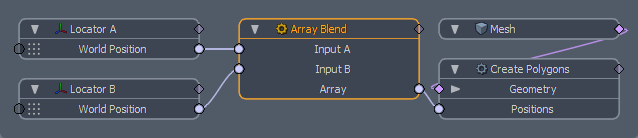
The points are then used by a Create Polygons node to produce a curve:
The Array Blend modifier has the following channels and properties:
| Channels on the Node by Default | |
|
Input A/B |
The values to blend. |
|
Array |
The output array. |
| Properties Panel | |
|
Count |
Specifies the number of values to generate in the output array. For values that support the value math interface, these steps are interpolated to blend between the two inputs. |
|
Interpolation |
Allows you to remap the interpolation using a gradient editor. A line gradient between 0.0 and 1.0 interpolates at fixed samples between the first and last value. Changing the shape allows you to control the distribution of the samples. |
Array Count
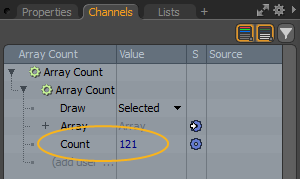
The Array Count modifier returns the number of elements in an array. In the example below, Array Count outputs the number of elements in the array produced by the Array Modifiers modifier.
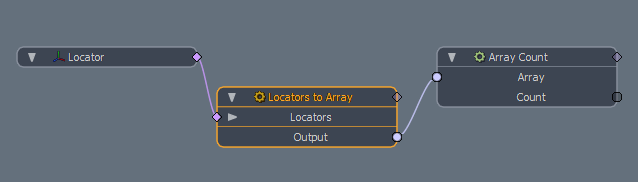
The count is displayed in the Channels viewport on the right, when Locators to Array is selected in the Schematic. Array Count may be useful when you need to know the number of elements for some other aspect of the rig. For instance, if you want to use a Radial Array, you can connect the Helix Generator node's Count value to the Count channel.
The Array Count modifier has the following channels:
| Channels on the Node by Default | |
|
Array |
The Array channel to count the number of elements in. |
|
Count |
The number of elements in the array. |
Array Element By Index
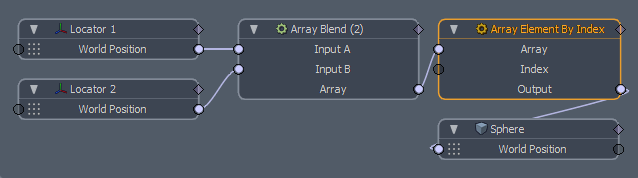
Array Element By Index allows you to access elements within an array using an index. For example, if the array contains the values "I", "Love", and "Modo", accessing index 0 returns "I", element at index 1 returns "Love" and index 2 returns "Modo". If the specified index is out of range, it returns the last element stored in the array. You can then use that element to drive something else in your scene.
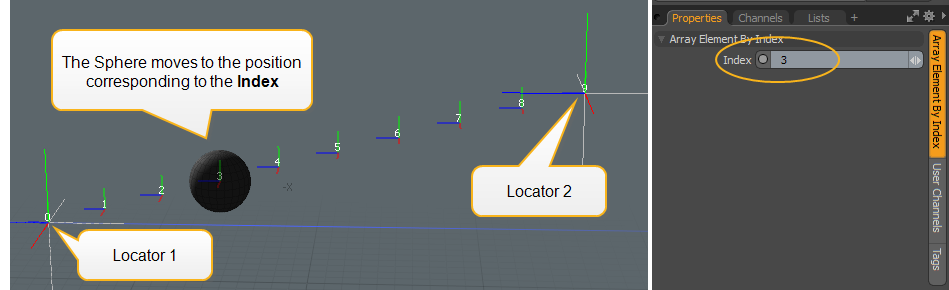
The example below shows an array produced from two locator positions using Array Modifiers. Array Element By Index is then used to drive the position of a sphere. When you change the Index value of the Array Element by Index node in the Properties panel on the right, the sphere moves to the corresponding position in the 3D viewport.
As array channels can store any value type, the output channel attempts to automatically convert to the channel type it is connected to.
Array Element By Index has the following channels:
| Channels on the Node by Default | |
|
Array |
The input array channel that contains the elements that are accessed by index. |
|
Index |
The index of the element to read from the array. |
|
Output |
The element in the array, accessed by index. |
Array Element Type
The Array Element Type modifier returns the type of data stored within an array. The output value is the internal name for the value type, for example "matrix4" for Matrix channels. This can be useful for debugging purposes.
Array Element Type has the following channels:
| Channels on the Node by Default | |
|
Array |
The input array to evaluate for the type of values it contains. |
|
Index |
The name of the value type in the array. If the array is empty, the output value is empty, otherwise it contains the internal name for the value type. |
Array Operator
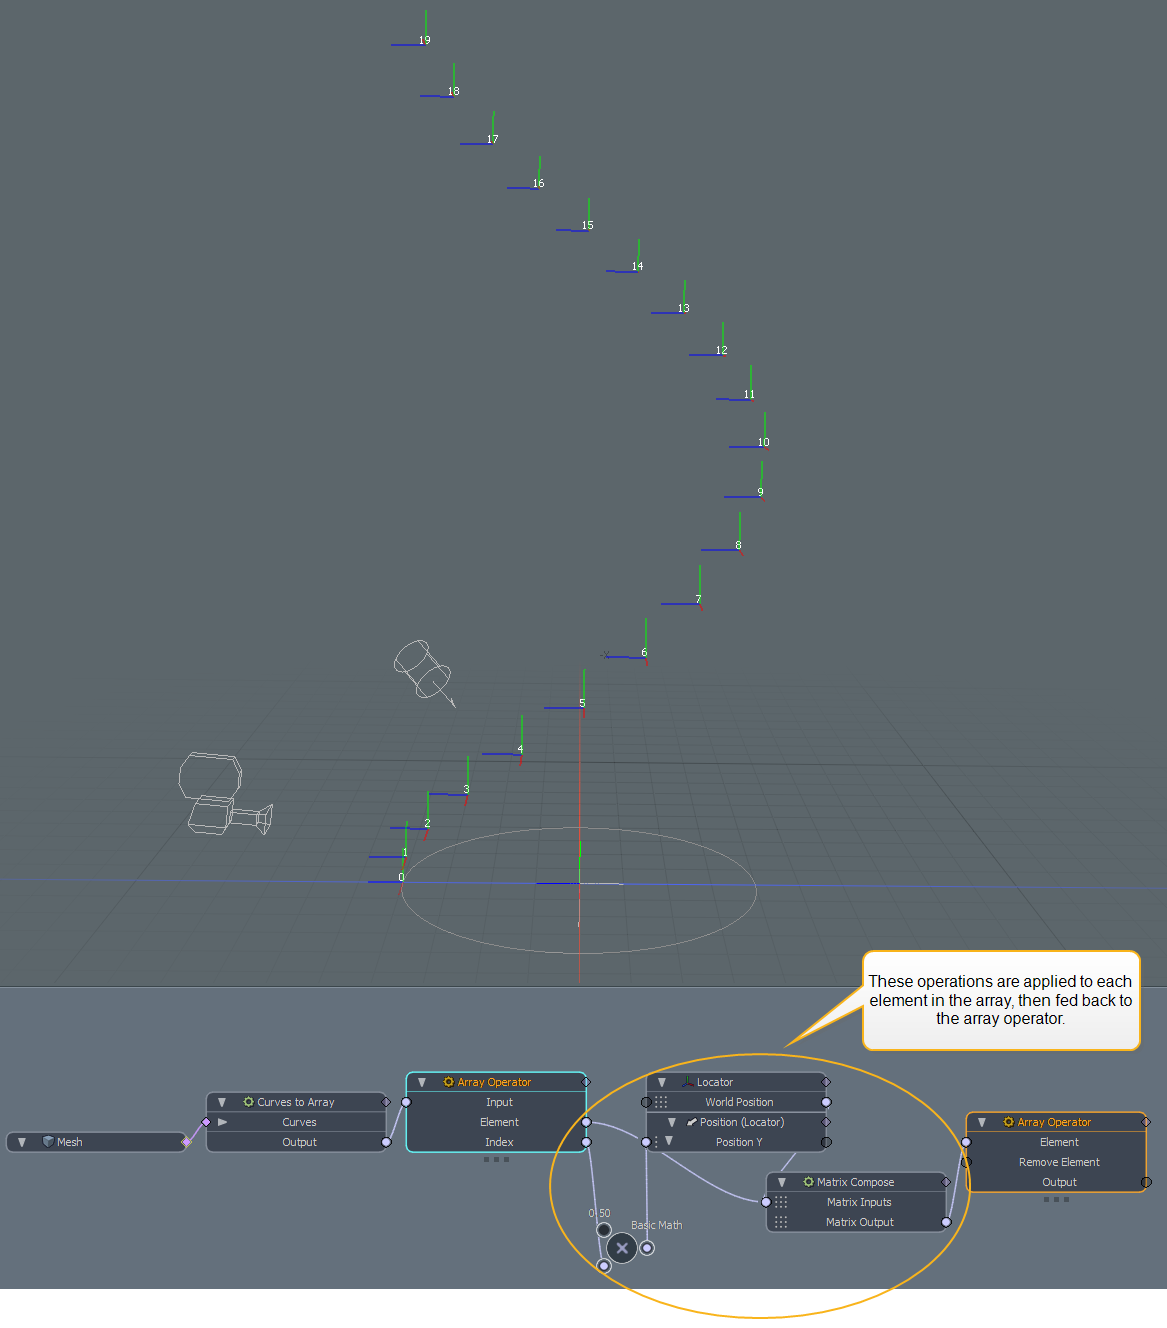
The Array Operator modifier allows you to access individual elements in an array and modify them using a rig. For each element within the input array, the rig is evaluated, calculating an output value that is then written back into the array.
In the example below, an array generated from a curve is the Input for the Array Operator. Each element in the array is then multiplied by 0.5, and fed into a Matrix Compose node. The Output from the Matrix Compose is then connected to the Element channel of the Array Operator. New locators are created in a spiral shape in the 3D viewport, which you can then use for other operations, such as Create Polygons.
Array Operator has the following channels:
| Channels on the Node by Default | |
|
Input |
The input array to modify. |
|
Output |
The modified output array. |
| Additional Channels | |
|
Element |
The current output element in the array that the rig is being evaluated for. This can read to get the current array element value. |
|
Index |
The index of the current element within the array that the rig is being evaluated for. |
| Element | The current input element in the array that the rig is being evaluated for. This can be driven to set the current array element value. |
| Remove Element | Specifies whether the element in the array should be removed. This can be driven to remove the array element. |
Curves to Array
The Curves to Array modifier samples a curve for different properties along its length and generates an array from the data.
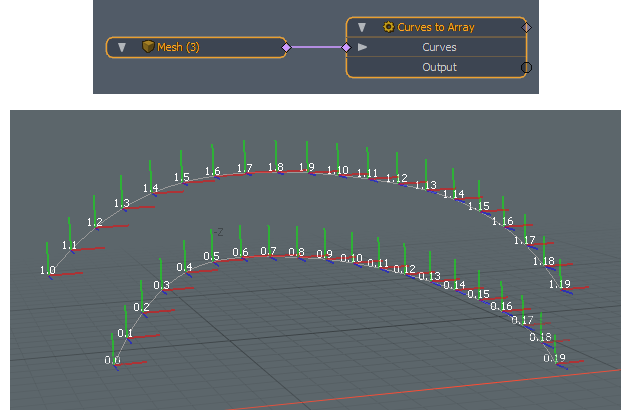
Any item type that provides a Curve Group channel can be connected to the Curves to Array modifier, but the most common connection is a mesh item containing a curve. If multiple curves are connected, the array will contain a sub-array for each curve, with the curve samples stored in the sub-array.
The modifier can sample four different curve property types:
• Percentage - Stores the percentage along the curve for each sample. For example, if the curve is sampled three times between 0.0 and 1.0, the values stored in Percentage are 0.0, 0.5, and 1.0.
• Position - Stores the world position for each sample along the curve.
• Tangent - Stores a normalized vector representing the direction of the curve at the position being sampled. The vector is relative to the center of the world, and stores the direction of the curve.
• Local Tangent - Stores a normalized vector representing the direction of the curve at the position being sampled, combined with the position being sampled.
The generated array can then be used by other operations, such as Create Polygons.
Curves to Array has the following channels and properties:
| Channels on the Node by Default | |
| Curves | The input curves used to generate the array. |
|
Output |
An array of the sampled property. If multiple curves are sampled, the array will contain sub-arrays for each sampled curve. |
| Properties Panel | |
|
Index |
An integer range that allows you to filter the input curves to be sampled. This can be a single integer to specify a single input curve, a range of numbers, a comma-separated list, or a combination. If the value is empty, or contains "...", all curves are sampled. |
|
Property Type |
Specifies the property to sample. The following options are available: • Percentage - Stores the percentage along the curve for each sample. For example, if the curve is sampled three times between 0.0 and 1.0, the values stored in Percentage are 0.0, 0.5, and 1.0. • Position (default) - Stores the world position for each sample along the curve. • Tangent - Stores a normalized vector representing the direction of the curve at the position being sampled. The vector is relative to the center of the world, and stores the direction of the curve. • Local Tangent - Stores a normalized vector representing the direction of the curve at the position being sampled, combined with the position being sampled. |
|
Start/End |
By default, the curve is evaluated from start to end. These fields specify the start and end points of the curve. |
|
Steps |
Specifies the number of steps along the sampled curve. |
|
Sampling Method |
Specifies the method to walk the curve for sampling. • Fraction - Divides the curve into equal lengths. • Parameter - Uses the divide based on the segments of the curve, adding more samples where the direction of the curve changes more quickly. |
|
Sample Distribution Rate |
A gradient that controls the distribution of samples along the length of the curve. By default, the linear gradient places samples at equal distances along the length of the curve. A gradient that eases in places most samples near the start of the curve, and a gradient that eases out places most samples near the end of the curve. The mini Gradient Editor in the properties can be used to define a custom gradient. |
Filter Array
The Filter Array modifier filters an input array, only writing elements from the input array to the output array if they match the filter. The filter is specified by an integer range, but it can also be driven by a pattern.
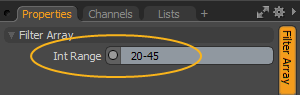
To specify a filter, select the Filter Array node and in the Properties on the right, enter a value in the Int Range field.
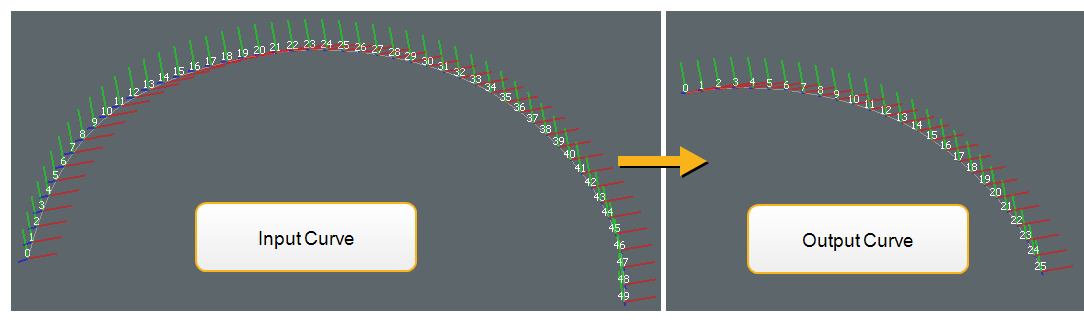
For example, the following rig generates an array from a curve. The array is then filtered, and only the positions 20 to 45 are used by the Create Polygons mesh operation to create another curve.

Filter Array has the following channels and properties:
| Channels on the Node by Default | |
| Array | The input array to be filtered. |
| Output | The filtered output array. |
| Properties Panel | |
| Int Range | The integer range used for filtering. Only elements within the array that match indices within the integer range are written to the output array. |
Locators to Array
The Locators to Array modifier reads Locator type item transforms into an array, creating an array of Matrix values. The modifier has two modes:
• Single - Reads data from a single locator over time.
• Multiple - Reads data from multiple locators at the current evaluation time.
A graph input on the modifier allows multiple locator type items to be connected. This connection allows any item that has a 3D transform to be connected, such as cameras, lights, or meshes.
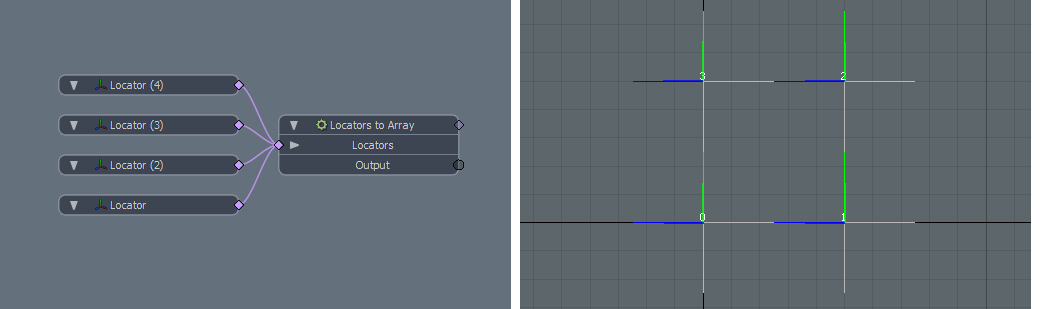
In the example below, four locators are connected to the Array Modifiers node.
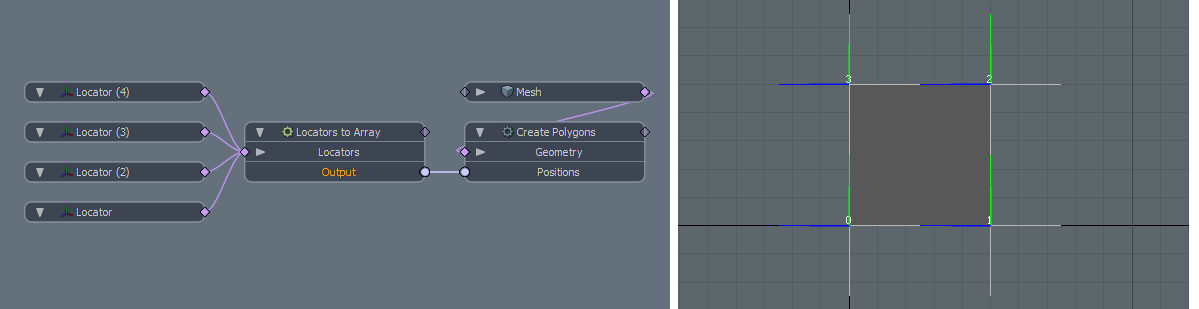
The Locators to Array node is then connected to a Create Polygons node, which uses the locator positions to create a polygon.
Locators to Array has the following channels and properties:
| Channels on the Node by Default | |
| Locators | The locators used to generate the array. |
|
Output |
The generated array of Matrix value types. |
| Properties Panel | |
|
Mode |
The Locators to Array modifiers has two modes: • Single - Reads a single locator over time • Multiple - Reads multiple locators at the evaluation time. |
|
Index |
When Mode is set to Single and multiple locators are connected to the modifier, this allows the locator to evaluate to be specified. If the index is out of range, the array is empty. |
|
Start Time |
When Mode is set to Single, the input locator transform is read over time, with an entry into the array for every frame. This channel specifies the first frame to begin sampling the transform. |
|
End Time |
When Mode is set to Single, this channel specifies the last frame to sample the transform. |
|
Output |
The generated array of Matrix value types. |
Merge Arrays
The Merge Arrays modifier combines two arrays into a single array. It can operate in two ways:
• Group - Groups two input arrays as individual sub-elements in another array.
• Join - Adds the elements from the second array at the end of the first array.
You can set the Mode for the merge operation in the Properties panel on the right.
Note: The type of data stored within the two arrays must be identical or compatible with each other. If the two arrays contain different types, one of the types is converted so that the value types match. If neither of the value types can be converted, the merge operation is not completed.
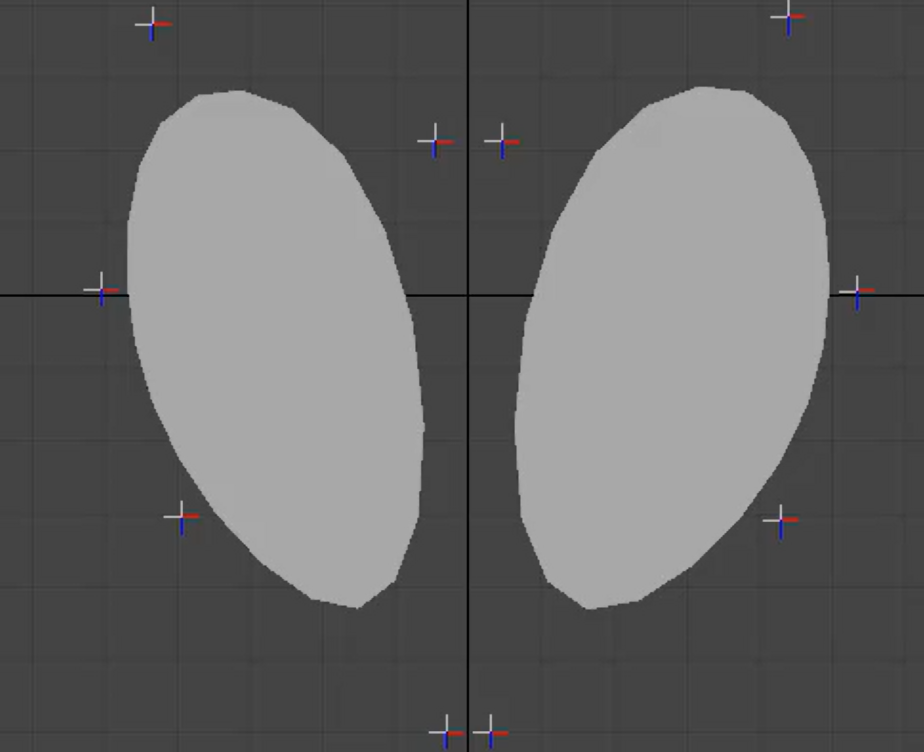
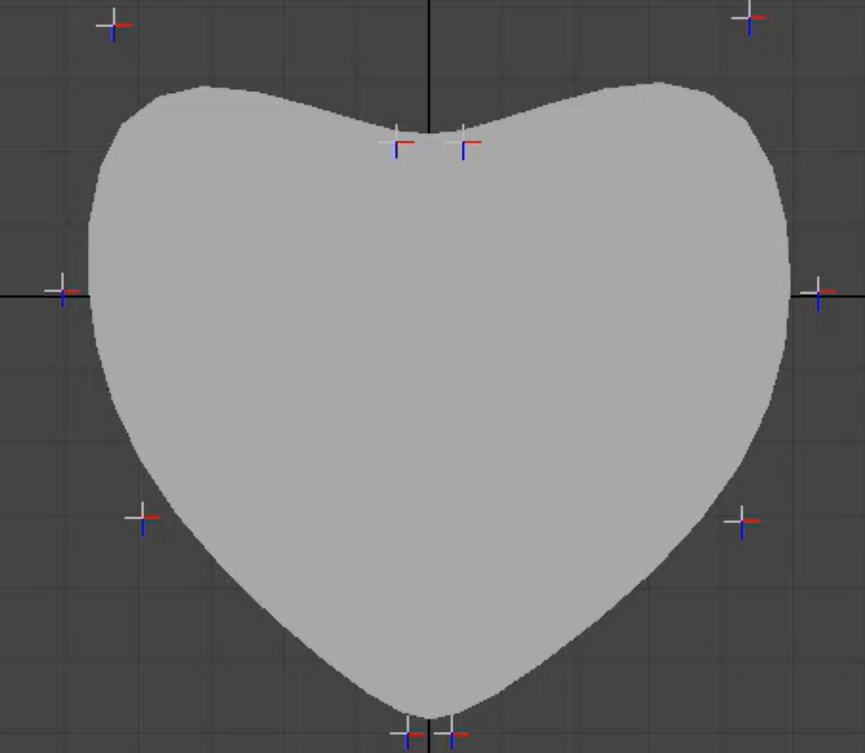
In this example, two arrays are merged to create a single array for the Create Polygons operation.
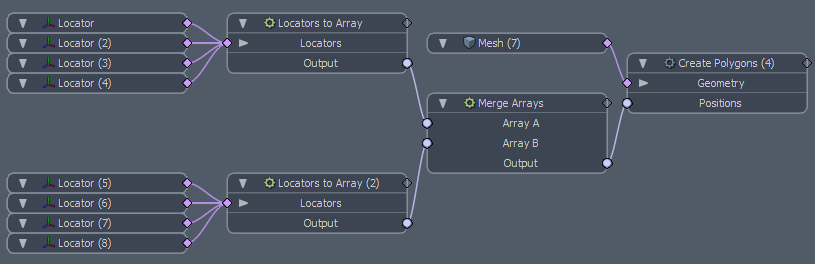
Locators to Array has the following channels and properties:
| Channels on the Node by Default | |
|
Array A/B |
The input arrays to be merged. |
|
Output |
The merged output array. |
| Properties Panel | |
| Mode |
Controls how the two arrays are merged. • Group - Adds the two input arrays as individual sub-elements in another array. • Join - Adds the elements from the second array to the end of the first array. |
Mesh Data Array
The Mesh Data array modifier creates a normal and position array from connected meshes and mesh instances. It has four different modes for building arrays:
• Selection Set - Using the set tag name, a position and normal is generated for each contiguous group of elements. Enable Per Element to create a normal and position for each individual element rather than per contiguous element group.
• Items - A position is created at each item's position and a normal is created using the X,Y, or Z direction of the item.
• Materials - A position and normal is created for the polygons in each material in each mesh.
• Mesh Part - Each connected chunk of geometry in each mesh creates a position and normal in the array.
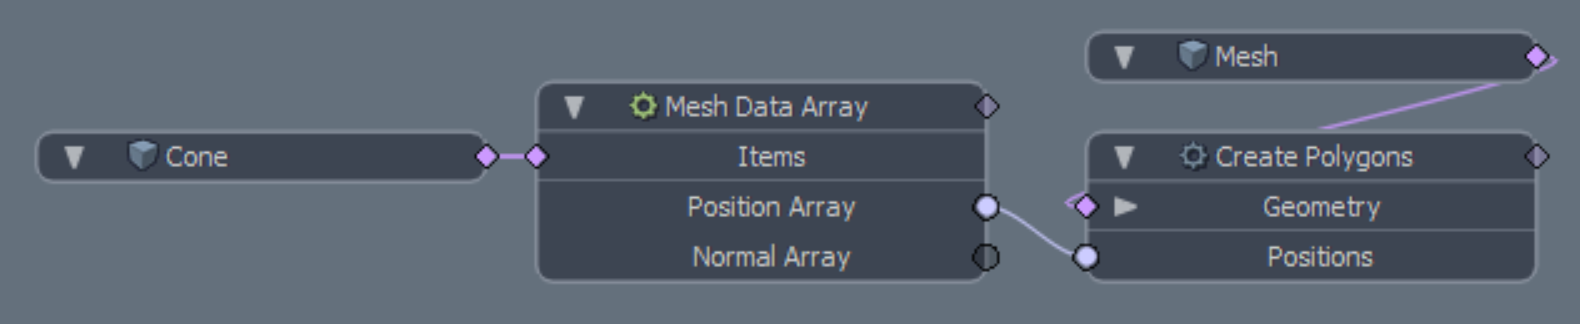
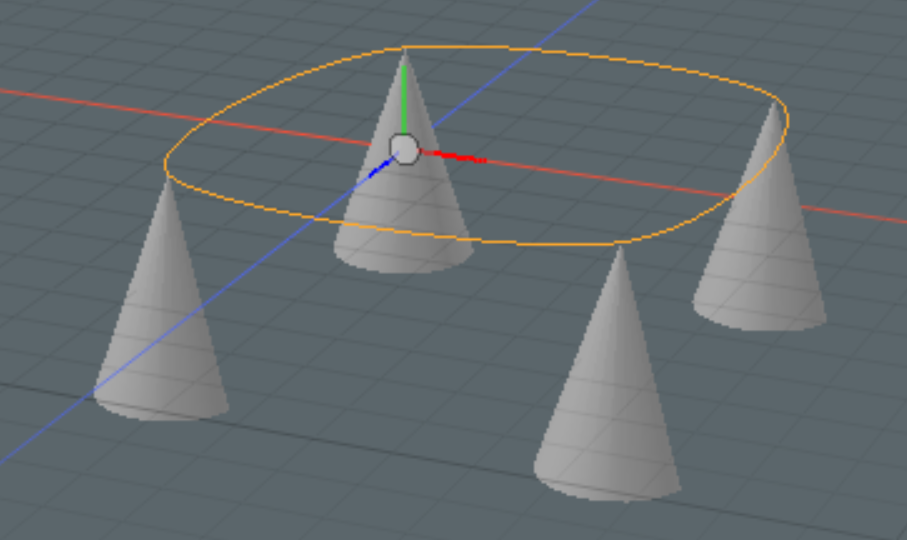
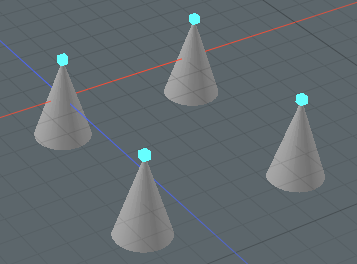
In the example below, the Mesh Data Array takes a mesh with four cones in it. The top vertex of each cone is part of a selection set called a. In the Mesh Data Array's properties, Mode is set to Selection Set, and a is specified as the Selection Set. An array is created from the positions of the elements in the selection set. This array is used by the Create Polygons mesh operation to generate a curve.
Mesh Data Array has the following channels and properties:
| Channels on the Node by Default | |
|
Items |
The meshes used to create the array. |
|
Position Array |
The array generated from the positions. |
|
Normal Array |
The array generated from the normals. |
| Properties Panel | |
|
Mode |
The way the modifier generates the array. The following options are available: • Selection Set - Using the set tag name, a position and normal is generated for each contiguous group of elements. Enable Per Element to create a normal and position for each individual element rather than per contiguous element group. • Items - A position is created at each item's position and a normal is created using the X,Y, or Z direction of the item. • Materials - A position and normal is created for the polygons in each material in each mesh. • Mesh Part - Each connected chunk of geometry in each mesh creates a position and normal in the array. |
|
Per Element |
When enabled, array values are created separately for each element. When disabled, array values are created per each contiguous geometry. |
|
Selection Set |
When Mode is set to Selection Set, this specifies the selection set to be used. |
|
Item Axis |
When Mode is set to Items, this specifies the item axis to be used. |
Offset Array
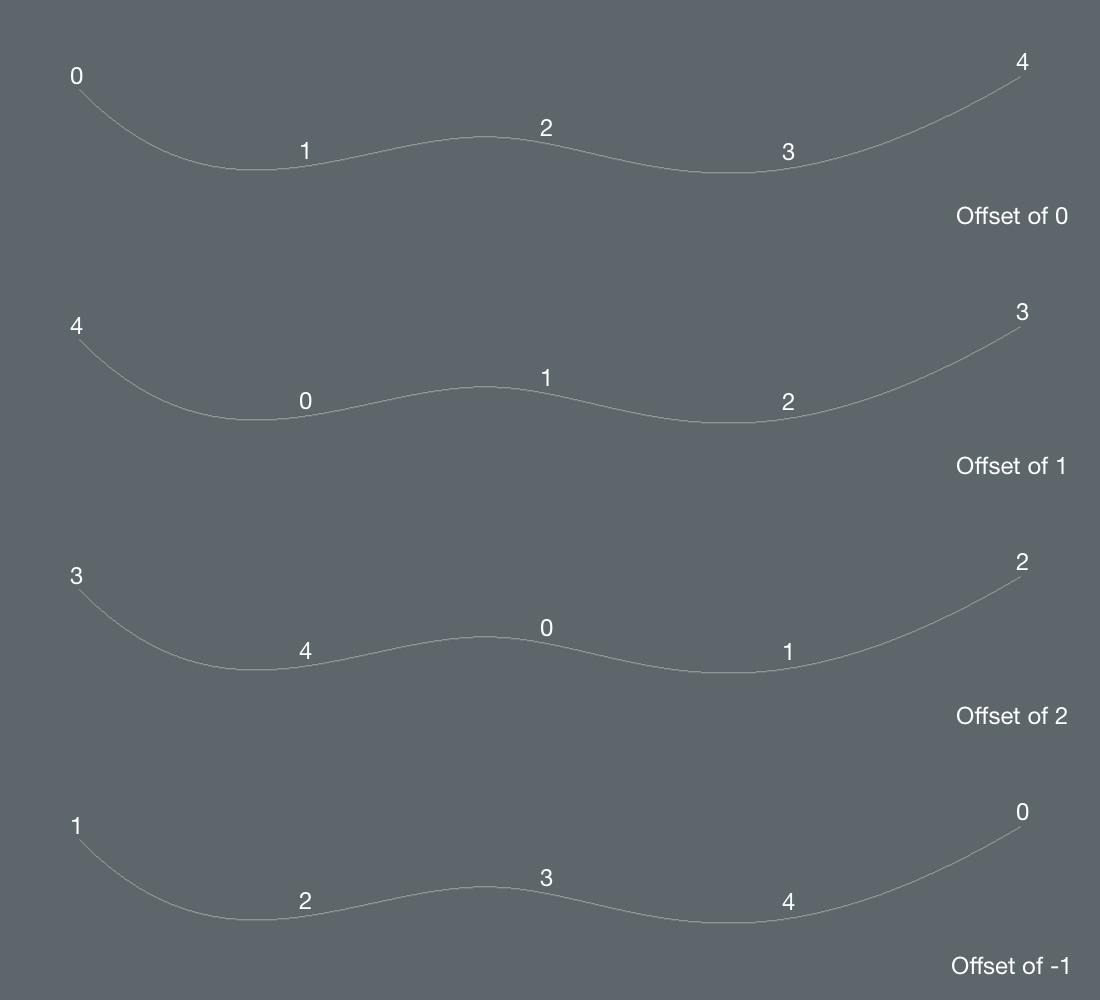
The Offset Array modifier moves elements in an array forwards or backwards by the specified offset amount. Elements that are pushed off the end of the array are inserted back at the beginning.
Offset Array has the following channels and properties:
| Channels on the Node by Default | |
| Array | The input array to offset. |
| Output | The offset output array. |
| Properties Panel | |
| Offset | The number of elements to offset by. A positive value moves elements forwards and a negative value moves elements backwards. |
Particles to Array
The Particles to Array modifier samples a particle simulation or static particle source and reads a specified particle feature into the array. You can read multiple particles at the current time, or multiple particles over a specified time period.
When reading particles at a single time frame, the output array will contain the sampled particle features. When reading particles over time, the output array will contain sub-arrays, each containing the particles sampled at the time step.
Note: Reading many particles over time requires a large amount of memory and may cause performance issues.
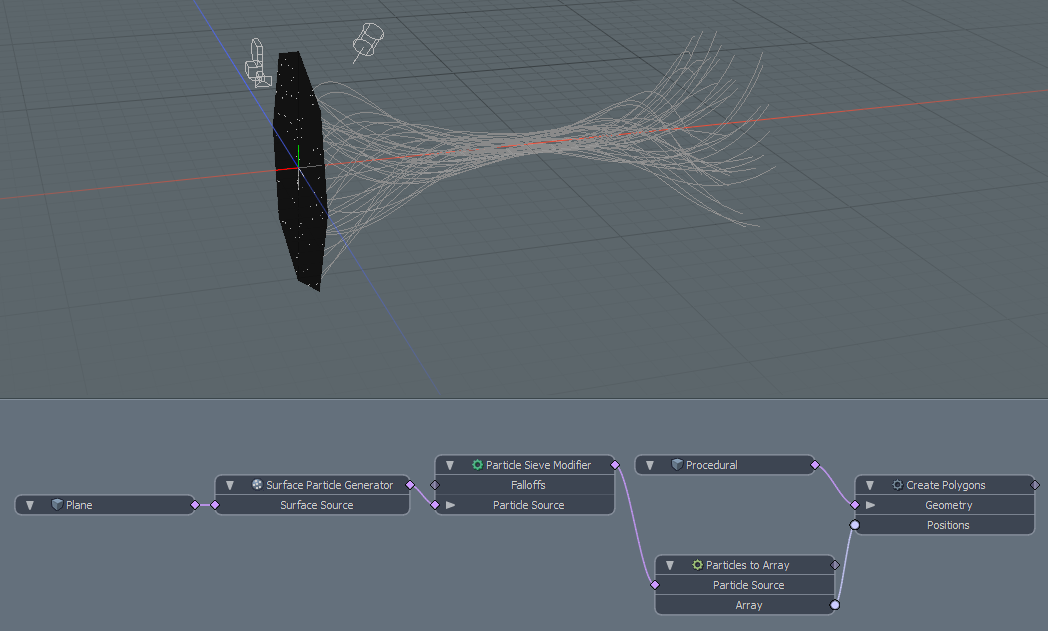
The example below shows a plane with a Surface Generator creating particles across the plane. The plane transform is animated through space. The Particles to Array modifier samples the particles at every time step and a Create Polygons mesh operation generates curves that trace the particle trajectory.
Particles to Array has the following channels and properties:
| Channels on the Node by Default | |
| Particle Source | The particle source used to generate the array. |
| Array | An array containing the sampled particle features. |
| Properties Panel | |
| Start Time/End Time | When sampling particles over multiple time steps, this specifies the times to start and end sampling. |
| Feature | Specifies the particle feature to sample into the array. The sub-type stored in the array will change as the feature changes. The supported features on the Particles to Array modifier are: • ID - Float • Position - Distance3 (Vector) • Velocity - Float3 (Vector) • Force - Float3 (Vector) • Mass - Mass • Age - Float • Angular Velocity - Float3 (Vector) • Torque - Float3 (Vector) • Size - Float • Transform - Matrix3 |
| Mode | Specifies whether to sample the particles at a single time step, or over multiple frames. |
Sort Array
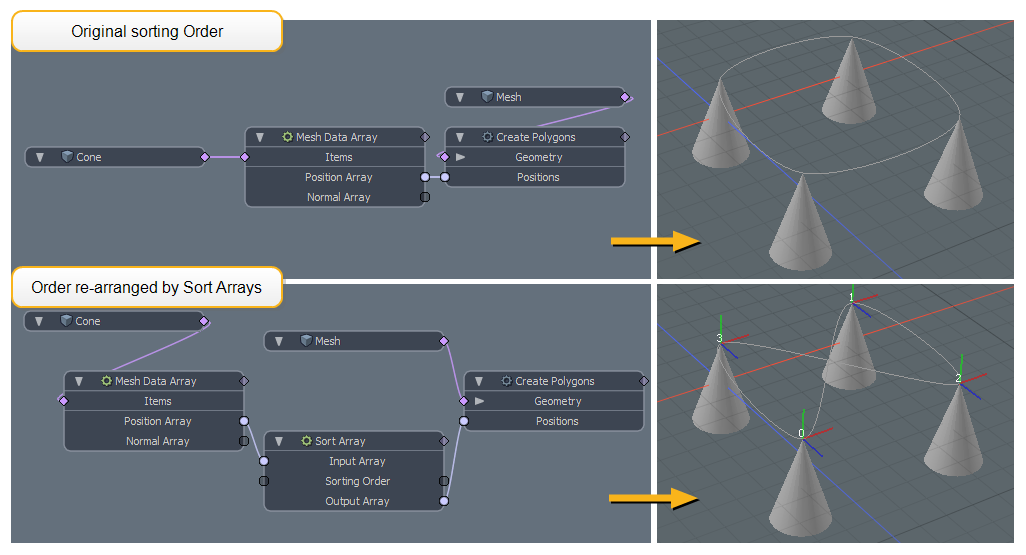
The Sort Array modifier creates a new array using the elements of the input array ordered according to the Sorting Order channel. The length of the order array does not need to match the input array, and elements can be included more than once. For example, if the input array contains letters, such as "a, b, c, d", "1" in the order array would output an "a", "2" would yield a "b", "3" would output "c", and so on. Setting the order array to "4, 3, 1" would produce the array "d, c, a".
You can set the order using the Sorting Tool:
| 1. | Select the Sort Array node, then in the Properties on the right, click Sorting Tool. |
| 2. | This creates points in the 3D view, which you can click to set the output array order. |
| 3. | Click the points in the order you want to sort them. |
New indices are assigned to the points corresponding the order you clicked them. Any operation you connect to the Sort Array's Output Array channel will use the newly sorted array.
Note: You can also use a String to Array modifier to drive the Sorting Order channel.
Sort Array has the following channels:
| Channels on the Node by Default | |
|
Input Array |
The input array to sort. |
|
Sorting Order |
The order you want the elements to be in within the array. Use the Sorting Tool in the modifier's Properties panel to specify the order. |
|
Output Array |
The sorted output array. |
|
Additional Channels |
|
|
Layered Array |
A True/False value to tell you if the input array contains any child arrays. |
|
Data Type |
Displays the type of data stored in the input array. |
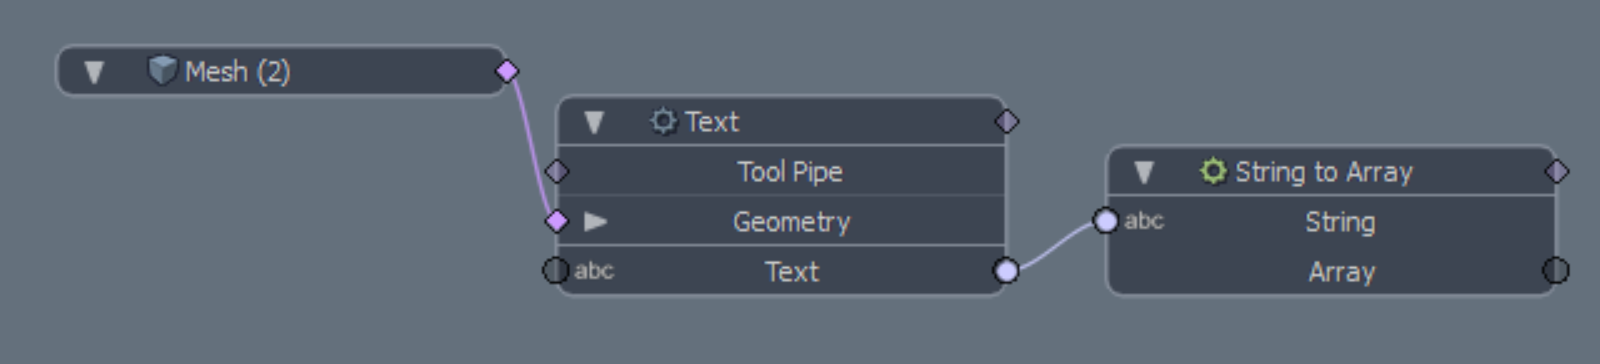
String to Array
The String to Array modifier Converts a string channel into an array, with options to split the string by word, letter, or a custom separator character.
To set how the modifier splits the array. To do this:
| 1. | Select the String to Array Node to open its properties on the right panel. |
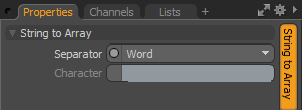
| 2. | Set the Separator option. You can choose from the following: |
• None - The string is not split up. Instead, an array is created that contains the entire string as the first value.
• Character - The string is split using a character, and any time Modo encounters the character in the string, a new entry is added into the array. For example, if the input string is "/some/file path/file name.ext", and the character specified is "/", the output array will be ("some", "file path", "file name.ext").
Note: The divider character can only be a single character, and not a string of multiple characters.
• Letter - The string is split after each letter. For example, if the string is "file name.ext", the output array will be ("f", "i", "l", "e", " ", "n", "a", "m", "e", ".", "e", "x", "t").
• Word - The string is split after every word, using the space character as a splitting character. For example, if the input string is "/some/file path/file name.ext", the output array will be ("/some/file", "path/file", "name.ext").
String to Array has the following channels and properties:
| Channels on the Node by Default | |
|
String |
The string input used to generate the array. |
|
Array |
The array generated from the string. |
| Properties Panel | |
|
Separator |
Controls what element is used to split up the string. The following options are available: • None - The string is not split up. Instead, an array is created that contains the entire string as the first value. • Character - The string is split using a character, and any time Modo encounters the character in the string, a new entry is added into the array. For example, if the input string is "/some/file path/file name.ext", and the character specified is "/", the output array will be ("some", "file path", "file name.ext"). • Letter - The string is split after each letter. For example, if the string is "file name.ext", the output array will be ("f", "i", "l", "e", " ", "n", "a", "m", "e", ".", "e", "x", "t"). • Word - The string is split after every word, using the space character as a splitting character. For example, if the input string is "/some/file path/file name.ext", the output array will be ("/some/file", "path/file", "name.ext"). |
|
Character |
When Separator is set to Character, specifies the character to be used. |