Weighting Tools
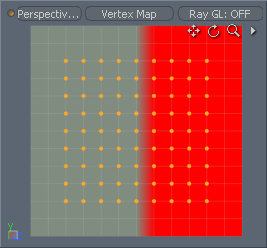
With Modo's weighting tools you can quickly and interactively adjust vertex Weight Maps used for animation — including those created automatically using Modo's Bind command. You can adjust the Weight Map values by using Modo's familiar brush-based workflow and, combined with a number of useful commands, you have a powerful way to optimize and correct deformations related to weights. To see the results of the tools, you need to select the target weight (done automatically when you select a joint) and make sure that the 3D viewport is set to either the Vertex Map viewport style or has Show Weight Maps enabled to display the Weight Map as an overlay to the viewport.
Using the Tools
The weighting tools are in the Setup and Animation interface tabs in the Weighting sub-tab. To use the Vertex Map tools, you need to select the target Mesh Item layer first in the Items (Scenes) List tab. You also need to create or select the appropriate Weight Map in the Vertex Map list viewport. See the Working with Vertex Maps topic for information on creating Vertex Maps.
Tip: The performance speed for editing the Weighting Tools only updates the cached elements that have changed when editing the Adjust Weights option. When working on a selection of a sub-set of points, such as an arm or finger on a larger character, the performance gains are significant. But if the entire mesh is changing, such as updating the root joint which controls all of the mesh points, the interaction may be slower.
Adjust Weights
![]() With the Adjust Weights tool, you can adjust the weight values interactively in the viewport. Drag a handle to the left or right to increase or decrease the overall value, You can specify whether to add to the existing values, display the numeric values of each vertex, or normalize the target map. Any adjustments that you make are applied to the entire map, or you can isolate the changes to specific sections with a component selection.
With the Adjust Weights tool, you can adjust the weight values interactively in the viewport. Drag a handle to the left or right to increase or decrease the overall value, You can specify whether to add to the existing values, display the numeric values of each vertex, or normalize the target map. Any adjustments that you make are applied to the entire map, or you can isolate the changes to specific sections with a component selection.
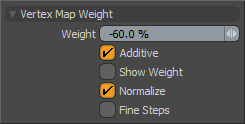
Weight: Determines the weight value to apply to the target Vertex Map.
Additive: When enabled, adds the weight values to existing map values instead of replacing them.
Show Weight: When enabled, shows the current weight value for the vertex in the 3D viewport at each vertex position for the target item.
Normalize: When enabled, takes into account the weight values of other Weight Maps present for the target vertices and adjusts the values as needed so that the combined weight values never exceed 1.0 (100%).
Fine Steps: When enabled, applies weight values with more precision to provide precise decimal values to the target.
Isolate Weights
![]() Clicking the Isolate Weights button eliminates all weight values outside of a selected area and, therefore, isolates the selected area. This is useful to eliminate crosstalk between neighboring surfaces with distance-based Weight Maps. Select the area that is to remain and then click Isolate Weights to remove all other weight values from the map.
Clicking the Isolate Weights button eliminates all weight values outside of a selected area and, therefore, isolates the selected area. This is useful to eliminate crosstalk between neighboring surfaces with distance-based Weight Maps. Select the area that is to remain and then click Isolate Weights to remove all other weight values from the map.
Paint
![]() The Paint Weights tool paints Weight Map values in a similar manner to painting texture maps. After selecting the target Weight Map and specifying a Value to paint, right-click in the 3D viewport to specify a brush size. Drag over the surface to apply the weight value. Press Ctrl to remove the weight amount when painting. You can also paint vertex color maps with this tool. You only need to select the appropriate map type before painting with this tool.
The Paint Weights tool paints Weight Map values in a similar manner to painting texture maps. After selecting the target Weight Map and specifying a Value to paint, right-click in the 3D viewport to specify a brush size. Drag over the surface to apply the weight value. Press Ctrl to remove the weight amount when painting. You can also paint vertex color maps with this tool. You only need to select the appropriate map type before painting with this tool.
Paint Value: Determines the strength of the painting action. Higher values saturate the canvas more quickly than lower values. Set to 100% to quickly overlay an area or to 5% or less to make subtle adjustments.
Set Color: Use to be able to define a color value and apply it to the target map. When applying values to a vertex color map, this is enabled automatically.
Color: Defines a color with RGB values to apply to the target vertex color map.
Alpha: Determines the opacity of the color applied to the vertex color map. Use 100% for an opaque color; use less than 5% for a transparent color.
Smooth
![]() The Smooth tool blurs (or softens) Weight Map values to smooth out their values across the surface they are applied to. After selecting the target Weight Map, define a Smooth Amount to apply. Right-click in the 3D viewport to set a brush size and then drag over the surface to smooth the weight values. Press Ctrl as you drag to sharpen (increase the contrast in) neighboring weight values.
The Smooth tool blurs (or softens) Weight Map values to smooth out their values across the surface they are applied to. After selecting the target Weight Map, define a Smooth Amount to apply. Right-click in the 3D viewport to set a brush size and then drag over the surface to smooth the weight values. Press Ctrl as you drag to sharpen (increase the contrast in) neighboring weight values.
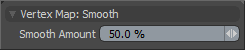
Smooth Amount: Controls the strength of the smoothing applied to the Vertex Map. Higher values (> 50%) produce increasingly softer results; lower values (< 50%) produce less noticeable softening.
Smooth Selected
![]() Softens the Vertex Map values of any selected geometry component automatically. If you apply this command multiple times, Modo continues to smooth the values. This is similar to a blur filter applied to an image and also works well when applied with any of the availableUsing Falloffs.
Softens the Vertex Map values of any selected geometry component automatically. If you apply this command multiple times, Modo continues to smooth the values. This is similar to a blur filter applied to an image and also works well when applied with any of the availableUsing Falloffs.
|
Initial Vertex Selection |
Smooth Selected Applied Once |
Smooth Selected Applied a Second Time |
Scale Down
Courtesy William Vaughan
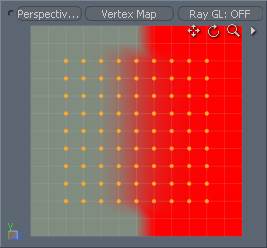
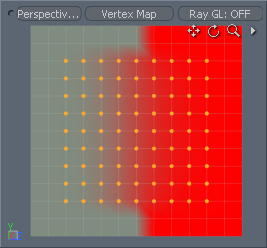
![]() The Scale Down tool interactively adjusts the values in a map toward 0 (zero). Pressing the Ctrl key scales up the values. The overall effect is similar to dodging and burning in an image editor.
The Scale Down tool interactively adjusts the values in a map toward 0 (zero). Pressing the Ctrl key scales up the values. The overall effect is similar to dodging and burning in an image editor.
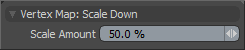
Scale Amount: Determines the strength of the scaling applied to the values.
Erase—
![]() Removes any values in the target map that the brush touches. This doesn't just lower the value to 0%, but it completely removes the value for each affected vertice. There are no user-adjustable values for this tool.
Removes any values in the target map that the brush touches. This doesn't just lower the value to 0%, but it completely removes the value for each affected vertice. There are no user-adjustable values for this tool.
Set Value
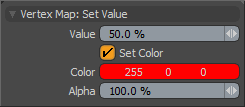
![]() The Set Value tool is a combination paint tool and erase tool. It affects any vertex it touches 100% with no fading or attenuation. Pressing Ctrl key as you use it erases values.
The Set Value tool is a combination paint tool and erase tool. It affects any vertex it touches 100% with no fading or attenuation. Pressing Ctrl key as you use it erases values.
Value: Determines the weight applied when editing Weight Map values.
Set Color: Use to be able to define a color to apply to the map when painting onto vertex color maps. This option is enabled automatically.
Color: Defines a color in the target vertex color map with RGB values.
Alpha: Defines a transparency value used in the target RGBA vertex color map. Use 100% for an opaque color; use less than 5% for a transparent color.