How to Create a Decal That Can be Projected
Decals are easily created by creating a flat, square plane and then applying a material containing your decal's textures to that plane. The plane carrying the decal can then be projected manually via the Decal Planar MeshOp, or created automatically by pressing the Decals... button found in the create tab.
When creating a decal, there's no set rules on what texture maps should or shouldn't be used, but it is recommended to use a mask as a stencil layer to ensure that the decal appears on the asset correctly.
|
|
|
|
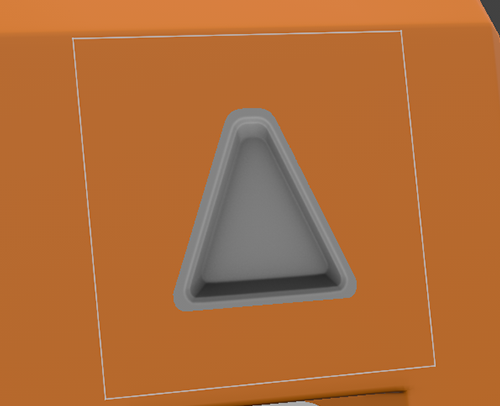
Decal using a mask. Materials applied to the asset the decal is being projected on are visible in areas that have been masked out. |
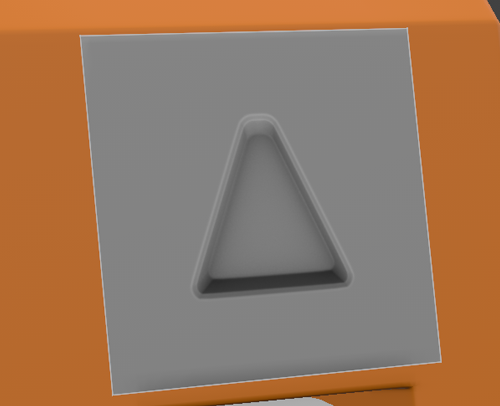
Decal not using a mask. The edges of the plane carrying the decal are clearly visible. |
Tip: If using texture maps that follow PBR naming conventions, Modo's PBR Loader can be enabled to speed up the creation of materials. For more information on the PBR Loader, see PBR Loader
To create Decal that can be projected:
- Hold Shift on your keyboard, and click the Plane
 tool in the Create tab.
 - Rename the plane to Decal_01 or something similar so that it is easily findable in the Items List.
- With the plane selected, press M on your keyboard to assign a material.
- In the Polygon Set Material window, name the material Decal_01 or similar.
- Once the material name has been set, click OK.
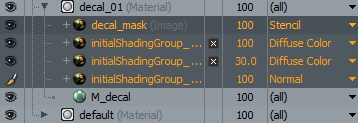
- Navigate to the Shader Tree and expand the decal material.
- Once expanded, select your textures in your system's explorer window and then drag and drop them into the decal material.
- Once the textures are present in the decal material, assign their layer effects as needed.
- Once all textures have had their layer effects set, select all of them by holding shift and then clicking the first and last textures in the list.
- Once selected, navigate to Texture Locator tab in the Properties window. In the Texture Locator tab, change the Horizontal and Vertical Repeat parameters to Edge.
This creates a flat 1x1 meter plane at the work plane origin.
The Polygon Set Material window opens.
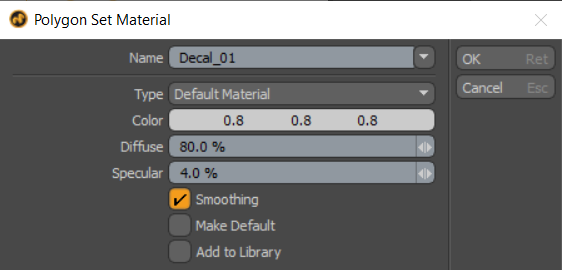
Parameters such as Type, Color, Diffuse and Specular can be left as default.
The material is assigned to the plane and is now available in the Shader Tree.
If you are using textures that follow PBR naming conventions, enable the PBR loader before adding textures to the decal material so that layer effects are assigned automatically.
For example, if using a Normal map, set the texture's layer effect to Normal.
Mask textures should have their layer effect set to Stencil and may need to be inverted.
Tip: For more information on layer effects in the shader tree, see Layer Effects.

Changing the Horizontal and Vertical Repeat parameters to Edge ensures that your decal does not tile when projected.
Your decal is now created and ready to be projected onto a mesh.
It's important to note that if you wish to move your decal from the origin of the work plane, it must be moved while in Item Mode and not while in a Component Mode. For decals to be projected as expected, transformations on both the decal and the asset it is being projected on must be frozen at zero. For more information on freezing transformations and different selection modes in Modo, see Freezing Geometry and Selection Modes.