Instances
Instances are a special item type in Modo that add little additional data overhead to a scene, as they contain no actual geometry. Instead, they reference a source object at render time, allowing you to generate a huge number of duplicates for an item with little additional memory usage or performance hit. As an added benefit, you can modify the source geometry at any time and the changes automatically propagate to each instance. For example, consider a model of a computer case, where each bolt is an instance of a single mesh. When the client decides the bolt needs to be a hex head rather than a standard phillips head, all instances of the bolt can be easily updated by simply modifying or replacing the geometry in the source item.
Instances are as easy to create as a normal duplicate, and many cloning and array tools offer additional functionality to generate Instances instead of direct geometric clones. Instances themselves can be treated like normal mesh layers, each having its own set of transforms and render options. You can select them like any other item, and position, scale and rotate them. This gives you a great deal of control over placement of the copies. While instances reference their shading and material settings from the source object, you can assign an item mask through a Material Group Item in the Shader Tree and target custom surface settings to a specific instance. For more information on item masks, see Material Group.
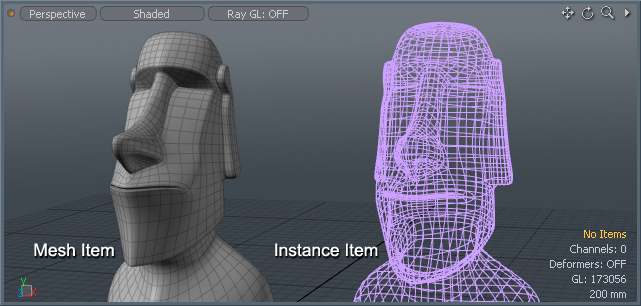
Mesh instances are differentiated in the Items list by their pink cube Shader Tree icon (as opposed to the standard blue-gray cube icon for Mesh Items). They are also distinct in that the layer name is displayed italicized and their unselected wireframe representation in the viewport is always, by default, pink in color.
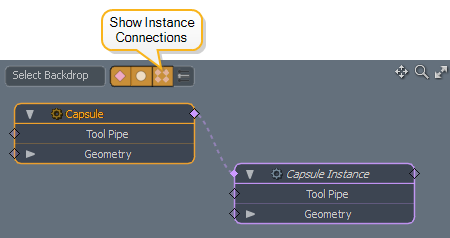
In the Schematic, instances are highlighted in pink when you select their source item. Clicking the Show Instance Connections button at the top of the Schematic viewport draws a dashed line between the instance and its source item, indicating their connection.
Instances are not limited to Mesh Items, they are useful whenever you have a large number of identical items. If a series of streetlights in a scene all shared identical settings, you can instance the first light and then later on, just as with Mesh Items, changes made to the source light propagate to all the instances.
Creating Instances
You can create instances in several ways:
• Select a Mesh Item in Items mode, and press Shift+D on the keyboard.
• Right-click an item layer in the Items list and select the Instance (or Instance Hierarchy) option from the context menu.
• Select an item layer in the Items list or directly in the 3D viewport and in the menu bar, click Item > Instance.
• Select a Mesh Item in Items mode, activate the Move or the Transform tool, and hold Ctrl/Cmd+Shift while dragging on a handle.
• Right-click a Replicator in the schematic viewport and select Replicators > Freeze Replicator to convert the selected Replicator into a series of individual Instances.
• In Items selection mode, many of the duplication tools, such as Clone, Curve Clone, and Radial Array, provide an option to generate instances. With the tool active, simply enable the instance checkbox and the clones become instances instead of generating full geometry. Alternate versions of the tools are generally available by the small arrow in the bottom right corner of a tool's button. Click and hold to open the pop-up menu to select the alternate tools.
Selecting Instances
Once an instance has been created, you can work with it like any other item in the scene. Select and transform it directly in the 3D viewport or use the numerical settings found in the Properties panel when the item is selected. While it is possible to select and modify the center and pivot position of an instance, this actually moves the instance itself. To modify a center, you need to edit the source item. However, since instance placement is based on the item's center, modifying the center point of the source moves all the instanced items.
If a complex scene makes it difficult to locate the source item of an instance, select the instance and then in the menu bar click Select > Source of Instance. You can also access this command by right-clicking the instance in the Items list and choosing Select Source of Instance from the pop-up menu.
You can convert an instance to a normal Mesh Item for further editing in a number of ways:
• Select an instance and in its Properties tab, click the Convert to Mesh button.
• Right-click on the item layer itself to open the context menu and choose Change Type > Mesh option.
• In the menu bar, click Item > Change Type > Mesh.
Building a Mask for an Instance
To apply surfacing to an instance that is different from the source mesh, assign an item mask: right-click the target instance and in the pop-up menu, select Create Item Mask. The resulting Shader Tree material group can then be populated with any number of Shader Tree layers.
The following video demonstrates the workflow.
Tip: The difference between cloning (duplicating) geometry in a component mode versus cloning while in Items mode is that in the latter case, each clone becomes its own item layer in the Items list. Cloning in a component mode merely duplicates the geometry within the same existing item layer. If you feel the Items list becomes too cluttered with instances, you can group layers: click on the top instance layer, and press and hold Shift and click on the bottom layer to gang-select all layers, then press Ctrl+G to automatically parent all the selected items to a group locator in the Items list. You can then toggle the visibility of all the child items by clicking the arrow icon (![]() ) preceding the group layer's name. Likewise, you can toggle visibility of the instances themselves by enabling/disabling the eye (
) preceding the group layer's name. Likewise, you can toggle visibility of the instances themselves by enabling/disabling the eye (![]() ) of the parent group (assuming that the preference to do so isn't disabled; see Defaults Preferences).
) of the parent group (assuming that the preference to do so isn't disabled; see Defaults Preferences).